
Cheese balls aren’t just party snacks—they’re a canvas for all your favorite flavors, and surprisingly forgiving to make. I love how you can dress them up or keep them simple, depending on what’s in the fridge or your mood that day.
This recipe has seen me through countless gatherings, from chaotic family dinners to quiet nights in with just a good movie and a snack. It’s one of those dishes that feels familiar but always offers a new twist if you want it.
The unexpected joy of transforming a simple cheese ball into an interactive, customizable appetizer.
Why this cheese ball recipe matters to me
- I love how forgiving this recipe is—tweaking ingredients makes each one unique.
- The smell of melting cheese, herbs, and toasted nuts is pure comfort.
- I’ve watched friends turn into kids when they see the cheese ball emerge from the fridge.
- It’s the kind of snack that sparks conversations and builds a little anticipation.
The story behind my cheese ball obsession
My grandma’s kitchen always smelled of toasted nuts and melted cheese, which inspired this recipe. One messy day, I realized how much fun it is to roll and coat, turning chaos into something beautiful. It’s a perfect blend of simplicity and indulgence, reminding me of family gatherings and slow weekends.
A brief history of the cheese ball
- Cheese balls became popular in the US in the 1950s, often served at parties and potlucks.
- Originally, they were made with processed cheese but now fresh cheeses are preferred.
- The classic coating of nuts or herbs adds a satisfying crunch and aroma.
- Some recipes include a dash of hot sauce for a spicy kick.
- The shape can be a sphere, a log, or even a mini cheese wheel—be creative!
Ingredient insights and tweaks
- Cream cheese: First-person—smooth, soft, easy to mix. Swap for Greek yogurt for tang, but less firm.
- Cheddar: Sharp, crumbly, melts well. Mild or smoked cheese offers different flavor profiles.
- Herbs: Fresh chives bring brightness; dried are more concentrated, so use less.
- Nuts: Toasted almonds add crunch and aroma; try pecans or walnuts for variety.
- Hot sauce: Adds heat and depth; soy sauce can be a salty alternative.
Spotlight on Cream Cheese & Nuts
Cream cheese:
- It’s creamy, mild, and melts into a smooth base. Use full-fat for richness.
- It melts better when softened at room temp, so plan ahead.
Nuts:
- They toast quickly, releasing oils and aroma. Use raw, unsalted nuts for best flavor.
- Chop them finely for even coating, or leave larger for more crunch.
Substitutions for dietary needs and flavor tweaks
- Dairy-Free: Substitute with dairy-free cream cheese—creamy but less rich.
- Vegan Cheese: Use a plant-based cheese that melts well for similar texture.
- Gluten-Free: Nuts are naturally gluten-free, but check coatings for additives.
- Herb Variations: Fresh herbs can be replaced with dried, but use less.
- Spice Level: Hot sauce swaps with sriracha or paprika for different heat profiles.
Equipment & Tools
- Mixing bowls: Combine ingredients thoroughly.
- Plastic wrap: Wrap and chill the cheese mixture.
- Spoon or scoop: Shape the cheese ball.
- Plate with coating: Roll the cheese ball in nuts or herbs.
Step-by-step guide to a perfect cheese ball
- In a mixing bowl, soften 200g cream cheese—about 30 seconds in the microwave works.
- Stir in 150g shredded sharp cheddar, a pinch of salt, and a splash of Worcestershire if you like.
- Add chopped herbs or spices—paprika, chives, or anything you love. Mix until well combined.
- Chill the mixture for at least 30 minutes. It firms up, making it easier to shape.
- Once firm, scoop and roll the mixture into a ball, about the size of a tennis ball.
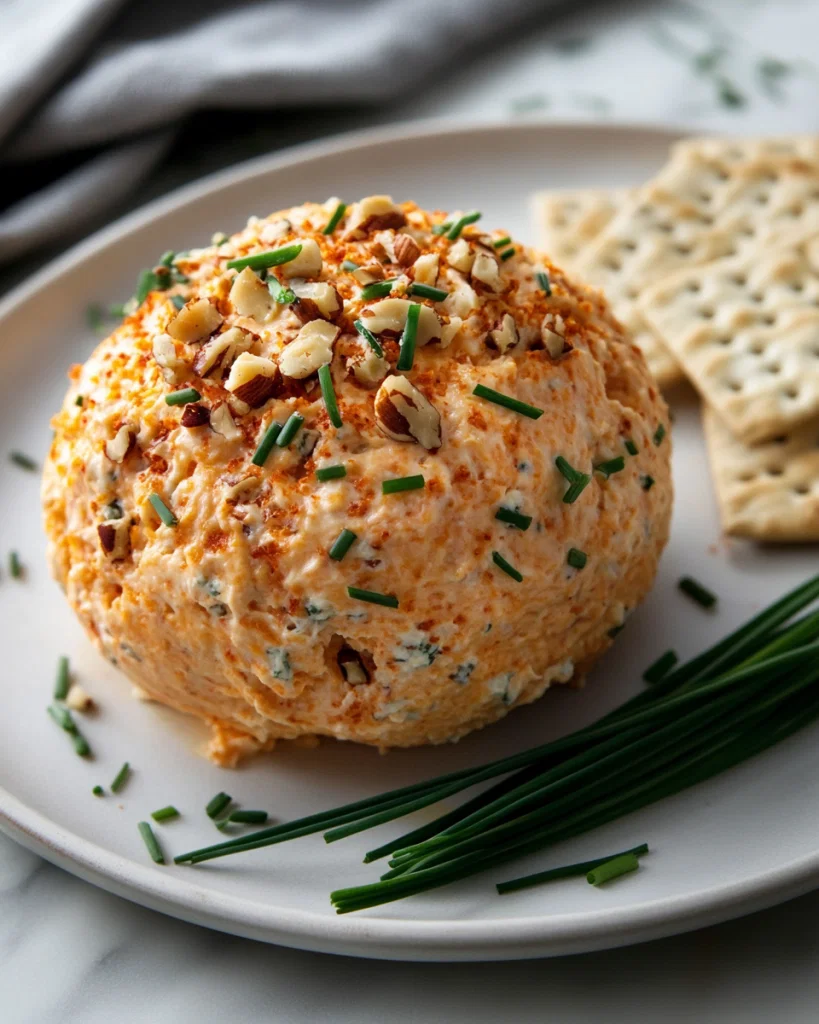
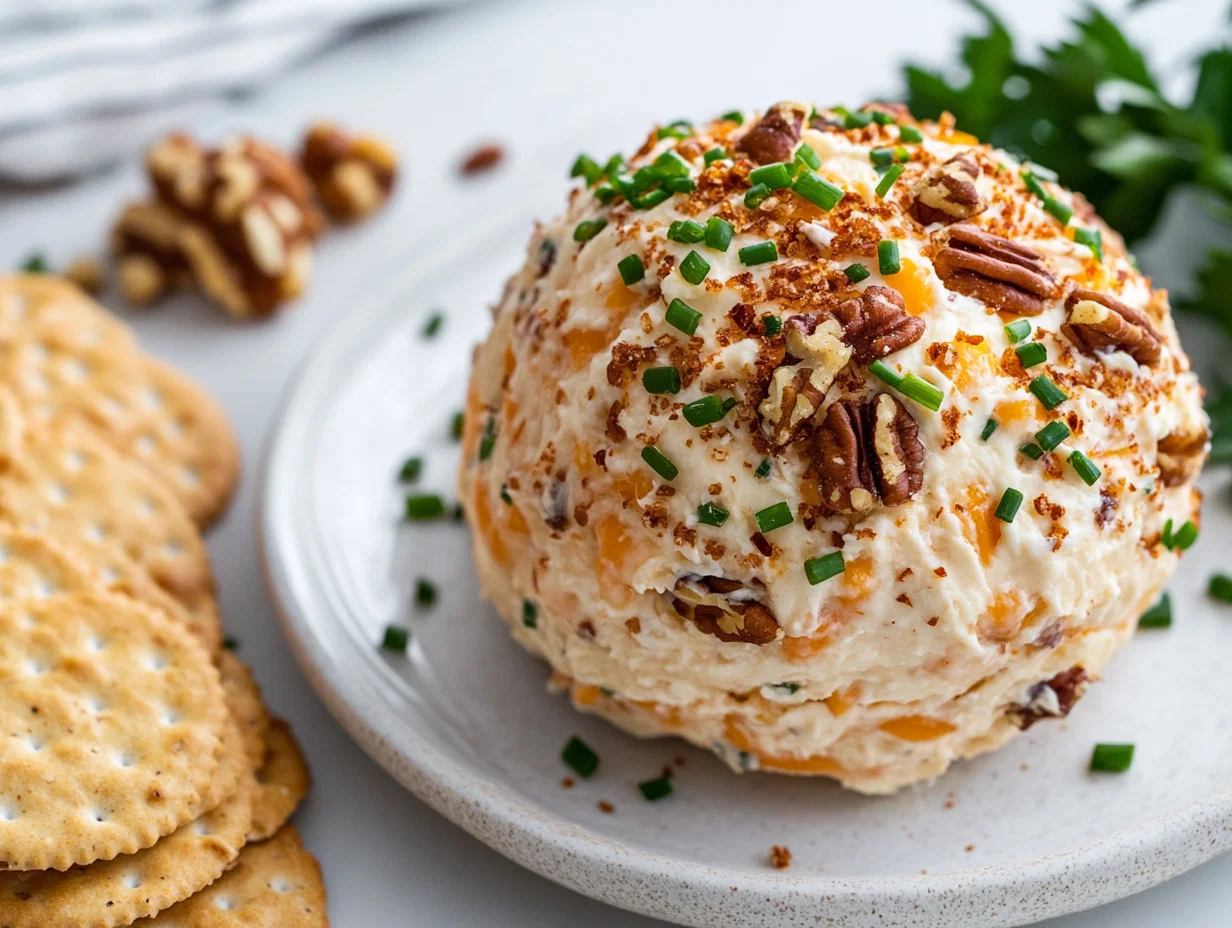
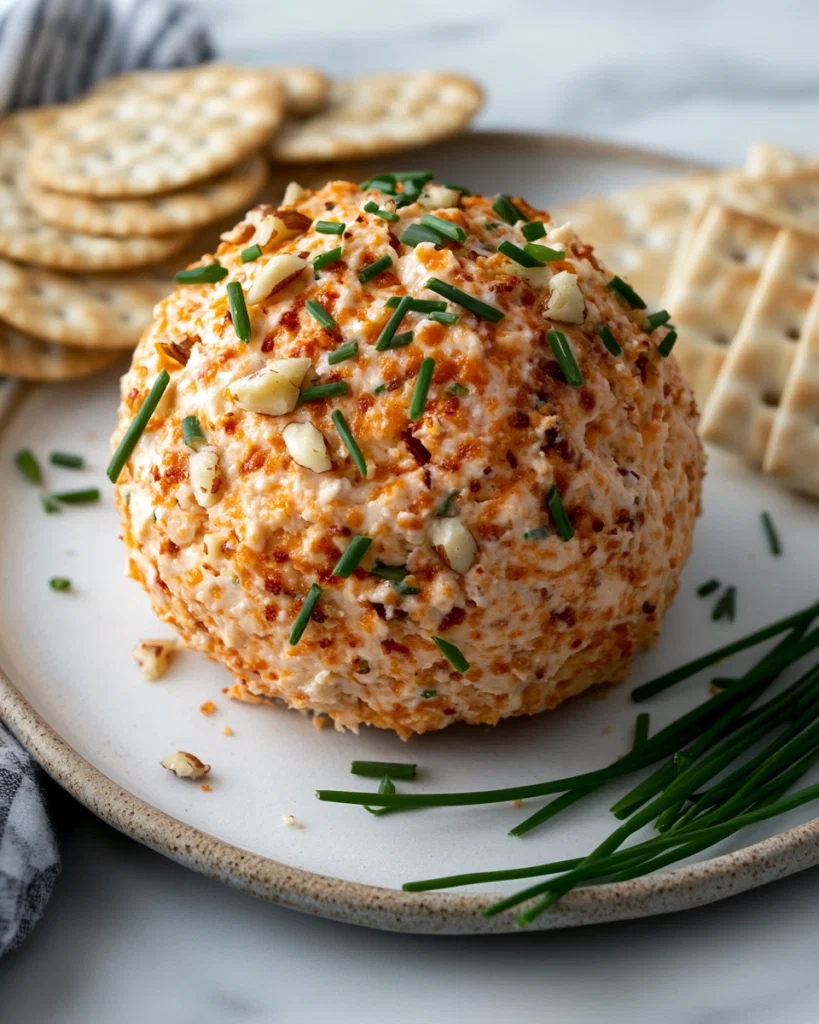
- Pour chopped nuts, herbs, or spices onto a plate. Roll the cheese ball in the coating, pressing gently to adhere.
- Wrap tightly in plastic wrap and refrigerate for another 30 minutes. This helps the flavors meld.
- Serve with crackers, sliced baguette, or veggie sticks. Let it sit at room temp for 10 minutes before slicing.
Let the cheese ball rest in the fridge for at least 30 minutes before serving. This helps flavors meld and makes it easier to slice.
How to Know It’s Done
- Cheese ball is firm but still slightly soft when pressed.
- Coating sticks evenly and not falling apart.
- Smell the cheese—should be fresh, not sour or overly yeasty.
Cheese Ball
Equipment
- Plastic Wrap
- Spoon or scoop
- Plate with coating
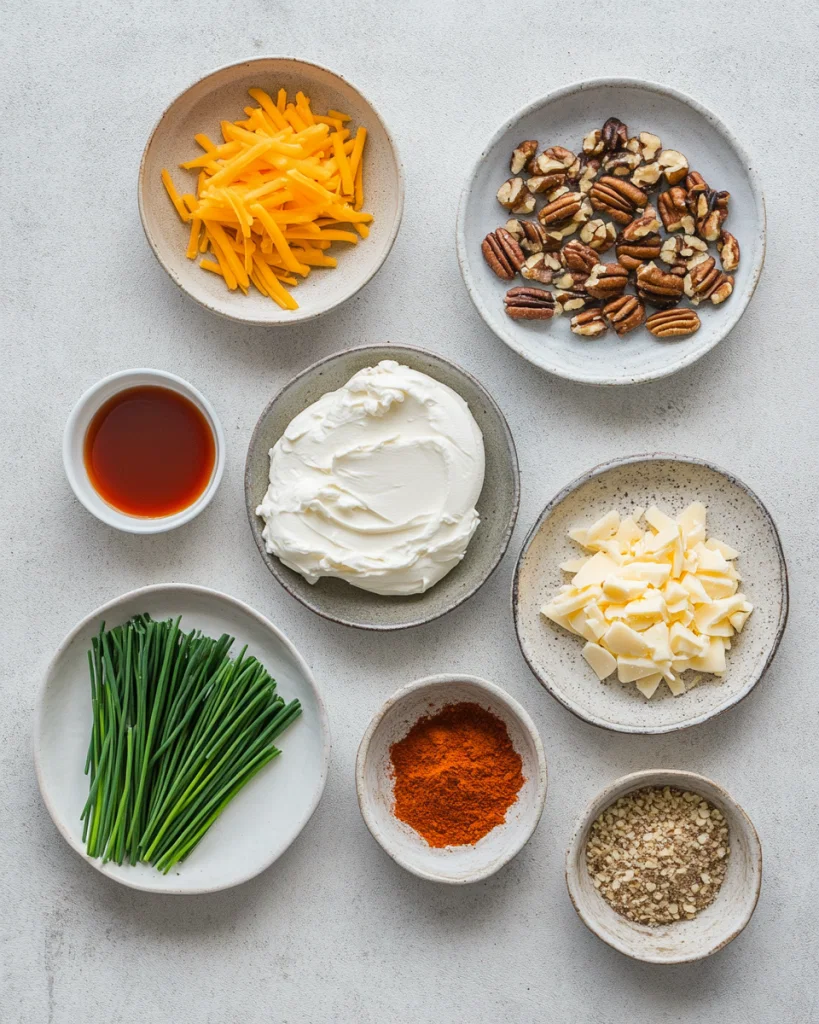
Ingredients
- 200 g cream cheese softened at room temperature
- 150 g shredded sharp cheddar cheese for flavor and meltability
- to taste salt optional, adjust as needed
- 1 tsp Worcestershire sauce optional, adds depth
- 2 tbsp chopped herbs such as chives, parsley, or paprika
- 100 g toasted nuts finely chopped, like almonds or pecans
Instructions
- Place the softened cream cheese in a mixing bowl and stir until smooth and creamy, with no lumps.
- Add the shredded cheddar cheese to the cream cheese and mix well, ensuring the cheeses are evenly combined.
- Stir in a pinch of salt and a splash of Worcestershire sauce, then add your chopped herbs for flavor. Mix everything thoroughly until well incorporated.
- Cover the mixture with plastic wrap and refrigerate for at least 30 minutes to firm up, making it easier to shape.
- Once chilled, scoop the mixture with a spoon or scoop and gently roll it between your hands to form a smooth, round ball about the size of a tennis ball.
- Pour the toasted nuts onto a plate and roll the cheese ball in them, pressing gently so the coating sticks evenly all over.
- Wrap the coated cheese ball tightly in plastic wrap again and refrigerate for another 30 minutes to allow flavors to meld.
- Remove the cheese ball from the fridge, let it sit at room temperature for about 10 minutes, then serve with crackers, baguette slices, or veggie sticks for a perfect snack.
Nutrition
Tips and tricks for perfect cheese ball
- Mini-head: Room temp ingredients → Make mixing easier and more even.
- Use fresh herbs for vibrant flavor—dried herbs can taste dull.
- Mini-head: Toast nuts lightly → Boost flavor and crunch.
- Chill the mixture thoroughly to prevent sticking and shape easily.
- Mini-head: Use a spatula for mixing → Get every bit incorporated without sticking.
Common mistakes and how to fix them
- FORGOT TO CHILL: Chill longer or add a bit of cold water to firm up the mixture.
- DUMPED TOO MUCH NUTS: Use less or press them firmly into the surface for better adhesion.
- OVER-TORCHED COATING: Toast nuts lightly and keep an eye on them—smell for a nutty aroma.
- MISSHAPED BALL: Chill the mixture longer or wet your hands to shape smoothly.
Fast fixes for common cheese ball mishaps
- When mixture is too soft, chill for 15 more minutes.
- Splash a little cold water if mixture is too crumbly.
- Patch cracks by pressing mixture back together with damp fingers.
- Shield the cheese ball with a thick coating of nuts if it’s cracking.
- Refrigerate briefly if the coating isn’t sticking well.
What to Serve With a Cheese Ball
- Ritz crackers
- French bread slices
- Pretzel sticks
- Sliced baguette
- Cucumber slices
Make ahead and storage tips
- Prepare the cheese mixture up to 24 hours in advance; keep chilled.
- Shape and coat the cheese ball, then refrigerate for up to 2 days. Flavors deepen.
- Reheat isn’t needed; serve it cold or at room temperature after resting.
- Bring to room temp for 10 minutes before serving to soften slightly and enhance flavor.
10 Practical Q&As About Cheese Ball Recipe
1. Can I use different cheeses?
Use a mix of sharp cheddar and cream cheese for a tangy, creamy flavor that molds well.
2. Can I customize the cheese blend?
Yes, add some crumbled blue cheese or feta for a sharp, salty twist.
3. How long should I chill the mixture?
Chill the cheese mixture for at least 30 minutes to make shaping easier.
4. What should I roll the cheese ball in?
Use chopped nuts or herbs to coat the outside for added texture and flavor.
5. How long can I keep the cheese ball?
Serve immediately or wrap tightly and refrigerate for up to 24 hours.
6. Are there substitutes for fresh cheese?
Use fresh cream cheese and sharp cheddar for the best flavor.
7. Can I add hot sauce?
A small amount of hot sauce or Worcestershire can add a zing.
Making a cheese ball is a bit like creating a little edible sculpture. It’s satisfying to see a messy mixture turn into a sleek, inviting ball that you want to tear into.
Plus, it’s endlessly adaptable: switch up the cheeses, coat it with different herbs or nuts, and serve it with whatever crunch you fancy. That’s the beauty of this simple, honest recipe—it’s yours to tweak and enjoy.


