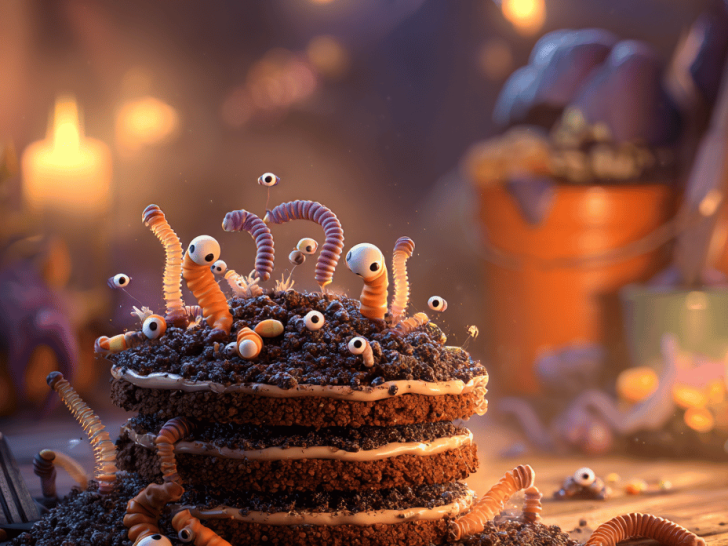
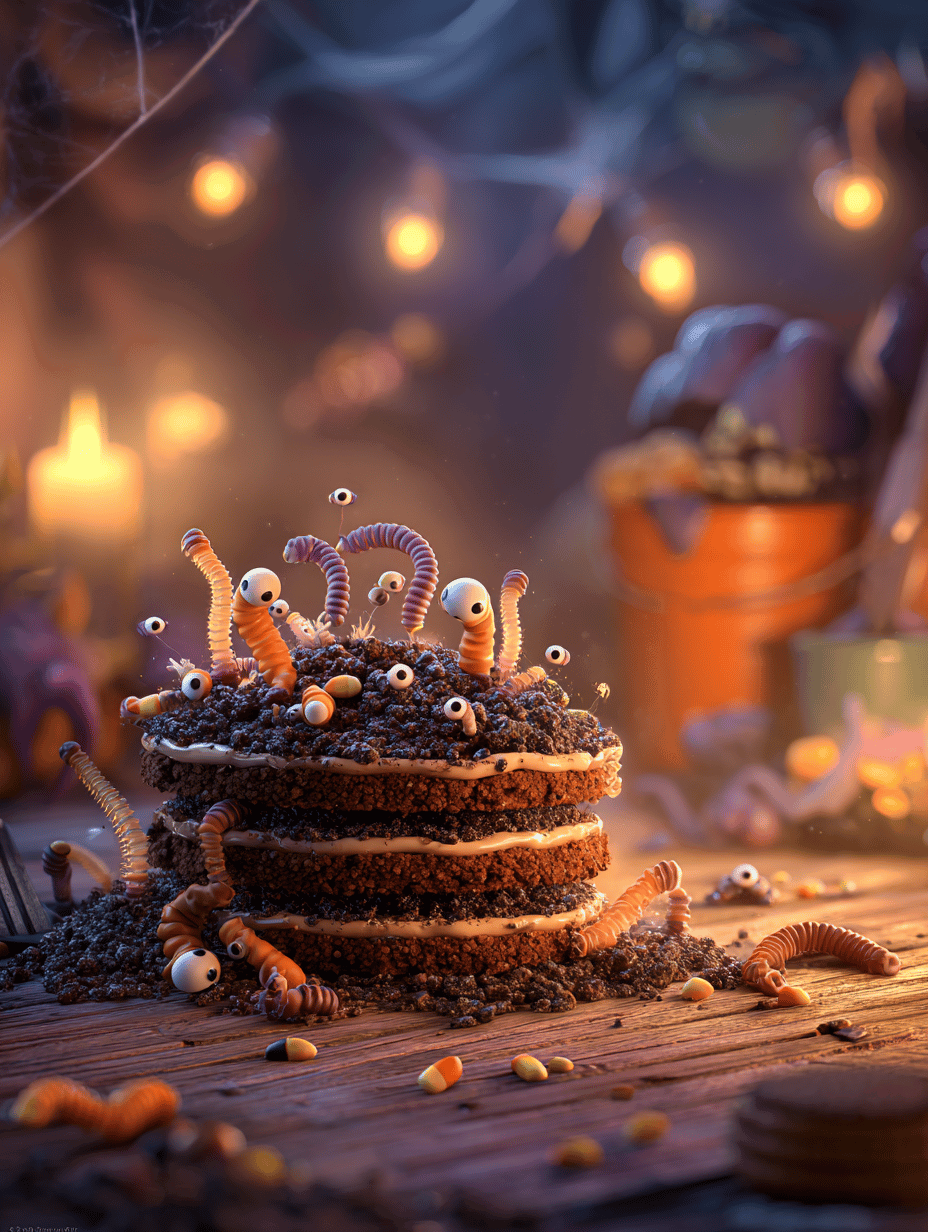
Halloween Dirt Cake with Gummy Worms: A Nostalgic Spookfest in Every Bite
Why I Love This Dirt Cake—A Love Letter to Childhood Mischief
I’ve always had a soft spot for messy, playful desserts that spark joy and a little bit of mischief. This dirt cake feels like a childhood prank transformed into a delicious treat—layers of chocolate, crushed cookies, and gooey surprises that invite you to dig in with your hands. It’s a little chaotic, a lot nostalgic, and incredibly satisfying to see everyone’s faces light up when they see it. Plus, it’s the perfect dessert to get everyone giggling, especially when gummy worms peek out like buried treasures from the “soil.”
What keeps me coming back to this recipe? The irresistible aroma as it sets—rich chocolate mingling with crushed cookies and a hint of vanilla. The visual chaos of gummy worms wriggling out of the “dirt,” adding that playful, creepy touch. And honestly, the pride that comes with creating something that looks like a kid’s nightmare but tastes like heaven. This dirt cake is truly the epitome of edible mischief, making it a Halloween favorite in my household and a guaranteed crowd-pleaser at parties.
What I Love About This Recipe—From Giddy to Grateful
- The first time I saw gummy worms slithering out of the layered mound, I couldn’t stop laughing. It’s pure fun and adds a whimsical touch to the dessert.
- Making this with my niece last Halloween was chaos—in the best way. Sprinkles everywhere, worms in my hair, and giggles galore. It’s a memory I cherish.
- There’s a cozy pride in assembling each layer—every step feels like building an edible fort, and the anticipation of the final reveal makes it all worthwhile.
- When I serve it, the look on everyone’s face—part confusion, part delight—makes all the messy work worth it. It’s a conversation starter and a showstopper all at once.
- Most of all, it’s become a tradition—an easy way to connect past and present with just a few ingredients and a whole lot of giggles. It’s a treat that’s as much about fun as it is about flavor.
Ingredient Breakdown—A Love Letter to Simple Flavors
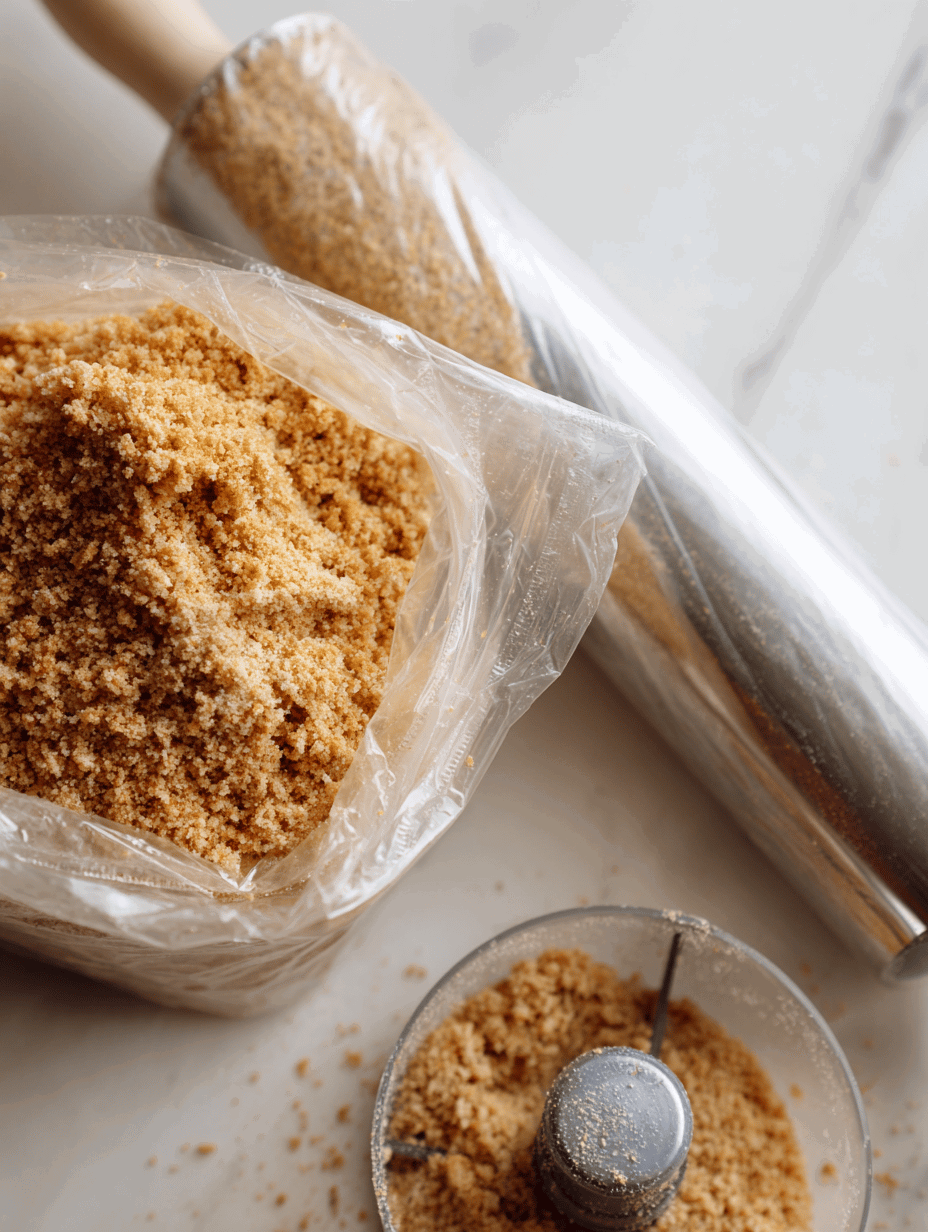
- Graham cracker crumbs: I love flavoring mine with a pinch of cinnamon for a smoky warmth, but plain is perfectly fine. For a richer note, you can swap in digestive biscuits.
- Chocolate pudding: Instant mix is my go-to for speed and smoothness. For a more intense cocoa flavor, homemade pudding works beautifully—just keep an eye on it, as it thickens quickly.
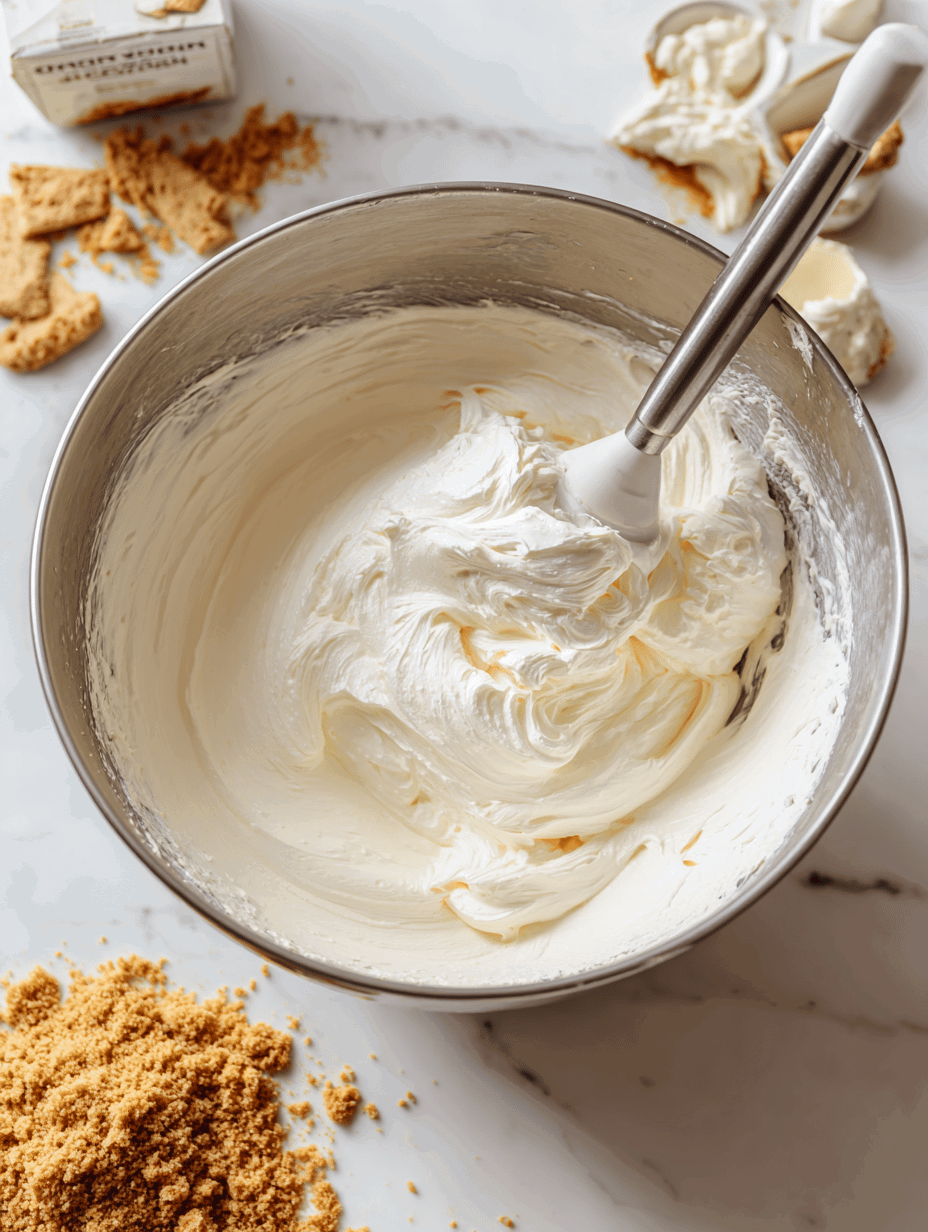
- Cream cheese: It provides a tangy richness and smooth texture. Beat it well to avoid lumps. Vegan cream cheese can be used for a dairy-free version, though it may be softer and require a bit more mixing.
- Gummy worms: The star of the show—look for brightly colored, soft worms that still have a chew. If gummy worms aren’t available, marzipan worms make a fun substitute, though they lack the squishy texture.
- Whipped cream: Light and airy, it balances the richness of the other layers. For extra fluffiness, fold in a spoonful of mascarpone or Greek yogurt to add tang and creaminess.
Step-by-Step: Building Your Ghoulish Delight
Equipment & Tools
- 9×13 inch (23×33 cm) baking dish—large enough for layers but not too deep
- Mixing bowls—one for pudding, one for the cream cheese mixture
- Spatula and whisk—essential for smooth, even layers
- Measuring cups and spoons—precision helps keep the chaos under control
- Plastic bag or rolling pin—perfect for crushing cookies into fine crumbs
Steps
- Begin by crushing cookies into small, sandy crumbs—use a plastic bag and rolling pin or a food processor. Leave some larger pieces for added crunch.
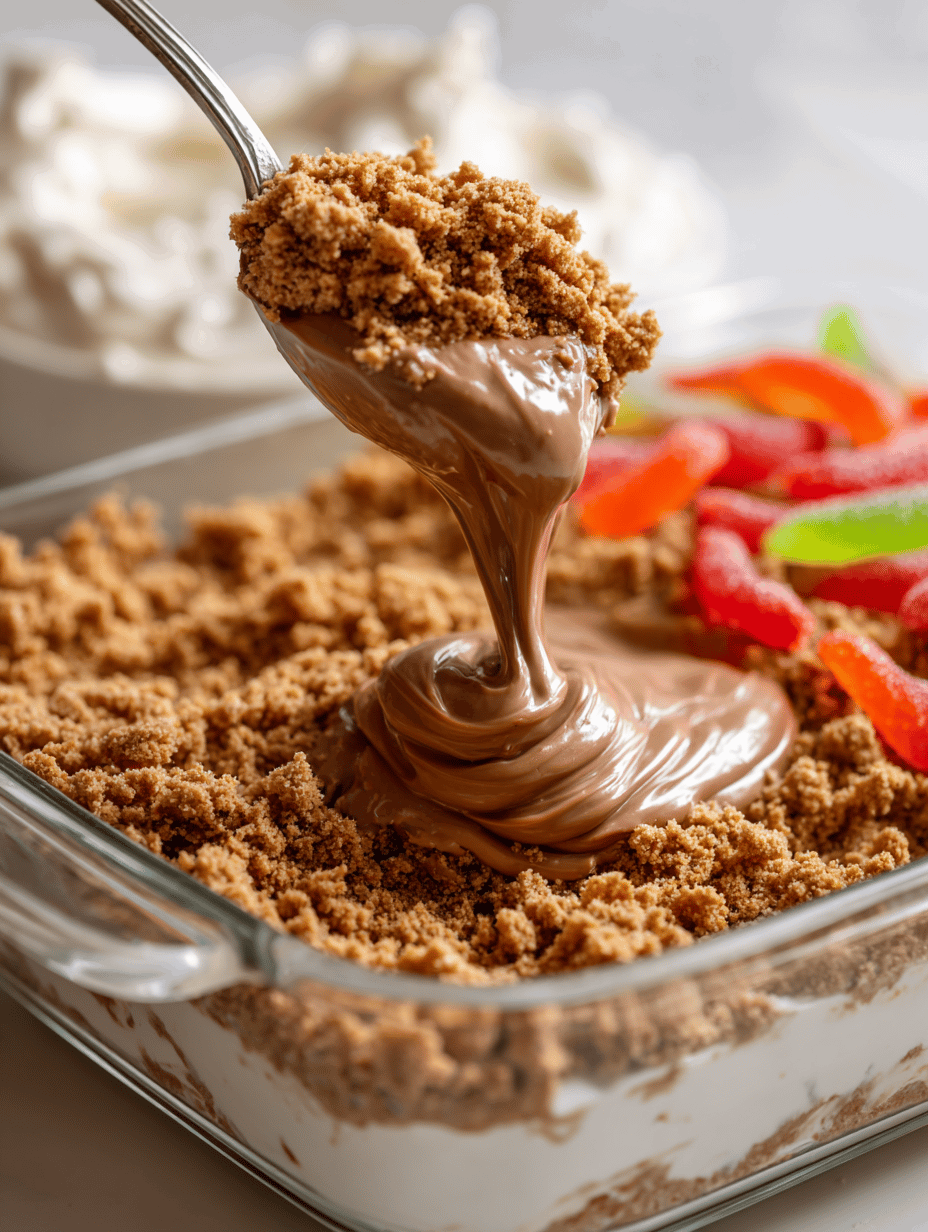
- Prepare the pudding according to the package instructions. It should be thick but pourable, filling your kitchen with an irresistible chocolate aroma. Set aside.
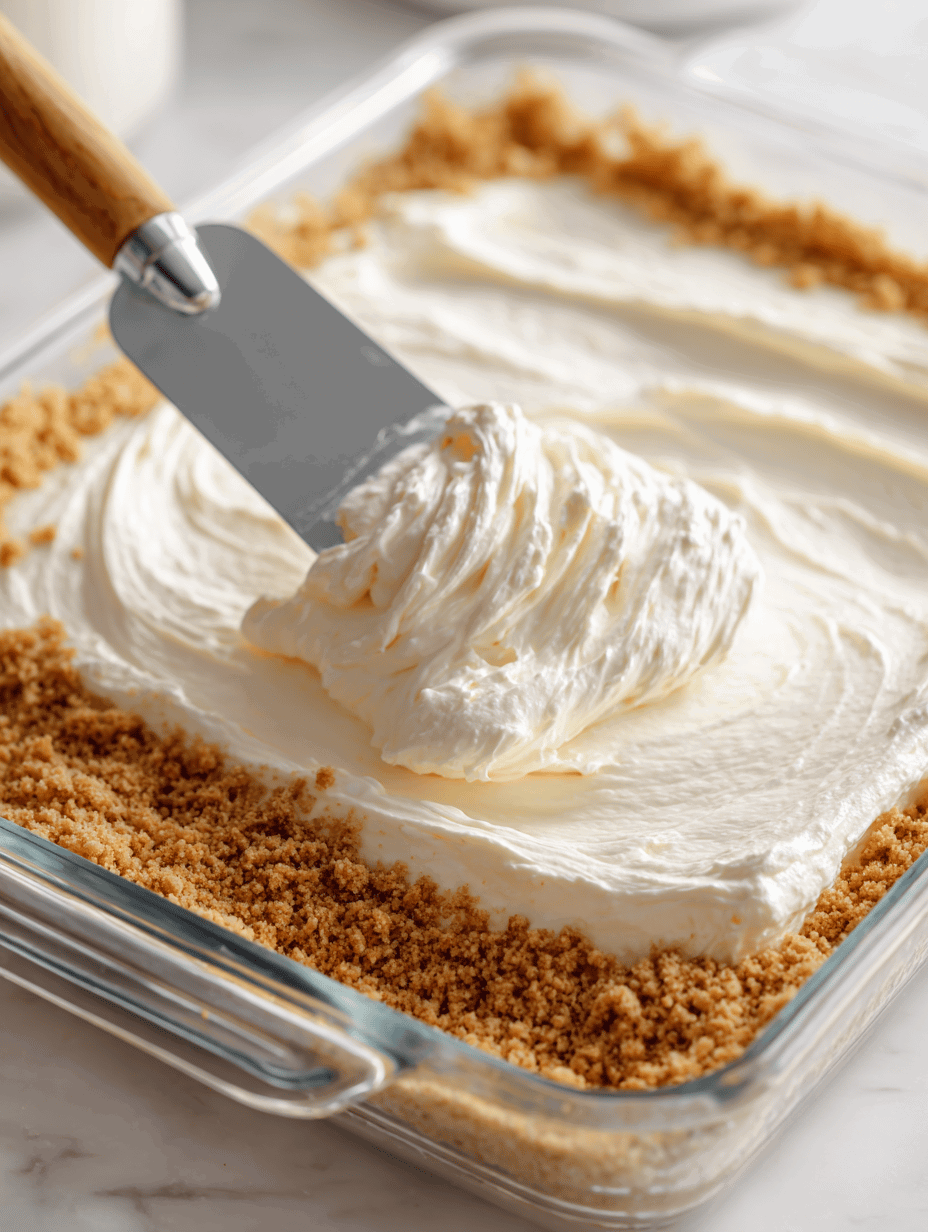
- In a large bowl, beat the cream cheese until smooth. Gently fold in whipped cream until fully combined. This creates a fluffy, creamy layer that contrasts beautifully with the denser pudding.
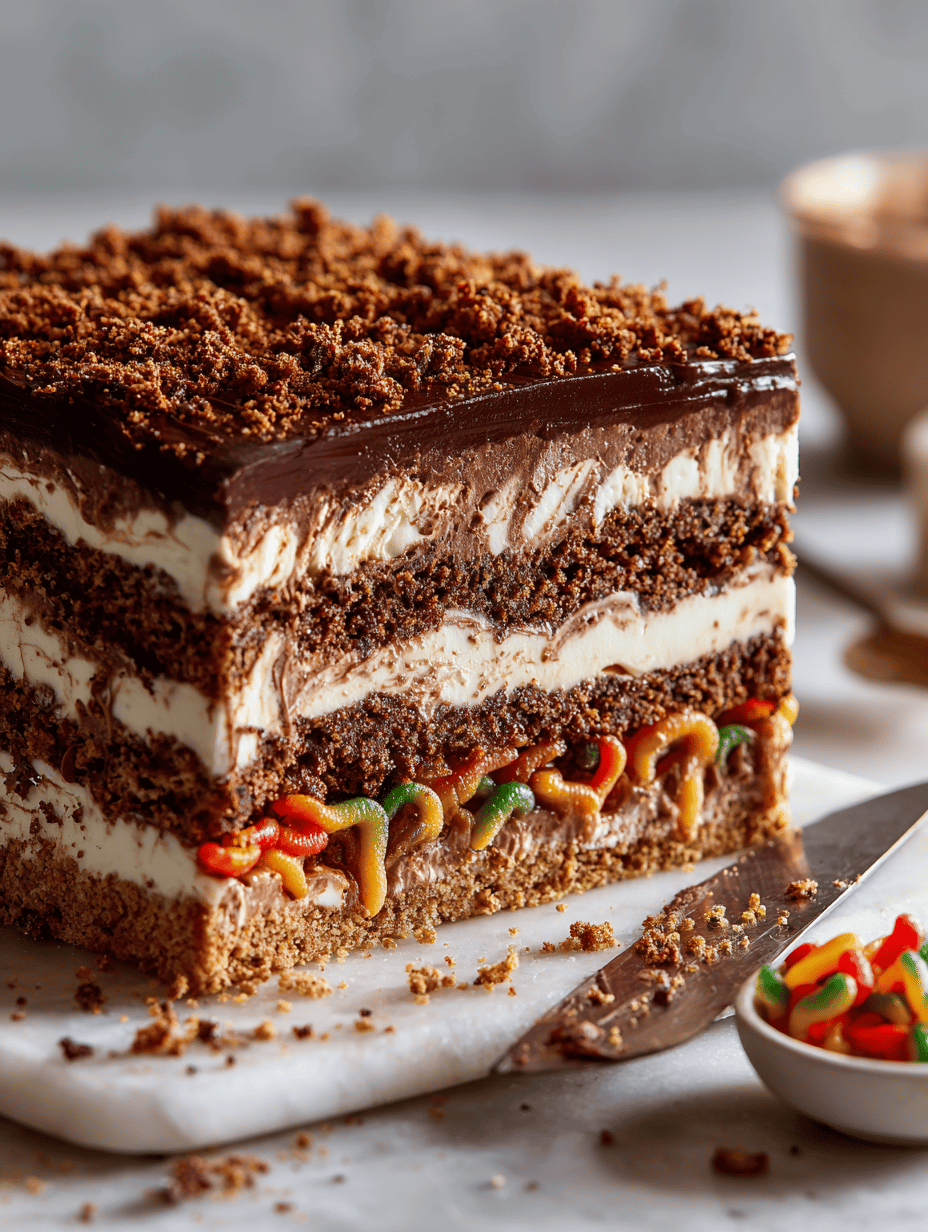
- Start layering: spread a thin layer of cookie crumbs at the bottom of your dish. Pour a layer of pudding (about 2-3 cm thick). Repeat—cookie crumbs, pudding—until you reach near the top of the dish.
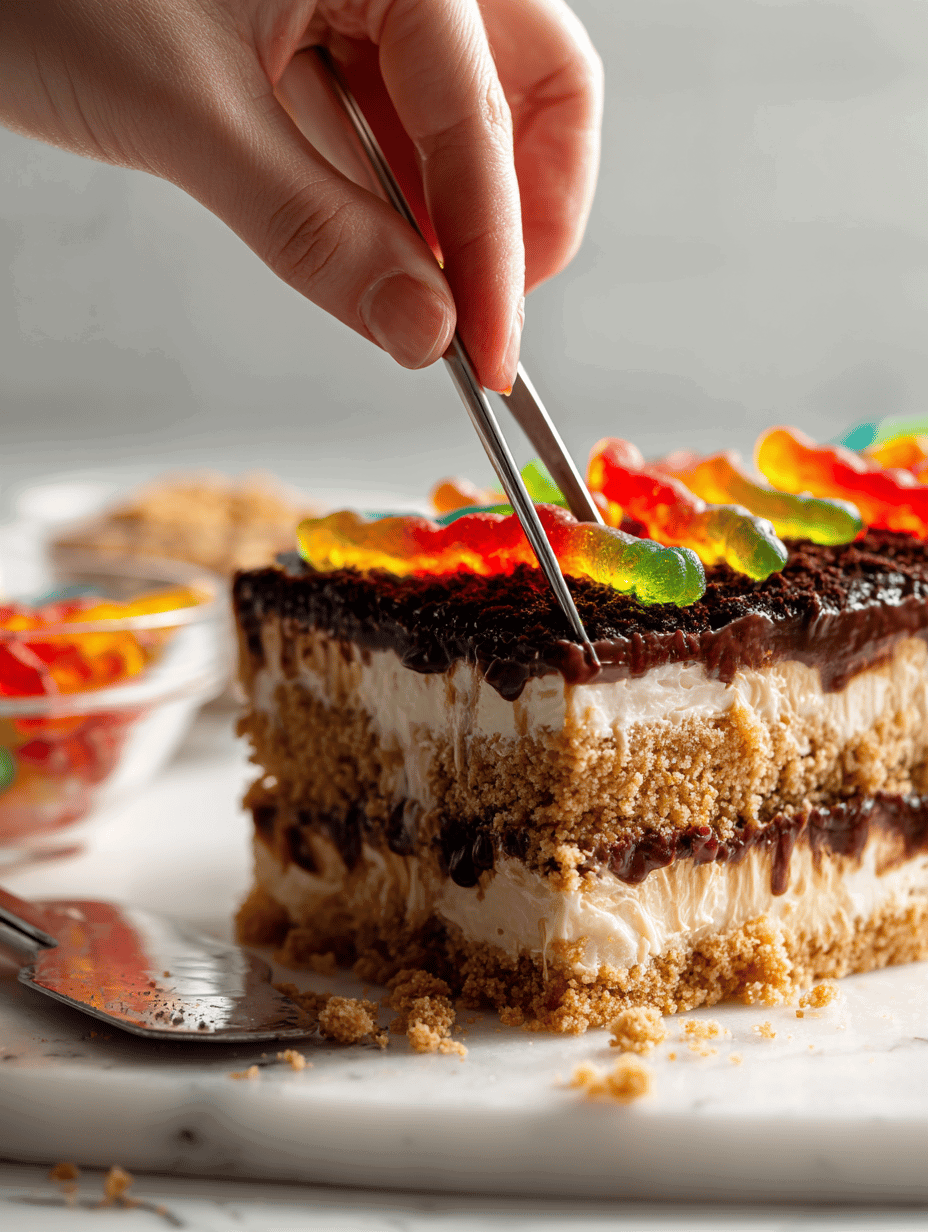
- Spread the cream cheese mixture over the top layer. Smooth it out with a spatula, then sprinkle remaining cookie crumbs over the surface to resemble “dirt.” Carefully press gummy worms into the “soil,” poking out at odd angles for a creepy, crawly effect.
- Garnish with additional gummy worms or edible decorations if desired. Cover and chill in the fridge for at least 4 hours or overnight. The flavors meld, and the texture firms up, making it easier to serve and enjoy.
Mistakes and Fixes—Avoid the Common Pitfalls
- Forgot to chill? The layers won’t set properly. Simply pop it back in the fridge for an extra hour or two to firm everything up.
- Too many crumbs? The texture becomes gritty. Add a dollop of whipped cream or more cream cheese mixture to loosen the layers and restore creaminess.
- Over-thickened pudding? Gently fold in a splash of milk or cream to loosen it up without losing its richness.
- Skipped the gummy worms? The fun element is missing. Add them just before serving for that surprise factor and visual appeal.
Quick Kitchen Fixes for Last-Minute Snags
- If pudding is too runny, fold in more whipped cream or chill longer to thicken.
- Crumbs too coarse? Pulse them a few more times in the food processor for finer texture.
- Clumpy cream cheese? Warm it slightly and whisk vigorously until smooth.
- Prevent sticking by spraying the dish lightly with cooking spray before layering.
- For an extra spooky touch, brush gummy worms with edible glitter or shimmer dust for a shimmering, eerie effect.
This Halloween dirt cake isn’t just a fun, nostalgic treat—it’s a delightful way to bring family and friends together for a playful celebration. The combination of rich chocolate layers, crunchy cookies, and colorful gummy worms creates a feast for both the eyes and the palate. Whether you’re reminiscing about childhood memories or creating new traditions, this dessert encourages messy hands, big smiles, and lots of laughter. Remember, the true magic of this cake lies in the joy of making it—embrace the chaos, have fun decorating, and savor every delicious, spooky bite. So gather your ingredients, unleash your creativity, and turn your kitchen into a Halloween playground that will leave everyone talking long after the last crumb has been eaten.
Halloween Dirt Cake with Gummy Worms
Equipment
- 9x13-inch baking dish
- Spatula
- Plastic bag or rolling pin
Ingredients
- 2 cups cookie crumbs (graham crackers or digestive biscuits) add a pinch of cinnamon for extra flavor if desired
- 1 pack instant chocolate pudding mix follow package instructions for preparation
- 8 oz cream cheese softened
- 1 cup whipped cream or heavy cream, whipped until soft peaks
- 1 bag gummy worms brightly colored and soft
Instructions
- Crush the cookies into fine crumbs using a plastic bag and rolling pin or a food processor, leaving some larger pieces for crunch.
- Prepare the chocolate pudding according to the package instructions, whisking until smooth and slightly thickened. Set aside to cool if needed.

- In a large mixing bowl, beat the softened cream cheese until smooth and creamy, then gently fold in the whipped cream until fully combined, creating a fluffy layer.
- Start assembling the dirt cake by spreading a thin layer of cookie crumbs at the bottom of your dish, creating a sandy base.
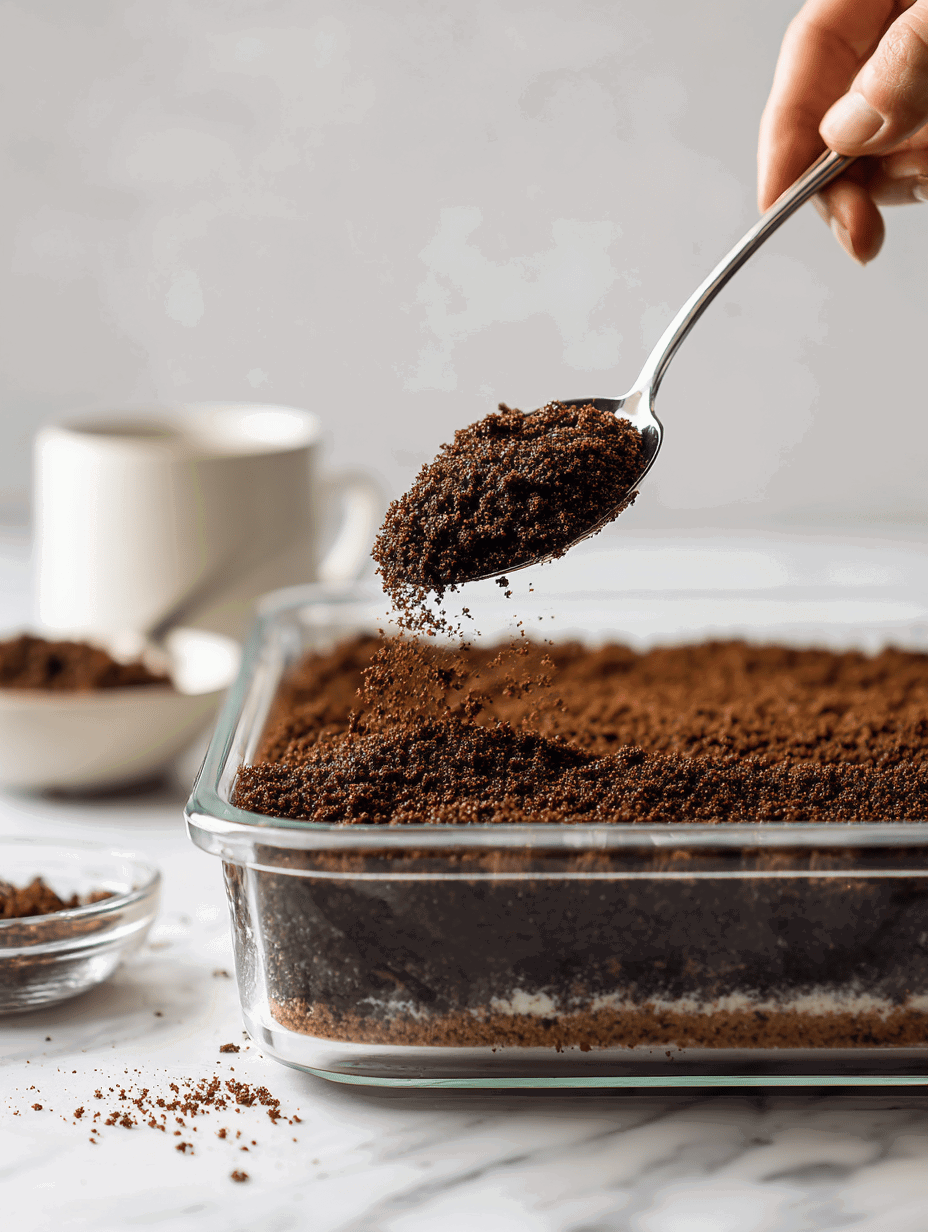
- Pour a layer of chocolate pudding over the crumbs, about 2-3 centimeters thick, and spread evenly with a spatula.
- Repeat the layering process—cookie crumbs, then pudding—until you reach near the top of the dish, finishing with a layer of crumbs.
- Spread the fluffy cream cheese mixture over the top layer of crumbs, smoothing it out with a spatula for an even surface.
- Sprinkle remaining cookie crumbs over the surface to resemble dirt, then press gummy worms into the crumb layer at odd angles to look like buried worms emerging.

- Decorate with additional gummy worms or edible decorations if desired, then cover and refrigerate for at least 4 hours or overnight to allow flavors to meld and layers to set.
- Once chilled, serve slices of the dirt cake, enjoying the moist, crumbly, and chewy textures along with the playful visual of worms wriggling out of the ‘soil’.
![Cottage Cheese Ice Cream Recipe [Healthy and Refreshing]](https://cdn.beyondthebayoublog.com/wp-content/uploads/2024/07/Cottage-Cheese-Ice-Cream-Recipe-Healthy-and-Refreshing-150x150.jpg)