Classic s’mores are hard to beat, but sometimes it’s fun to switch things up around the campfire. A few simple ingredient swaps can turn the traditional graham cracker and chocolate combo into something completely new. That’s what makes s’mores such a favorite for camping trips and summer nights.
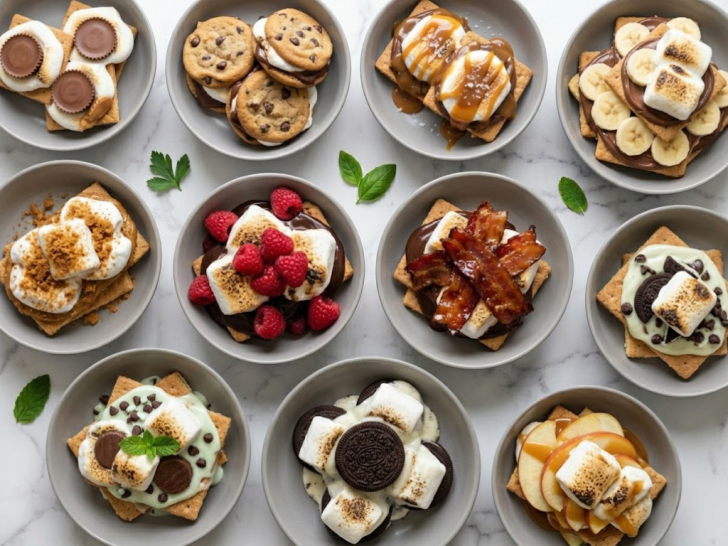
After looking through both sources, it’s clear that people are getting more creative with flavors and textures. Cookie butter, peanut butter cups, berries, caramel, bacon, and different types of cookies are some of the most popular additions right now. These combinations keep the nostalgic feel of classic s’mores while adding something unexpected.
This list includes a mix of fun, easy, and crowd-friendly variations that work perfectly around a fire pit or campsite. From fruity twists to rich chocolatey combinations, these ideas make campfire desserts feel a little more exciting without adding extra work.
1. Peanut Butter Cup S’mores
Preparing Peanut Butter Cup S’mores is a practical upgrade to the classic campfire treat. This recipe is highly effective because it replaces the standard chocolate bar with a peanut butter cup, which provides a molten, creamy core that regular chocolate simply can’t match. It’s the ultimate “guilty pleasure” for a 2026 summer night, offering a perfect ratio of salty peanut butter to sugary marshmallow.
The process is remarkably efficient, it’s a “stack and melt” operation. While traditional s’mores can sometimes feel a bit one-dimensional, the addition of peanut butter adds a savory depth and a richness that makes one s’more feel like a complete dessert.
The texture is a messy, glorious symphony of “crunchy” graham cracker, “gooey” toasted marshmallow, and “velvety” melted peanut butter. The flavor profile is a nostalgic, heavy-hitting blend of roasted sugar, salty nut butter, and milk chocolate.
Servings: Makes as many as you can handle!
Ingredients
- Graham cracker squares (Honey or Chocolate flavor)
- Large marshmallows
- Standard-sized Peanut Butter Cups (like Reese’s)
- Optional: Sliced bananas or a sprinkle of sea salt for a “gourmet” twist
Instructions
- The Foundation: Lay out your graham cracker squares on a plate or clean surface. Place one peanut butter cup on half of the crackers.
Pro Tip: If you’re doing this indoors, you can pop the graham cracker and peanut butter cup in the microwave for 5–8 seconds just to take the chill off the chocolate before adding the hot marshmallow. - The Toast: Roast your marshmallow over a campfire, grill, or even a kitchen gas burner until it reaches your desired level of “golden-brown” or “charred.”
- The Assembly: Quickly place the hot, bubbling marshmallow directly on top of the peanut butter cup.
- The Squish: Place the second graham cracker square on top and press down gently.
The “Meltdown” Secret: Hold the s’more together for about 30 seconds before eating. The residual heat from the marshmallow is what melts the peanut butter cup into that perfect, gooey consistency. - Serve: Eat immediately with plenty of napkins nearby.
2. Chocolate Chip Cookie S’mores
Preparing Chocolate Chip Cookie S’mores is a practical way to create the “ultimate dessert mashup.” This recipe is highly effective because it replaces the dry snap of a graham cracker with the soft, buttery chew of a cookie. It solves the biggest s’more problem, the cracker shattering upon the first bite by providing a flexible, indulgent “shell” that holds all that gooey goodness inside. This is the definitive “Treat Yourself” dessert of 2026.
The process is efficient because the cookies already contain chocolate chips, which begin to melt the moment they touch the hot marshmallow. It’s a “double-chocolate” experience that feels like it came from a high-end bakery but takes only seconds to assemble at the campfire.
The texture is “soft, chewy, and stretchy” with “molten” pockets of chocolate. The flavor profile is an intense blend of brown sugar, butter, vanilla, and toasted marshmallow.
Servings: However many cookies are in the jar!
Ingredients
- 2 Chocolate Chip Cookies (Bakery-style soft cookies or classic crispy ones)
- 1-2 Large marshmallows
- The Extra: 1 thin square of Milk Chocolate (optional, since the cookies have chips!)
- Optional: A smear of sea salt caramel for a “salted” version
Instructions
- The Cookie Choice: If you like a “soft” s’more, use soft-baked cookies. If you like “crunch,” go for the classic crispy chips.
Pro Tip: If your cookies are room temperature, hold them near the edge of the fire for 10 seconds to warm the chocolate chips before you add the marshmallow. - The Base: Lay one cookie flat (bottom side up) on your plate.
- The Toast: Roast your marshmallow until it is “dangerously gooey” you want a molten center to help soften the cookie even further.
- The Assembly: Place the hot marshmallow directly onto the bottom of the first cookie.
- The “Chocolate Boost”: If you want extra chocolate, place a thin square on the marshmallow now.
- The Squish: Place the second cookie (bottom side down) on top. Press firmly but slowly to let the marshmallow spread to the edges without breaking a crispy cookie.
- The Rest: Let it sit for 15-20 seconds. This allows the cookie and marshmallow to “bond” into a single, cohesive unit.
3. Salted Caramel S’mores
Preparing Salted Caramel S’mores is a practical way to turn a rustic campfire snack into a sophisticated, high-end dessert. This recipe is highly effective because it introduces “layering” pairing the smoky sweetness of a toasted marshmallow with the buttery, salt-forward notes of caramel. It’s the ultimate dessert for a Summer 2026 evening when you want something that feels “chef-inspired” but requires zero actual baking.
The process is remarkably efficient. By using a pre-made high-quality salted caramel sauce or a caramel-filled chocolate square, you achieve a professional flavor profile in seconds. The salt is the “magic” ingredient here; it cuts through the sugar of the marshmallow and the richness of the chocolate, making every bite addictive rather than cloyingly sweet.
The texture is a luxurious transition from “crisp cracker” to “billowing marshmallow” to a “silky, flowing caramel” center. The flavor profile is a complex mix of toasted vanilla, dark cocoa, and burnt sugar.
Servings: As many as your heart desires!
Ingredients
- Graham cracker squares (Honey or Cinnamon)
- Large marshmallows (standard or “jumbo” for extra goo)
- Dark chocolate squares (60% cacao or higher works best with caramel)
- The Hero Ingredient: Salted Caramel Sauce (jarred) OR Salted Caramel filled chocolate squares (like Ghirardelli)
- The Finisher: A tiny pinch of Flaky Sea Salt (like Maldon)
Instructions
- The Base Layer: Place your dark chocolate square on a graham cracker.
Pro Tip: If using caramel sauce, drizzle about a teaspoon directly onto the chocolate square before adding the marshmallow. If using caramel-filled chocolate, the “sauce” is already inside! - The Roast: Toast your marshmallow over an open flame until it is deeply golden and starting to sag on the stick.
The “Melter” Technique: For this version, try to get the marshmallow “flaming” for just a second, the high heat is necessary to properly melt the thick caramel and dark chocolate. - The Assembly: Slide the hot marshmallow onto the chocolate/caramel base.
- The Salt Pop: Sprinkle a tiny pinch of flaky sea salt directly onto the hot marshmallow.
- The Cap: Place the top graham cracker on and press down firmly until the caramel starts to ooze out the sides.
- The “Rest”: Wait 15 seconds. This allows the heat of the marshmallow to fully liquefy the caramel and soften the dark chocolate.
4. Nutella Banana Campfire S’mores
Preparing Nutella Banana Campfire S’mores is a practical way to bring a “creperie” vibe to your backyard fire pit. This recipe is highly effective because it swaps traditional chocolate bars for a generous swipe of hazelnut spread, which acts as a “glue” for fresh fruit and melts instantly upon contact with a hot marshmallow. It is the ultimate decadent treat for a 2026 summer night, offering a perfect balance of rich cocoa, nutty hazelnut, and creamy fruit.
The process is remarkably efficient. Since Nutella is already spreadable, you don’t have to worry about “waiting” for a chocolate bar to melt. Adding banana slices introduces a fresh, potassium-rich element that softens the intensity of the sugar, making these feel slightly more substantial than a standard s’more.
The texture is a beautiful mess of “crisp” crackers, “velvety” spread, “tender” bananas, and “pillowy” marshmallows. The flavor profile is a classic “hazelnut-choco-banana” trio that tastes like a gourmet dessert.
Servings: As many as the jar allows!
Ingredients
- Graham cracker squares
- Large marshmallows
- The Spread: Nutella (Hazelnut cocoa spread)
- The Fruit: 1 ripe banana, thinly sliced
- Optional: A sprinkle of crushed hazelnuts for extra crunch
Instructions
- The Foundation: Take two graham cracker squares. Spread a thick, generous layer of Nutella on one (or both!) of the squares.
- The Fruit Layer: Press 2–3 thin banana slices directly into the Nutella.
Pro Tip: Slicing the bananas thin is key it keeps the s’more stable so the “insides” don’t slide out when you take your first bite. - The Toast: Roast your marshmallow to your preferred level of gooeyness. For Nutella s’mores, a “slow-roasted” golden brown works best to provide a steady heat.
- The Assembly: Place the molten marshmallow directly onto the bananas.
- The Squish: Top with the second graham cracker and press down. The heat from the marshmallow will warm the bananas and make the Nutella even silkier.
- Serve: Eat immediately while the “hazelnut lava” is flowing!
5. Cookie Butter Marshmallow S’mores
Preparing Cookie Butter Marshmallow S’mores is a practical way to enjoy the warm, spiced flavors of autumn in the middle of summer. This recipe is highly effective because it utilizes Biscoff (or Speculoos) spread, which carries notes of cinnamon, nutmeg, and ginger. It is essentially a “gingerbread s’more” that swaps out standard chocolate for a caramelized, deep spice profile that pairs perfectly with the char of a roasted marshmallow.
The process is remarkably efficient. Since cookie butter is already smooth and spreadable, it creates an instant “bond” between the cracker and the marshmallow. This is the ultimate choice for those who find traditional chocolate s’mores a bit too “sharp” and prefer a mellow, toasted-sugar flavor profile.
The texture is a “silky-smooth” spice cream against a “toasted, gooey” center. The flavor profile is a cozy blend of cinnamon, brown sugar, and caramelized shortbread.
Servings: Unlimited (until the jar is empty!)
Ingredients
- Graham cracker squares (Cinnamon grahams work exceptionally well here)
- Large marshmallows
- The Hero: Cookie Butter (Biscoff or Speculoos spread)
- The “Secret” Layer: 1 square of White Chocolate (optional, but rounds out the spice beautifully)
- Optional: A light dusting of ground cinnamon on top
Instructions
- The Prep: Spread a thick layer of cookie butter on one graham cracker square.
The “White Chocolate” Variation: If you’re using white chocolate, place the square on top of the cookie butter now. The creamy vanilla notes of white chocolate act as the perfect “milk” to the cookie butter’s “spice.” - The Toast: Roast your marshmallow until it is “puffing” and slightly charred. The charred bits of the marshmallow mimic the caramelized flavor of the cookie butter perfectly.
- The Assembly: Place the hot marshmallow directly onto the spread.
- The Melt: Top with the second cracker and squeeze gently.
Pro Tip: Let this one sit for about 20 seconds. The cookie butter is oil-based and will become beautifully runny when it absorbs the heat from the marshmallow. - Serve: Dust with a tiny bit of extra cinnamon if you’re feeling fancy.
6. Dark Chocolate Raspberry S’mores
Preparing Dark Chocolate Raspberry S’mores is a practical way to bring “fine dining” to the campfire. This recipe is highly effective because it uses the natural tartness of fresh berries to cut through the intense sugar of the marshmallow. It’s a sophisticated, “adult” version of the classic treat that trades cloying sweetness for a complex, bittersweet flavor profile.
The process is remarkably efficient. By using high-percentage dark chocolate, you ensure the chocolate doesn’t “overpower” the fruit. The raspberries act as “flavor bombs” when they get squished between the hot marshmallow and the chocolate, they release a warm juice that creates an instant, fresh raspberry sauce right inside the s’more.
The texture is a brilliant contrast of “crisp” cracker, “molten” chocolate, “bursting” berries, and “fluffy” marshmallow. The flavor profile is deeply decadent, tangy, and bright.
Servings: As many as the berry patch provides!
Ingredients
- Graham cracker squares (Chocolate-flavored grahams are a 10/10 choice here)
- Large marshmallows
- The Chocolate: 2 squares of high-quality Dark Chocolate (70% cocoa or higher)
- The Fruit: 3–4 fresh raspberries per s’more
- Optional: A drop of honey or a tiny pinch of sea salt
Instructions
- The Base: Place your dark chocolate squares on one graham cracker.
- The Berry Nest: Place 3 or 4 fresh raspberries directly on top of the chocolate.
Pro Tip: Use your thumb to slightly “dent” the raspberries so they stay in place on the chocolate and don’t roll off while you’re roasting the marshmallow. - The Toast: Roast your marshmallow until it is “weeping” (so soft it starts to droop). You want maximum heat here to help melt that high-cocoa dark chocolate, which has a higher melting point than milk chocolate.
- The Assembly: Slide the hot marshmallow onto the raspberries.
- The Crush: Place the top cracker on and press down firmly. You want to hear the “pop” of the raspberries as they release their juice into the marshmallow.
- The Wait: Let it sit for 30 seconds. This is crucial, dark chocolate takes a moment to turn silky, and the raspberry juice needs to mingle with the melted chocolate.
7. Candied Bacon S’mores
Preparing Candied Bacon S’mores is a practical way to achieve the ultimate “sweet and salty” equilibrium. This recipe is highly effective because it introduces an element of umami and a smoky depth that transforms a childhood snack into a bold, culinary experience. It is the definitive “showstopper” for a 2026 summer BBQ, appealing to anyone who believes bacon makes everything better.
The process is efficient if you prep the bacon in advance. While it technically requires a quick oven bake (the “candying” part), the bacon can be made hours earlier and served cold or room temp, keeping the actual s’more assembly a “no-cook” campfire activity.
The texture is a complex layering of “snap” (cracker), “chew” (bacon), and “goo” (marshmallow). The flavor profile is smoky, salty, maple-sweet, and chocolate-rich.
Servings: As many as your bacon supply allows!
Ingredients
- Graham cracker squares
- Large marshmallows
- Milk or Dark chocolate squares
- The Star: 4–6 strips of thick-cut bacon
- 2 tablespoons brown sugar (for candying)
- 1/2 teaspoon black pepper or a pinch of cayenne (optional, for a “sweet heat” kick)
Instructions
- The Candied Bacon (Prep Ahead): * Preheat your oven to 200°C (400°F).
- Lay bacon strips on a parchment-lined tray and coat them generously with brown sugar and black pepper.
- Bake for 15–20 minutes until caramelized and crisp. Let them cool, then break each strip in half.
- The Foundation: Place a chocolate square on a graham cracker and top it with two half-strips of your candied bacon.
Pro Tip: If the bacon has cooled completely, place it on the chocolate and hold it near the fire for a few seconds to “re-activate” the oils before adding the marshmallow. - The Toast: Roast your marshmallow until it is “perfectly charred.” The bitterness of the char pairs incredibly well with the smoky bacon.
- The Assembly: Slide the hot marshmallow onto the bacon strips.
- The Squish: Apply the top graham cracker. The heat from the marshmallow will slightly melt the brown sugar glaze on the bacon, merging the flavors.
- Serve: Warn your guests this one is a flavor explosion.
8. Mint White Chocolate Campfire S’mores
Preparing Mint White Chocolate Campfire S’mores is a practical way to achieve a “cool and hot” sensory experience. This recipe is highly effective because it uses the refreshing, herbal notes of mint to brighten up the heavy sweetness of white chocolate and marshmallow. It is the ultimate “palate cleanser” of the s’mores world perfect for a balmy 2026 summer night when you want a dessert that feels crisp rather than cloying.
The process is remarkably efficient. By using a mint-infused chocolate square (like Andes mints or a mint-filled white chocolate bar), you get a consistent flavor without having to mess with fresh extracts or oils. The white chocolate melts much faster than dark chocolate, creating a “lava” effect almost instantly.
The texture is “buttery and smooth” with a sharp, cooling “zing.” The flavor profile is a creamy, “vanilla-mint” dream that mimics the taste of premium peppermint bark.
Servings: As many as you can handle!
Ingredients
- Graham cracker squares (Chocolate grahams work best for a “Thin Mint” vibe)
- Large marshmallows
- The Chocolate: White chocolate squares OR Mint-infused chocolate squares
- The Freshness: 1 thin sprig of fresh mint (optional, for a gourmet aroma)
- Optional: A sprinkle of crushed candy canes or mint chocolate chips
Instructions
- The Base: Place your white chocolate (and a mint chocolate square, if using) on a graham cracker.
Pro Tip: White chocolate has a very low melting point. If your marshmallows are extra hot, the chocolate will turn into a liquid “sauce” almost immediately, so have your crackers ready! - The Toast: Roast your marshmallow to a “pillowy” golden brown. Avoid over-charring this one; you want the clean, sugary taste of the marshmallow to let the delicate mint shine.
- The Assembly: Slide the hot marshmallow onto the white chocolate.
- The Infusion: If using fresh mint, place one or two leaves directly onto the hot marshmallow before capping it. The heat will release the mint’s essential oils instantly.
- The Squish: Place the top graham cracker on and press down.
- Serve: Eat it while it’s “oozy.” The white chocolate and mint will blend together to create a creamy, pale-green swirl.
9. Cookies and Cream Oreo S’mores
Preparing Cookies and Cream Oreo S’mores is a practical way to solve the “cracker crumble” problem. This recipe is highly effective because it replaces the traditional graham cracker with an Oreo cookie, which is naturally sturdier and provides a built-in layer of sweet cream. It is the ultimate “meta-dessert” for 2026 a cookie inside a s’more that tastes like a deconstructed milkshake.
The process is remarkably efficient since you don’t have to snap crackers or break chocolate bars into perfect squares. By using a “Cookies ‘n’ Creme” chocolate bar in addition to the Oreo, you double down on the texture, ensuring every bite has that signature cocoa-crunch.
The texture is a satisfying “snap” from the cookie followed by a “velvety, gritty” cream and a “molten” marshmallow center. The flavor profile is a heavy-hitting combination of dark cocoa and sweet vanilla.
Servings: As many as the pack allows!
Ingredients
- Oreo Cookies (Double Stuf works best to hold the heat!)
- Large marshmallows
- The Chocolate: 1 square of Cookies ‘n’ Creme chocolate (like Hershey’s)
- Optional: A drizzle of chocolate syrup for the “ultimate” version
Instructions
- The Prep: Carefully twist apart your Oreo cookies.
Pro Tip: Keep the side with the white cream facing up, this will act as a “buffer” to keep the melting chocolate from sliding off the cookie. - The Foundation: Place a square of cookies ‘n’ creme chocolate on the cream-side of the Oreo half.
- The Toast: Roast your marshmallow until it is “perfectly gooey” and starting to brown.
The “Oreo Fit” Trick: Since Oreos are smaller than graham crackers, try to use the “standard” sized marshmallows rather than the “jumbo” ones so the filling doesn’t completely overwhelm the cookie. - The Assembly: Place the hot marshmallow directly onto the white chocolate square.
- The Cap: Place the other Oreo half (the plain chocolate side) on top and press down firmly.
- The Melt: Hold for 10 seconds. The heat from the marshmallow will soften the Oreo’s internal cream and the chocolate square simultaneously.
10. Caramel Apple Campfire S’mores
Preparing Caramel Apple Campfire S’mores is a practical way to enjoy the flavors of a county fair without the sticky mess of a whole candied apple. This recipe is highly effective because the crisp apple slice provides a refreshing, juicy crunch that acts as a palate cleanser for the rich caramel and marshmallow. It is the ultimate “Fruit-meets-Fire” dessert for a Summer 2026 evening, lighter than a cookie s’more but just as indulgent.
The process is remarkably efficient. By using thin apple slices as either an internal layer or a total replacement for the cracker, you introduce a natural tartness (Malic acid) that makes the sugar in the marshmallow “pop.”
The texture is a brilliant mix of “cold, crisp” apple, “molten” caramel, and “pillowy” marshmallow. The flavor profile is a nostalgic blend of tart Granny Smith, buttery caramel, and toasted vanilla.
Servings: 1 apple makes about 4–6 s’mores
Ingredients
- 1 large Granny Smith apple (or any tart, firm apple)
- Graham cracker squares (Cinnamon grahams are the best pairing here)
- Large marshmallows
- The Caramel: 1 square of caramel-filled chocolate OR a thick drizzle of salted caramel sauce
- Optional: A sprinkle of cinnamon or crushed peanuts for an authentic “caramel apple” finish
Instructions
- The Apple Prep: Slice the apple into thin rounds (about 1/4 inch thick).
Pro Tip: Use a small circular cutter or a knife to remove the core from the center of the slices. This creates a “ring” that holds the marshmallow perfectly in place. - The Foundation: Place a graham cracker down and top it with your caramel-filled chocolate square.
- The Apple Layer: Place the apple slice directly on the chocolate.
The “Low-Carb” Version: Skip the graham crackers entirely and use two apple slices as your “bread”! - The Toast: Roast your marshmallow to a “deeply bronzed” color. The warmth of the marshmallow is what will slightly soften the apple and melt the caramel.
- The Assembly: Place the hot marshmallow on top of the apple slice.
- The Squish: Apply the top graham cracker (or second apple slice) and press down.
- Serve: Eat immediately. The contrast between the cold apple and the hot marshmallow is the highlight of this treat.

hi there,
i’m James
The home cook and food blogger behind Beyond the Bayou Blog. Cooking has always been my happy place.
know more