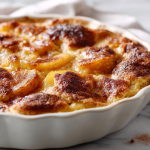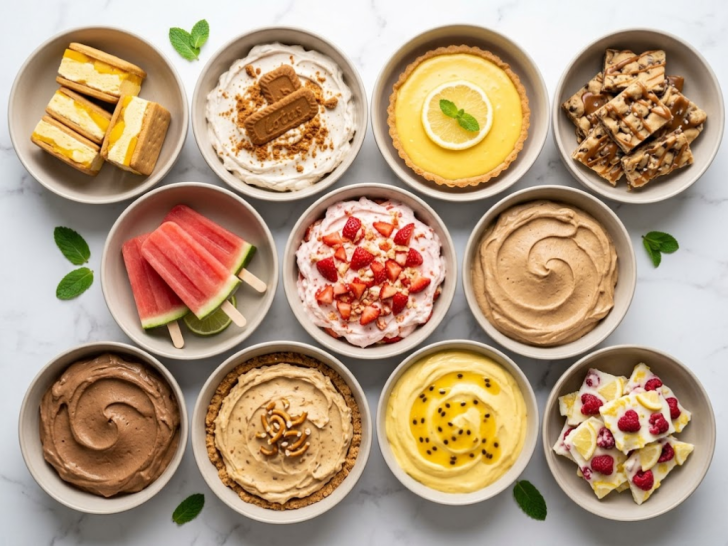
It is so rewarding to whip up a decadent treat that relies on the fridge rather than the stovetop.
I have noticed a major shift toward lighter, fruit-forward desserts that feel like a breath of fresh air. These recipes prioritize vibrant seasonal ingredients and clever textures that stay firm even on humid afternoons.
The best part about these chilled delights is the “make-ahead” factor that takes the stress out of entertaining. You can prep these beauties in the quiet morning hours and let them set while you enjoy the sun.
1. Mango Float Ice Cream Sandwiches
These frozen treats provide a handheld version of a classic Filipino icebox cake. By layering a creamy fruit filling between whole crackers, you create a portable dessert that is easy to serve at outdoor gatherings or as a simple afternoon snack.
The assembly process is straightforward and requires no baking, relying instead on the freezer to set the layers. The graham crackers soften slightly from the moisture of the cream, resulting in a texture that is easy to bite through while still maintaining its shape.
Each sandwich offers a balance of milky sweetness and the bright, natural acidity of fresh fruit. The combination of chilled heavy cream and condensed milk creates a smooth, ice-cream-like consistency that pairs well with the honeyed notes of the crackers.
Servings: 12 ice cream sandwiches
Ingredients
- 2 cups heavy whipping cream, chilled
- 1 can (14 oz) sweetened condensed milk
- 1 teaspoon vanilla extract
- 3 large ripe mangoes, peeled and diced
- 2 sleeves whole graham crackers
Instructions
- Place a large mixing bowl and beaters in the freezer for 10 minutes to chill before starting.
- Pour the cold heavy whipping cream into the chilled bowl and beat on medium-high speed until stiff peaks form.
- Gradually pour in the sweetened condensed milk and vanilla extract, folding gently with a spatula until the mixture is uniform and smooth.
- Stir about two-thirds of the diced mangoes into the cream mixture, saving the rest for layering.
- Line a 9×13-inch baking pan with parchment paper, leaving an overhang on the sides for easy removal.
- Arrange a single layer of whole graham crackers across the bottom of the prepared pan, breaking pieces if necessary to fit the edges.
- Pour the mango cream mixture over the cracker layer and spread it into an even, flat layer using an offset spatula.
- Scatter the remaining diced mangoes evenly over the top of the cream.
- Place a second layer of whole graham crackers on top of the cream, aligning them directly above the bottom crackers to make slicing easier later.
- Cover the pan tightly with plastic wrap and freeze for at least 6 hours, or until the filling is completely firm.
- Use the parchment paper overhang to lift the entire block out of the pan and onto a cutting board.
- Use a sharp knife to cut between the graham crackers to create individual ice cream sandwiches.
2. Biscoff Greek Yogurt Chilled “Cheesecake”
A simple no-bake dessert made with yogurt and cookies. This chilled Biscoff Greek yogurt cheesecake comes together by layering thick yogurt with Biscoff biscuits and letting it set in the fridge.
It works well as a quick dessert, snack, or even a sweet breakfast option. The minimal prep makes it useful when a no-cook recipe is needed with just a few ingredients.
The texture turns soft and creamy as it chills, with the cookies absorbing moisture and forming a cake-like layer. The flavor is slightly tangy from yogurt with a sweet, spiced caramel taste from the Biscoff.
Servings: 2–3
Ingredients
- 2 cups Greek yogurt
- 10–12 Biscoff cookies
Instructions
- Add the Greek yogurt to a container or serving dish and smooth it out evenly.
- Gently press the Biscoff cookies vertically or layer them into the yogurt.
- Arrange the cookies so they are mostly covered by the yogurt.
- Cover the container with a lid or wrap.
- Place it in the refrigerator for at least 6–8 hours or overnight.
- Once chilled, the cookies will soften and the mixture will firm up.
- Scoop or slice and serve directly from the dish.
3. No-Bake Lemon Tart
Preparing a tart without turning on the oven is a practical way to enjoy a bright dessert during the summer months. This recipe uses a simple pressed crust and a stovetop filling, making it a reliable choice for a weekend lunch or a casual gathering.
The filling relies on the natural thickening properties of citrus and heat to create a smooth, custard-like center. By allowing the tart to set in the refrigerator, the flavors have time to meld while the base becomes firm enough to slice cleanly.
The final result features a sharp, citrusy punch that is tempered by the buttery sweetness of the crust. Its texture is silky and cool, providing a light finish that feels substantial without being heavy.
Servings: 8 servings
Ingredients
- 1 1/2 cups graham cracker crumbs
- 6 tablespoons unsalted butter, melted
- 2 tablespoons granulated sugar
- 1 can (14 oz) sweetened condensed milk
- 3 large egg yolks
- 1/2 cup fresh lemon juice
- 1 tablespoon lemon zest
- Whipped cream for garnish
Instructions
- Combine the graham cracker crumbs, melted butter, and sugar in a bowl, stirring until the crumbs are evenly moistened.
- Press the mixture firmly into the bottom and up the sides of a 9-inch tart pan with a removable bottom.
- Chill the crust in the refrigerator for at least 30 minutes to ensure it is stable.
- Whisk the egg yolks and sweetened condensed milk together in a medium saucepan until thoroughly combined.
- Stir in the lemon juice and cook over medium-low heat, stirring constantly, for about 5 to 8 minutes until the mixture thickens slightly.
- Remove the pan from the heat and stir in the lemon zest.
- Pour the lemon filling into the chilled crust and smooth the surface with a spatula.
- Let the tart cool to room temperature before transferring it to the refrigerator.
- Chill for at least 4 hours, or until the filling is completely set and cold.
- Remove the tart from the pan and garnish the edges with dollops of whipped cream before serving.
4. Salted Caramel Cookie Dough Bark
A simple no-bake dessert with layers of chocolate and cookie dough. This salted caramel cookie dough bark combines a soft dough base with melted chocolate and a light caramel drizzle.
It works well as a quick dessert, snack, or something to make ahead and store in the fridge or freezer. The easy layering method makes it practical without needing baking.
The texture is firm on the outside with a soft, slightly chewy center. The flavor balances sweet chocolate with rich caramel and a light touch of salt in every bite.
Servings: 3
Ingredients
- 1 cup almond flour
- ¼ cup melted butter or coconut oil
- ¼ cup brown sugar or maple syrup
- ½ teaspoon vanilla extract
- ¼ teaspoon salt
- ½ cup chocolate chips
- 1 cup chocolate chips (for topping)
- 3 tablespoons caramel sauce
- Flaky salt (for topping)
Instructions
- In a bowl, mix almond flour, melted butter or oil, brown sugar or maple syrup, vanilla extract, and salt until a soft dough forms.
- Fold in ½ cup chocolate chips and mix gently.
- Line a tray with parchment paper and press the dough into an even layer.
- Place the tray in the freezer for about 10 minutes to firm up.
- Melt 1 cup chocolate chips until smooth.
- Pour the melted chocolate over the chilled dough and spread evenly.
- Drizzle caramel sauce over the top.
- Sprinkle flaky salt lightly over the surface.
- Freeze for 20–30 minutes until fully set.
- Break into pieces and serve chilled.
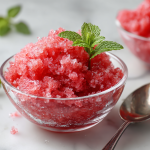
5. Watermelon and Lime Popsicles
Frozen fruit bars are a straightforward solution for staying cool during the peak of summer. Using fresh melon as the primary base allows for a snack that is both hydrating and easy to prepare in batches for outdoor activities or afternoon breaks.
The process involves blending fresh ingredients and allowing them to freeze until solid, requiring very little active kitchen time. Because these popsicles rely on the natural juices of the fruit, they offer a clean and crisp alternative to heavier dairy-based frozen desserts.
These popsicles have a grainy, icy texture that highlights the refreshing quality of the melon. The addition of citrus provides a sharp contrast to the sweetness, resulting in a flavor profile that is bright, tangy, and naturally light.
Servings: 6 to 8 popsicles
Ingredients
- 4 cups fresh watermelon, cubed and seeds removed
- 2 tablespoons fresh lime juice
- 1 tablespoon honey or agave nectar
- 1 teaspoon lime zest
- Small lime slices for garnish
Instructions
- Place the cubed watermelon, lime juice, and honey into a high-speed blender.
- Blend on high until the mixture is completely liquefied and no chunks of fruit remain.
- Stir in the lime zest by hand to ensure it is distributed evenly throughout the liquid.
- Taste the mixture and add a small amount of extra sweetener if the watermelon is not naturally sweet enough.
- If a smoother texture is preferred, pour the liquid through a fine-mesh strainer into a pitcher to remove any excess pulp.
- Place one thin lime slice into each popsicle mold, pressing it against the side so it stays visible.
- Carefully pour the watermelon mixture into the molds, leaving about a quarter-inch of space at the top to allow for expansion during freezing.
- Insert the popsicle sticks into the center of each mold.
- Freeze the molds for at least 4 to 6 hours, or until the popsicles are completely solid.
- To unmold, run the outside of the molds under warm water for a few seconds to loosen the sides before gently pulling the sticks.
6. Strawberry Shortcake Crunch Icebox Cake
This chilled dessert captures the familiar flavors of a classic fruit pastry in a format that requires no oven time. By layering cookies and cream, you create a soft, cake-like structure that is convenient for feeding a group at a summer lunch or a potluck.
The assembly relies on the refrigerator to transform the crisp layers into a tender consistency over several hours. This method is particularly useful for preparing ahead of time, as the structure of the cake improves the longer it sits and settles.
The texture is a combination of light, airy cream and softened cookies, punctuated by the crunch of a homemade topping. Every bite features a mild sweetness and the bright, juicy flavor of fresh berries, making it a refreshing option for warm weather.
Servings: 12 servings
Ingredients
- 2 cups heavy whipping cream, chilled
- 1/2 cup powdered sugar
- 1 teaspoon vanilla extract
- 1 pound fresh strawberries, hulled and sliced
- 2 sleeves golden Oreo cookies
- 3 tablespoons unsalted butter, melted
- 1/2 small box strawberry gelatin powder
Instructions
- Place 15 golden Oreo cookies in a food processor and pulse until they become fine crumbs.
- Transfer the crumbs to a bowl, add the strawberry gelatin powder and melted butter, and stir until the mixture looks like red sand; set this aside for the topping.
- In a large chilled bowl, beat the heavy whipping cream, powdered sugar, and vanilla extract until stiff peaks form.
- Spread a very thin layer of the whipped cream on the bottom of an 8×8-inch baking dish to keep the cookies in place.
- Arrange a single layer of whole golden Oreo cookies over the cream, breaking them if needed to fill the gaps.
- Spread one-third of the remaining whipped cream over the cookies, followed by a layer of sliced strawberries.
- Repeat the layers of cookies, cream, and strawberries until all ingredients are used, finishing with a final layer of whipped cream.
- Sprinkle the strawberry-cookie crumb mixture generously over the top layer of cream until completely covered.
- Cover the pan with plastic wrap and refrigerate for at least 6 hours, or overnight, to allow the cookies to soften into a cake-like texture.
- Slice into squares and serve chilled directly from the refrigerator.
7. No-Bake Coffee Mousse
Preparing a light, whipped dessert is a simple way to enjoy a caffeine-inspired treat without much effort. This mousse uses a few basic pantry items to create a soft, airy dish that works well as a quick evening pick-me-up or a chilled finale to a weekend lunch.
The process involves dissolving coffee granules into a base before folding in air to achieve a voluminous shape. Because it requires no heat and very little active preparation, it is a practical recipe for those who need a reliable dessert that can be assembled in minutes.
The texture is notably silky and light, melting quickly on the tongue. It carries a robust roasted flavor that is softened by the cream, resulting in a balanced taste that is neither too bitter nor overly sweet.
Servings: 4 servings
Ingredients
- 2 cups heavy whipping cream, cold
- 1/2 cup powdered sugar
- 2 tablespoons instant coffee granules
- 1 tablespoon hot water
- 1 teaspoon vanilla extract
- Chocolate shavings for garnish
Instructions
- Combine the instant coffee granules and hot water in a small cup, stirring until the coffee is completely dissolved and forms a thick liquid.
- Pour the cold heavy whipping cream into a large, chilled mixing bowl.
- Add the powdered sugar and vanilla extract to the cream.
- Begin beating the cream on low speed, gradually increasing to medium-high as it starts to thicken.
- Pour the dissolved coffee mixture into the cream while continuing to whisk.
- Beat the mixture until stiff peaks form, being careful not to over-mix and turn the cream into butter.
- Spoon the mousse into individual serving glasses or ramekins.
- Place the glasses in the refrigerator for at least 1 hour to allow the mousse to set and the flavors to deepen.
- Top with a light dusting of chocolate shavings just before serving.
8. Frozen Peanut Butter and Pretzel Pie
Combining salty and sweet elements makes this frozen pie a reliable option for casual gatherings or family desserts. The use of a crushed pretzel base provides a sturdy foundation that contrasts with the smooth, chilled filling, offering a different take on traditional pastry crusts.
The assembly is quick and requires only the freezer to set the components into a sliceable form. It is a practical choice for meal prep, as the pie can be made well in advance and kept frozen until it is time to serve.
The texture is dense and creamy, similar to a firm ice cream, while the crust remains crisp and brittle. Each slice delivers a strong nuttiness balanced by the salt of the pretzels, creating a savory and sweet profile that is very satisfying.
Servings: 8 servings
Ingredients
- 2 cups crushed pretzels
- 1/2 cup unsalted butter, melted
- 1/4 cup granulated sugar
- 1 cup creamy peanut butter
- 1 package (8 oz) cream cheese, softened
- 1 cup powdered sugar
- 1 container (8 oz) whipped topping, thawed
- 1/4 cup chocolate syrup for drizzling
Instructions
- Mix the crushed pretzels, melted butter, and granulated sugar in a medium bowl until the pretzels are evenly coated.
- Press the mixture firmly into the bottom and up the sides of a 9-inch pie plate to create an even crust.
- Place the crust in the freezer for 15 minutes to firm up while you prepare the filling.
- Beat the softened cream cheese and creamy peanut butter together in a large bowl until the mixture is completely smooth.
- Add the powdered sugar to the peanut butter mixture and continue beating until well combined.
- Gently fold in the whipped topping using a spatula until no white streaks remain, being careful not to deflate the mixture.
- Spoon the filling into the chilled pretzel crust and smooth the top with a spatula.
- Drizzle the chocolate syrup over the top of the pie in a decorative pattern.
- Cover the pie and freeze for at least 4 to 6 hours, or until the center is firm.
- Remove from the freezer 10 minutes before slicing to make serving easier.
9. Chilled Passionfruit Crème Pot Mousse
Serving a fruit-based cream in individual pots is an efficient way to provide a light dessert for a lunch gathering or a structured dinner. This recipe uses the natural acidity of passionfruit to set the cream, resulting in a smooth finish without the need for complex techniques.
The preparation is quick and relies on a few high-quality ingredients to achieve a dense, custard-like consistency. By allowing the pots to chill thoroughly, the flavors intensify and the texture stabilizes, making it an ideal make-ahead option for busy schedules.
The mousse features a velvety mouthfeel that contrasts with the bright, tropical sharpness of the fruit. It offers a clean sweetness that is balanced by a distinct tang, providing a refreshing palate cleanser that feels elegant yet simple.
Servings: 4 servings
Ingredients
- 1 1/2 cups heavy whipping cream
- 1/2 cup granulated sugar
- 1/2 cup passionfruit pulp (seeds included or strained)
- 1 tablespoon fresh lime juice
- 1 teaspoon vanilla extract
- Fresh mint leaves for garnish
Instructions
- Combine the heavy whipping cream and granulated sugar in a medium saucepan over medium heat.
- Stir the mixture constantly until the sugar dissolves and the cream just begins to reach a gentle boil.
- Reduce the heat and let the cream simmer for exactly 3 minutes, stirring occasionally to prevent scorching.
- Remove the saucepan from the heat and whisk in the passionfruit pulp, lime juice, and vanilla extract.
- Let the mixture sit at room temperature for about 10 minutes to cool slightly and begin the thickening process.
- Pour the liquid evenly into four small ramekins or glass jars.
- Tap the containers gently on the counter to remove any air bubbles from the surface.
- Place the pots in the refrigerator and chill for at least 4 hours, or overnight, until completely set.
- Serve the pots cold, topped with a fresh mint leaf for a touch of color.
10. No-Bake Lemon Raspberry Yogurt Bark Clusters
Creating small clusters of frozen yogurt is a simple way to prepare a portion-controlled snack that stays fresh in the freezer. This method uses a few basic ingredients to build a cold treat that works well for a quick breakfast addition or a light evening bite.
The process involves mixing a creamy base with fruit and citrus before freezing the mixture in small mounds. It is a practical alternative to a traditional large sheet of bark, as the individual clusters are easier to grab and serve without the need for breaking or cutting.
These clusters have a firm, icy snap that quickly transitions into a smooth texture as they melt. The flavor is defined by the sharp tartness of the berries and the bright citrus notes, which contrast with the mellow sweetness of the yogurt.
Servings: 12 clusters
Ingredients
- 2 cups plain Greek yogurt
- 1/4 cup honey
- 1 tablespoon lemon zest
- 1 tablespoon fresh lemon juice
- 1 cup fresh raspberries, slightly mashed
- 1/2 cup granola for topping
Instructions
- Line a large baking sheet with parchment paper or a silicone mat to prevent sticking.
- Whisk together the Greek yogurt, honey, lemon zest, and lemon juice in a medium bowl until the mixture is completely smooth.
- Gently fold the mashed raspberries into the yogurt mixture, leaving some streaks of color for a marbled appearance.
- Use a large spoon or an ice cream scoop to drop the yogurt mixture into 12 even mounds onto the prepared baking sheet.
- Flatten each mound slightly with the back of the spoon to create a thick disc shape.
- Sprinkle a generous amount of granola over the top of each cluster, pressing it down lightly so it adheres to the yogurt.
- Place the baking sheet in the freezer for at least 3 hours, or until the clusters are frozen solid.
- Peel the frozen clusters off the parchment paper and serve immediately.
- Store any remaining clusters in a sealed freezer-safe bag or container to maintain their texture.

hi there,
i’m Austin
A photographer who loves to cook. During the day, I take pictures, but at night, I dive into the world of flavors and recipes.
know more