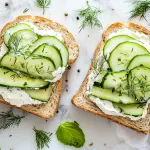
Beach picnics are all about simple food that’s easy to pack, refreshing to eat, and doesn’t turn messy in the heat. The best options are usually light, portable, and easy to enjoy straight from a cooler or picnic basket. That way, you spend less time prepping and more time relaxing by the water.
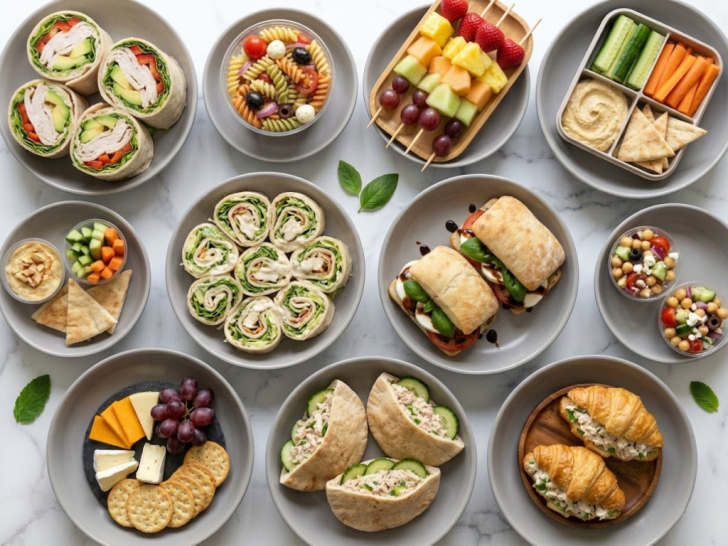
After reviewing both sources, one thing stands out clearly, wraps, pasta salads, fruit cups, snack boards, and finger foods continue to dominate beach picnic menus because they travel well and stay fresh longer. Fresh ingredients, make-ahead recipes, and easy-to-share dishes are especially popular for summer outings.
This list includes a mix of refreshing snacks, filling bites, and crowd-friendly favorites that work perfectly for a beach day. Everything is simple, low-fuss, and designed to hold up well outdoors without sacrificing flavor.
1. Turkey Avocado Wraps
Preparing Turkey Avocado Wraps is a practical way to assemble a high-protein, filling meal without turning on a single appliance. This recipe is highly effective because it relies on the creamy fat of the avocado to replace heavy condiments, while the turkey provides a lean, savory base. It is a reliable “no-cook” dinner that stays fresh and portable.
The process is efficient, a “layer and roll” operation that takes less than five minutes. Using large flour tortillas or even big collard green leaves makes this a versatile meal that balances “crunch” from fresh greens with the “smooth” texture of ripe avocado.
Servings: 2 wraps
Ingredients
- 2 large flour tortillas (or whole wheat/spinach wraps)
- 6–8 slices of high-quality deli turkey breast
- 1 ripe avocado, sliced or mashed
- 2 slices of provolone or swiss cheese
- 1 cup shredded romaine lettuce or spinach
- 4–6 thin slices of tomato
The Flavor Boost:
- 1 tablespoon Dijon mustard or pesto
- A squeeze of lime juice (to keep the avocado green)
- Salt and black pepper to taste
Instructions
- The Base: Lay the tortillas flat on a clean surface. Spread a thin layer of Dijon mustard or pesto over the center.
- The Creamy Layer: Add the avocado slices or mash.
Pro Tip: If you’re packing these for later, mash the avocado with a little lime juice first; the acidity prevents browning and helps the wrap stay shut. - The Protein: Layer the turkey slices and cheese over the avocado. Keeping the meat and cheese near the bottom provides a sturdy “core.”
- The Crunch: Pile on the shredded lettuce and tomato slices. Season with a pinch of salt and pepper.
- The Roll: Fold in the sides of the tortilla, then roll it up tightly from the bottom.
- The Cut: Slice diagonally in the middle for an easy-to-eat presentation.
2. Italian Pasta Salad Cups
Preparing Italian Pasta Salad Cups is a practical way to serve a classic crowd-pleaser in a portable, mess-free format. This recipe is highly effective because it uses a short pasta shape (like rotini or farfalle) to “trap” the vinaigrette and small diced ingredients, ensuring every bite is fully seasoned. Serving them in individual cups is an efficient way to manage portions and prevent the salad from getting “heavy” at the bottom of a large bowl.
The process is a simple “boil and toss” operation. By dicing the meats and cheeses into sizes similar to the pasta, you create a consistent texture that balances the “chew” of the noodles with the “snap” of fresh vegetables.
Servings: 6–8 individual cups
Ingredients
- 8 oz. (approx. 225g) rotini or fusilli pasta, cooked and cooled
- 1/2 cup salami or pepperoni, diced
- 1/2 cup mozzarella pearls or diced provolone
- 1/2 cup cherry tomatoes, halved
- 1/4 cup black olives, sliced
- 1/4 cup red onion, finely diced
- 1/4 cup green bell pepper, diced
- The Dressing:
- 1/2 cup Italian vinaigrette
- 1 teaspoon dried oregano
- 1/4 cup grated Parmesan cheese
- Optional: Fresh parsley and red pepper flakes
Instructions
- The Pasta: Cook the pasta in salted water until al dente. Drain and rinse with cold water immediately to stop the cooking process and remove excess starch.
Pro Tip: Rinsing with cold water is essential for pasta salad; it prevents the noodles from sticking together and keeps them firm when the dressing is added. - The Mix: In a large bowl, combine the cooled pasta, diced salami, cheese, tomatoes, olives, onions, and peppers.
- The Dressing: Pour the Italian vinaigrette over the mixture. Add the oregano and Parmesan cheese. Toss thoroughly until every piece is glistening.
- The Infusion: Let the salad sit in the refrigerator for at least 30 minutes. This allows the pasta to absorb the flavors of the vinaigrette.
- The Assembly: Spoon the salad into clear plastic or glass cups.
The “Party” Hack: Stick a small bamboo skewer or a fork into each cup so they are ready for guests to grab and go. - The Finish: Top with a final sprinkle of parsley or Parmesan before serving.
3. Fresh Fruit and Berry Skewers
Preparing Fresh Fruit and Berry Skewers is a practical way to serve fruit that is interactive and visually striking. This recipe is highly effective because it prevents the “soggy bottom” issue of a traditional fruit salad bowl by keeping each piece of fruit independent and aerated. It is an efficient “no-cook” dessert or side that works just as well for a casual backyard hangout as it does for a structured brunch.
The process is a simple “wash, prep, and thread” operation. By arranging the fruit in a specific color order (like a rainbow), you create an appealing presentation without needing any special culinary skills. The addition of a light honey-lime glaze or a side of yogurt dip transforms simple produce into a finished dish.
Servings: 10–12 skewers
Ingredients
- 1 pint strawberries, hulled
- 1 pint blueberries
- 1 pint blackberries or raspberries
- 2 kiwis, peeled and cubed
- 1/2 fresh pineapple, cubed
- 1/2 cantaloupe or honeydew, balled or cubed
- 10–12 wooden or bamboo skewers
The Optional Glaze:
- 1 tablespoon honey
- 1 teaspoon lime juice
- Fresh mint leaves for garnish
Instructions
- The Prep: Wash all berries and pat them dry. Cube the larger fruits (pineapple, melon, kiwi) into uniform 1-inch pieces.
Pro Tip: Uniformity is the secret to a professional-looking skewer. If the pineapple chunks are twice the size of the strawberries, the skewers will look lopsided. - The Threading: Slide the fruit onto the skewers. For a “Rainbow” effect, follow this order:
- Red: Strawberry
- Orange: Cantaloupe
- Yellow: Pineapple
- Green: Kiwi
- Blue/Purple: Blueberry and Blackberry
- The Glaze: In a tiny bowl, whisk the honey and lime juice. Lightly brush the fruit just before serving. This adds a beautiful “glassy” shine and prevents the fruit from drying out.
- The Chill: Keep the skewers on a platter in the refrigerator until the moment you are ready to serve.
- The Presentation: Lay them flat on a white platter or poke them into a halved melon for a standing “fruit bouquet.”
4. Hummus Veggie Snack Box
Preparing a Hummus Veggie Snack Box is a practical way to ensure you have a balanced, protein-rich meal or snack ready to go. This recipe is highly effective because it uses a “compartmentalized” approach, keeping dry ingredients away from moist ones to maintain texture and freshness. It is an efficient “no-cook” solution for long afternoons or quick desk lunches.
The process is a simple “assembly line” operation. By combining complex carbohydrates, healthy fats, and fiber, you create a satiating meal that prevents energy crashes. The variety of colors and textures makes it feel more like a gourmet bistro box than a simple snack.
Servings: 1 box
Ingredients
- 1/2 cup classic or roasted red pepper hummus
- 1/2 cup cucumber slices or “baby” cucumbers
- 1/2 cup bell pepper strips (red, orange, or yellow)
- 1/4 cup cherry tomatoes
- 1/4 cup baby carrots or radishes
The “Crunch” & Protein:
- 1/4 cup whole-wheat crackers or pita bread triangles
- 1 hard-boiled egg, halved
- 1 tablespoon almonds or walnuts
- 1–2 ounces of cubed feta or cheddar cheese
Instructions
- The Container: Use a bento-style box with dividers or small silicone cupcake liners to keep the ingredients separate.
- The Dip: Place the hummus in a small, leak-proof container or a dedicated compartment.
Pro Tip: Sprinkle a little smoked paprika or a drizzle of olive oil on top of the hummus to keep it from forming a “skin” and to add a punch of flavor. - The Veggie Prep: Slice the cucumbers and peppers into “batons” that are easy to dip. Pat the cherry tomatoes dry so they don’t roll around and create moisture.
- The Protein: If using a hard-boiled egg, peel it just before packing and season with a pinch of salt and pepper.
- The Assembly: Arrange the crackers and nuts in the driest section of the box. Place the cheese and egg near the veggies.
- The Storage: Keep the box refrigerated until ready to eat. These can be prepped up to 2 days in advance.
5. Chicken Caesar Pinwheel Wraps
Preparing Chicken Caesar Pinwheel Wraps is a practical way to transform a classic salad into a portable, bite-sized appetizer or meal. This recipe is highly effective because it uses a “cream cheese binder” to prevent the Caesar dressing from making the tortilla soggy, ensuring the wraps hold their shape. It is an efficient use of pre-cooked rotisserie chicken, making it a true no-cook staple.
The process is a simple “spread, layer, and roll” technique. By chilling the rolls before slicing, you achieve clean, professional-looking spirals that showcase the contrast between the green romaine, white chicken, and golden Parmesan.
Servings: 4–6 servings (approx. 24 pinwheels)
Ingredients
- 3 large flour tortillas (10-inch “Burrito” size)
- 2 cups cooked chicken breast, finely shredded or diced (Rotisserie chicken works perfectly)
- 2 cups romaine lettuce, very finely chopped
- 1/2 cup shredded Parmesan cheese
- 1/2 cup Caesar dressing (thick variety is best)
- 4 oz. (1/2 block) cream cheese, softened
- 1/4 teaspoon black pepper
- Optional: 1/4 cup crushed croutons (for internal crunch)
Instructions
- The Binder: In a medium bowl, whisk together the softened cream cheese and Caesar dressing until smooth.
Pro Tip: The cream cheese is the “secret” ingredient, it creates a moisture barrier that keeps the tortilla firm while adding a rich, tangy flavor that mimics the egg yolk in traditional Caesar dressing. - The Mix: Fold the shredded chicken, Parmesan cheese, and black pepper into the dressing mixture.
- The Spread: Lay the tortillas flat. Spread a thin, even layer of the chicken mixture over the entire surface, leaving a 1/2-inch border at the very top edge.
- The Green: Sprinkle the finely chopped romaine lettuce over the chicken layer. Press down lightly so the lettuce sticks to the base.
- The Roll: Roll each tortilla up as tightly as possible, starting from the bottom.
- The Chill: Wrap each log tightly in plastic wrap and refrigerate for at least 30–60 minutes.
Note: Do not skip the chilling! This “sets” the cream cheese so the pinwheels don’t fall apart when you cut them. - The Slice: Using a sharp serrated knife, trim the uneven ends, then slice the logs into 1-inch rounds.
6. Caprese Sandwich Sliders
Preparing Caprese Sandwich Sliders is a practical way to deliver the classic Italian trio of tomato, basil, and mozzarella in a substantial, handheld format. This recipe is highly effective because it relies on high-quality, fresh ingredients rather than complex cooking techniques. It is an efficient “no-cook” dinner or appetizer that focuses on the contrast between creamy cheese, acidic tomatoes, and the herbal punch of fresh pesto.
By using a pack of slider rolls (like Hawaiian or ciabatta rolls), you can assemble a large batch at once. The bread acts as a sponge for the balsamic glaze, ensuring that the flavors are contained within every bite.
Servings: 12 sliders
Ingredients
- 1 pack (12 count) slider rolls (sweet Hawaiian or mini ciabatta)
- 8 oz. fresh mozzarella (sliced into rounds or “pearls”)
- 3 large vine-ripened tomatoes, sliced
- 1/2 cup fresh basil leaves
- 1/4 cup basil pesto (store-bought or homemade)
- 2 tablespoons balsamic glaze (thick/reduction)
- 1 tablespoon extra-virgin olive oil
- Salt and black pepper to taste
Instructions
- The Bread: Slice the entire block of slider rolls in half horizontally so you have one large “top” and one large “bottom.”
- The Base: Spread a generous layer of basil pesto over the bottom half of the rolls. This provides a flavorful moisture barrier for the bread.
- The Cheese: Layer the fresh mozzarella slices evenly over the pesto.
Pro Tip: If your mozzarella is very “wet,” pat the slices dry with a paper towel before adding them to the sandwich to prevent the bread from becoming soggy. - The Tomatoes: Place the tomato slices on top of the cheese. Season the tomatoes directly with a pinch of salt and black pepper to draw out their juice.
- The Green: Layer the fresh basil leaves over the tomatoes.
- The Drizzle: Lightly drizzle the balsamic glaze and olive oil over the basil and tomatoes.
- The Cap: Place the top half of the rolls back on.
- The Slice: Use a serrated knife to cut between the individual rolls to create the sliders.
Note: For the best flavor, let the assembled sandwiches sit for 10 minutes before serving. This allows the balsamic and pesto to soak slightly into the bread.
7. Mediterranean Chickpea Salad Cups
Preparing Mediterranean Chickpea Salad Cups is a practical way to serve a protein-packed, plant-based dish that stays fresh and crisp. This recipe is highly effective because chickpeas are structurally sturdy—unlike leafy greens, they won’t wilt, making this an efficient option for “prep-ahead” meals. Serving them in individual cups ensures each portion has the perfect ratio of briny olives, creamy feta, and zesty dressing.
The process is a simple “drain, dice, and dump” operation. The combination of textures—the “pop” of the chickpeas, the “crunch” of cucumbers, and the “softness” of the feta—creates a complete sensory experience in a small, portable container.
Servings: 6–8 individual cups
Ingredients
- 2 cans (15 oz each) chickpeas (garbanzo beans), drained and rinsed
- 1 English cucumber, diced
- 1 pint cherry tomatoes, halved or quartered
- 1/2 red onion, finely diced
- 1/2 cup Kalamata olives, sliced
- 1/2 cup crumbled feta cheese
- 1/4 cup fresh parsley, chopped
The Lemon-Herb Vinaigrette:
- 1/4 cup extra-virgin olive oil
- 2 tablespoons fresh lemon juice
- 1 tablespoon red wine vinegar
- 1 clove garlic, minced
- 1 teaspoon dried oregano
- 1/2 teaspoon salt and 1/4 teaspoon black pepper
Instructions
- The Chickpeas: Rinse the chickpeas thoroughly under cold water.
Pro Tip: For a better texture, pat the chickpeas dry with a clean kitchen towel before mixing. This helps the dressing cling to them rather than sliding off. - The Veggie Prep: Dice the cucumber, onion, and tomatoes into pieces roughly the same size as the chickpeas. Uniformity makes it easier to eat out of a cup.
- The Dressing: In a small jar or bowl, whisk together the olive oil, lemon juice, vinegar, garlic, oregano, salt, and pepper.
- The Toss: In a large bowl, combine the chickpeas, cucumber, tomatoes, onion, olives, and parsley. Pour the dressing over the top and toss to coat.
- The Feta: Gently fold in the feta cheese at the very end to keep the crumbles intact.
- The Assembly: Spoon the salad into clear cups.
The “Make-Ahead” Rule: These actually taste better after sitting for 20 minutes, as the chickpeas soak up the lemon and garlic. They can be refrigerated for up to 3 days.
8. Cheese Crackers and Grapes Board
Assembling a Cheese, Crackers, and Grapes Board is the most practical way to provide a sophisticated, shared dining experience without any cooking. This “recipe” is highly effective because it relies on the classic pairing of salt, fat, and sugar, where the crispness of a cracker meets the creaminess of cheese and the burst of a cold grape. It is an efficient, elegant solution for a light dinner or a social centerpiece.
The strategy here is all about variety and layout. By offering different textures (hard vs. soft cheese) and flavors (sweet grapes vs. savory crackers), you ensure there is a perfect combination for every palate.
Servings: 4–6 people
Ingredients
- The Cheeses (Choose 3):
- 1 wedge of sharp Cheddar (firm/savory)
- 1 wheel of Brie or Camembert (soft/creamy)
- 1 wedge of Manchego or Gouda (nutty/salty)
The Grapes:
- 2 large bunches of red and green seedless grapes (kept on the vine for aesthetics)
- The Crackers:
- 1 box assorted “entertainment” crackers (water crackers, multigrain, and butter rounds)
The Extras:
- 1/2 cup raw almonds or marcona almonds
- 1 small jar of honey or fig jam (for drizzling on the soft cheese)
- Fresh rosemary or thyme sprigs (for garnish)
Instructions
- The Foundation: Choose a large wooden cutting board, a slate slab, or even a clean baking sheet.
- The Anchor: Place your cheeses on the board first. Space them out to create “stations.”
Pro Tip: Take the cheese out of the fridge 30 minutes before serving. Cheese tastes significantly better at room temperature as the fats soften and release their full aroma. - The Grapes: Place the grape bunches near the cheeses.
The “Vine” Rule: Keep the grapes in small clusters on the stem. This looks more abundant and makes it easier for guests to grab a small portion without chasing individual grapes around the board. - The “River”: Arrange the crackers in a flowing line or “river” that curves between the cheese and grapes. This guides the eye across the board.
- The Fillers: Use the almonds and small bowls of honey or jam to fill in any “bald spots” on the board.
- The Finish: Tuck a few sprigs of fresh herbs under the cheese or grapes for a pop of color and a fresh scent.
9. Tuna Cucumber Pita Pockets
Preparing Tuna Cucumber Pita Pockets is a practical way to enjoy a high-protein, refreshing meal that requires zero stove time. This recipe is highly effective because the pita acts as a sturdy vessel for the tuna salad, while the cucumbers provide a necessary “snap” that keeps the sandwich from feeling heavy. It is an efficient “no-cook” dinner that is especially useful for a quick meal on a warm day.
By incorporating the cucumber both inside the tuna mix and as a liner for the pita, you create a moisture barrier that prevents the bread from getting soft. The result is a clean, bright flavor profile with a satisfying crunch.
Servings: 2–4 pockets
Ingredients
- 2 large pita breads (halved to make 4 pockets)
- 2 cans (5 oz each) tuna in water, drained
- 1/2 English cucumber (half diced, half thinly sliced)
- 1/4 cup Greek yogurt or mayonnaise
- 1 tablespoon Dijon mustard
- 1/4 cup red onion, finely diced
- 1 tablespoon fresh dill or parsley, chopped
- 1 tablespoon lemon juice
- Salt and black pepper to taste
- Optional: A handful of baby spinach or sprouts
Instructions
- The Tuna Mix: In a medium bowl, flake the drained tuna with a fork. Add the Greek yogurt (or mayo), mustard, diced red onion, diced cucumber, lemon juice, and herbs.
Pro Tip: Using Greek yogurt instead of mayo adds a tangy zip and increases the protein content without adding heavy fats. - The Seasoning: Stir everything together until well combined. Season generously with salt and black pepper.
- The Pita Prep: Warm the pitas for 10 seconds in the microwave just to make them pliable, then slice them in half. Carefully open the pockets.
- The “Barrier” Layer: Slide the thin cucumber slices (and spinach, if using) into the pita first, lining the walls of the pocket.
Note: This step is crucial! The cucumber slices act as a shield, keeping the tuna salad from soaking directly into the pita bread if you aren’t eating it immediately. - The Stuffing: Spoon the tuna mixture into the pockets, packing it gently but firmly.
- The Finish: Serve immediately, or wrap tightly for a portable lunch.
10. Mini Croissant Chicken Salad Sandwiches
Preparing Mini Croissant Chicken Salad Sandwiches is a practical way to serve a meal that feels indulgent yet requires zero cooking. This recipe is highly effective because the buttery, flaky layers of the croissant provide a rich contrast to a bright, crunchy chicken salad. It is an efficient “no-cook” dinner or brunch staple that utilizes pre-cooked rotisserie chicken to save time.
The strategy here focuses on texture. By adding grapes for sweetness and celery for crunch, you create a balanced filling that doesn’t overwhelm the delicate pastry. These are perfect for a light meal that looks sophisticated with minimal assembly.
Servings: 12 mini sandwiches
Ingredients
- 12 mini croissants
- 3 cups cooked chicken breast, shredded or cubed (Rotisserie chicken is ideal)
- 1/2 cup mayonnaise (or a mix of mayo and Greek yogurt)
- 1/2 cup red grapes, halved or quartered
- 1/2 cup celery, finely diced
- 1/4 cup sliced almonds or chopped pecans
- 1 tablespoon fresh lemon juice
- 1 teaspoon Dijon mustard
- 1/2 teaspoon salt and 1/4 teaspoon black pepper
- The “Green” Layer: 12 small butter lettuce leaves
Instructions
- The Prep: In a large bowl, whisk together the mayonnaise, lemon juice, Dijon mustard, salt, and pepper until smooth.
- The Mix: Add the chicken, celery, grapes, and nuts to the bowl. Toss gently until everything is evenly coated in the dressing.
Pro Tip: If you have time, let the chicken salad chill in the fridge for 30 minutes before assembling. This allows the flavors to meld and the dressing to thicken slightly. - The Croissants: Use a serrated knife to slice the mini croissants in half horizontally.
Note: Try not to cut all the way through the back of the croissant; keeping a small “hinge” helps the filling stay inside the sandwich while eating. - The Assembly: Place a small leaf of butter lettuce on the bottom half of each croissant.
The “Dry” Rule: The lettuce isn’t just for color—it acts as a moisture barrier to keep the creamy chicken salad from making the croissant soggy. - The Stuffing: Spoon a generous amount of chicken salad onto the lettuce and close the top.
- The Finish: Serve immediately. If you need to transport them, keep them in a single layer in a rigid container to avoid crushing the flaky pastry.

hi there,
i’m James
The home cook and food blogger behind Beyond the Bayou Blog. Cooking has always been my happy place.
know more