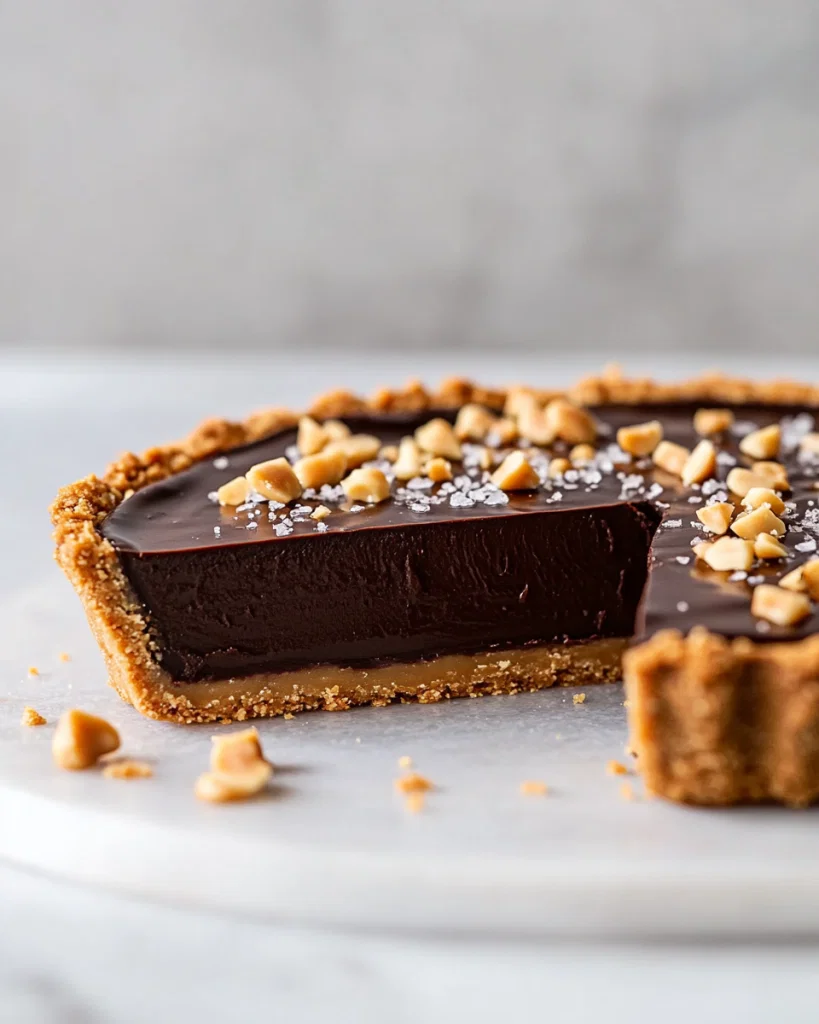
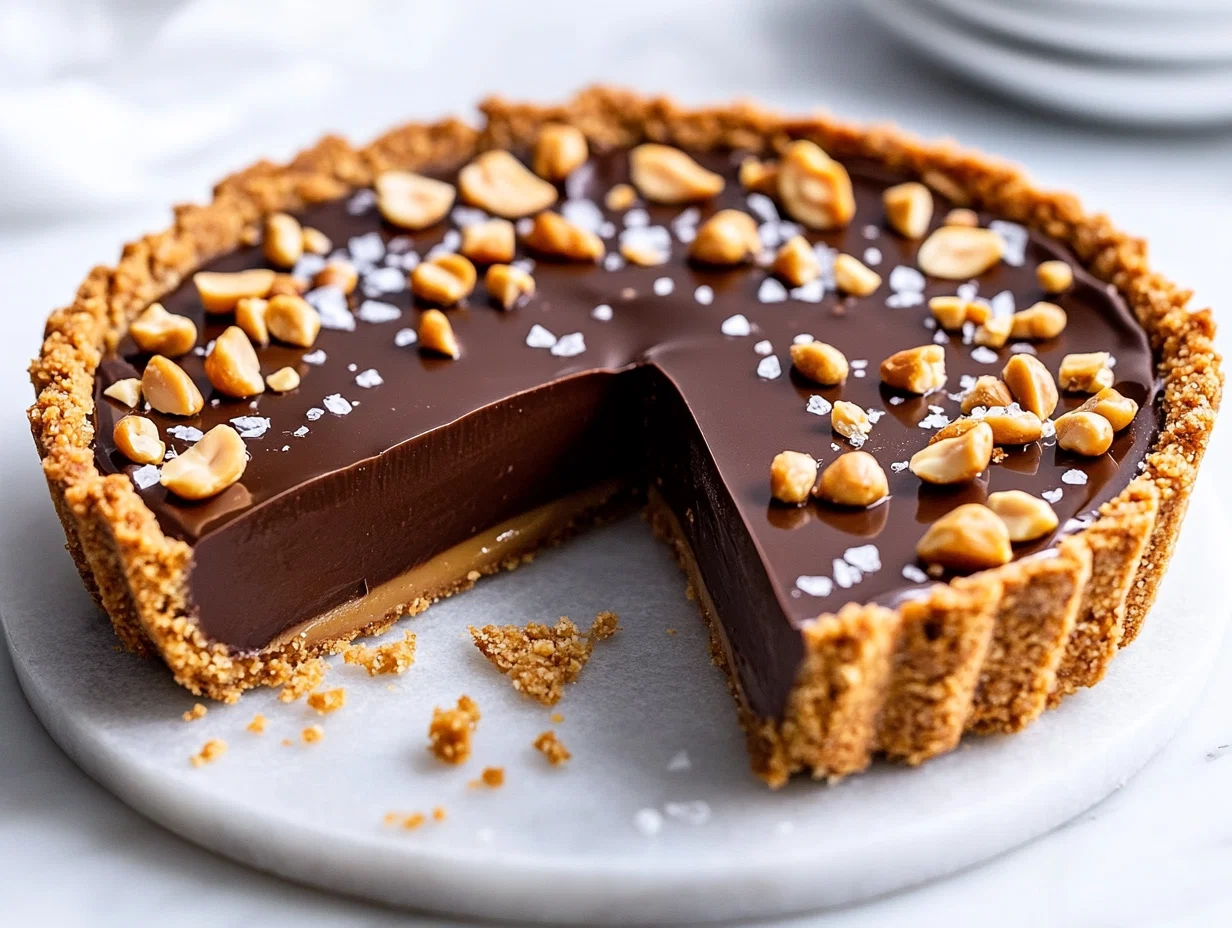
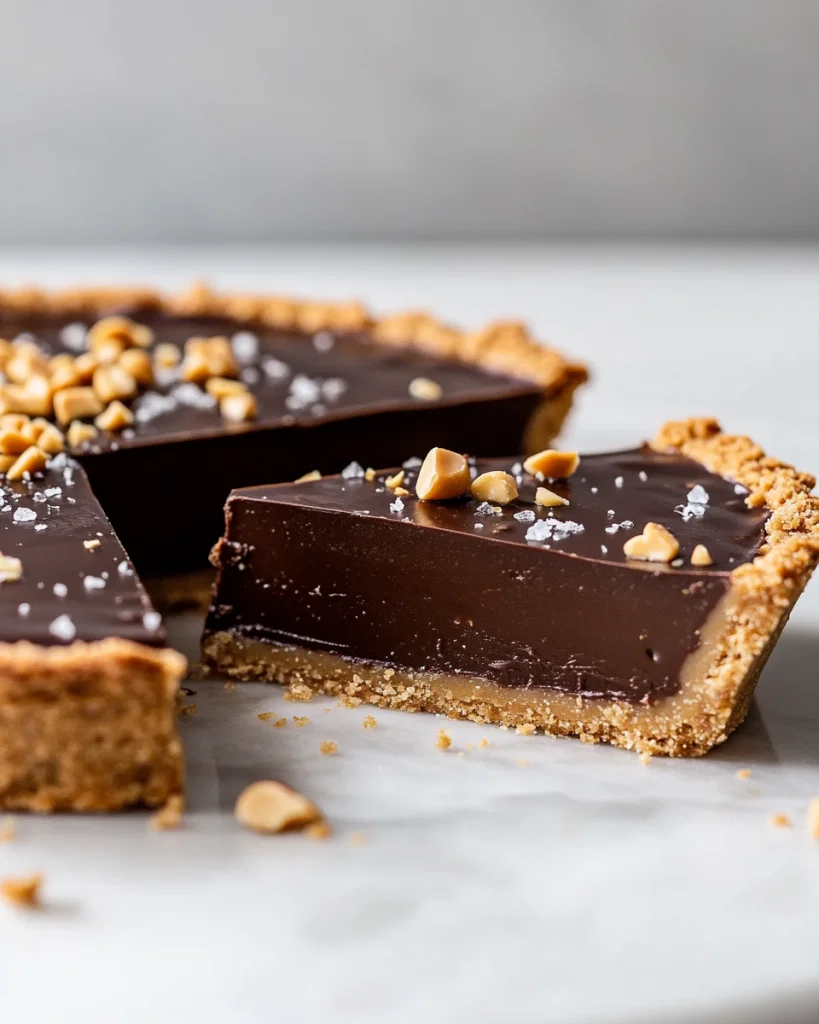
This tart isn’t just about the flavor, it’s about the experience—the way the silky ganache melts on your tongue, the crunch of the buttery crust, the salty-sweet punch of peanut butter. I love how it’s a messy, imperfect kind of dessert, not polished but full of character.
Making it feels like a little act of rebellion—breaking the rules of perfect presentation to create something deeply satisfying and honest. It’s a reminder that dessert should bring joy, not stress. Plus, it’s a crowd-pleaser, even if you’re just sneaking bites late at night.
A cook’s notes style focusing on the sensory experience of making and tasting this tart, emphasizing texture, smell, and visual cues.
Why This Tart Matters to Me
- I love how the smell fills the kitchen as the crust bakes—toast and butter, warm and inviting.
- There’s a little chaos in every slice—cracks, smudges, and all—and that’s part of the charm.
- Getting the ganache just right is my favorite part, shiny and smooth, like liquid velvet.
My Inspiration Behind the Chocolate Peanut Butter Tart
I first made this tart during a hectic holiday season when I needed something quick but impressive. It turned out to be a hit, and now I keep it as my go-to for unexpected guests or midnight cravings. The mix of sweet, salty, and creamy textures makes it endlessly satisfying. It’s a reminder that simple ingredients can create something memorable. I like to experiment with toppings—salted caramel, chopped pretzels, or even a dusting of flaky sea salt—each adding a new dimension.
Origins and Trivia of the Chocolate Peanut Butter Tart
- This recipe is inspired by classic American no-bake cheesecakes but with a rich chocolate twist.
- Peanut butter and chocolate have a long history of pairing, dating back to early 20th-century candy bars.
- Graham crackers, originally from the U.S., are the traditional crust base, offering a sweet, buttery crunch.
Ingredient Insights for the Chocolate Peanut Butter Tart
- Chocolate: I prefer 70% dark chocolate—rich, smooth, with a slight bitterness. Swap for semi-sweet if you like sweeter.
- Peanut Butter: Creamy peanut butter gives a silky fill. Natural or organic varieties work well, but expect a bit oil separation—stir well.
- Graham Crackers: Adds a sweet, buttery crunch. For a gluten-free version, try digestive biscuits or almond flour crust.
- Heavy Cream: Creates that glossy ganache. Coconut cream can be a dairy-free alternative, with a slightly different flavor.
- Butter: Binds the crust. Use melted butter for ease. Margarine can work but alters flavor.
Spotlight on Key Ingredients
Peanut Butter:
- Chocolate: Its tempering temperature is crucial for shine and snap. Melt gently over low heat, avoid overheating.
- During melting, chocolate should be smooth and shiny, not grainy or dull.
Graham Crackers:
- Peanut Butter: It should be creamy and smooth, not oily or gritty. Stir thoroughly before spreading.
- Aromatic, it’s the salty-sweet heart of the tart. Slightly warm for easier spreading.
Ingredient Substitutions for Different Diets and Preferences
- Dairy-Free: Swap heavy cream for coconut cream—richer, with a subtle coconut aroma.
- Gluten-Free: Replace graham crackers with gluten-free cookies or crushed almonds.
- Sugar-Free: Use a sugar substitute like erythritol in the crust, but watch for texture differences.
- Vegan: Use dairy-free chocolate and coconut oil instead of butter.
- Salted: Add a pinch of sea salt to enhance flavors or omit for a sweeter profile.
Equipment & Tools
- Food processor: Crush the graham crackers.
- Mixing bowl: Combine crust ingredients and mix the filling.
- Saucepan: Heat the cream.
- Spatula: Mix and smooth the ganache.
- Springform pan: Bake and serve the tart.
Step-by-step guide to the Chocolate Peanut Butter Tart
- Preheat oven to 180°C (350°F).
- Mix crushed graham crackers, melted butter, and a pinch of salt. Press into a 23cm (9-inch) tart pan. Bake for 10 minutes until golden.
- Let the crust cool completely.
- Heat heavy cream until just simmering. Pour over chopped chocolate; stir until smooth and glossy. Add vanilla or a pinch of sea salt if desired.
- Spread a thick layer of peanut butter over the cooled crust. Chill for 30 minutes.
- Pour the warm ganache over the peanut butter layer, smoothing with a spatula.
- Chill the tart in the fridge for at least 4 hours, preferably overnight.
- Before serving, decorate with chopped peanuts or chocolate shavings.
Chill the assembled tart for at least 4 hours, ideally overnight. Before serving, bring to room temperature for the best flavor and texture. Slice with a sharp, hot knife for clean cuts.
How to Know It’s Done
- Crust is golden and fragrant.
- Ganache is shiny and set but still slightly soft.
- Peanut butter layer is firm but spreadable, not greasy or oily.
Chocolate Peanut Butter Tart
Equipment
- Food Processor
- Saucepan
- Spatula
- Springform Pan
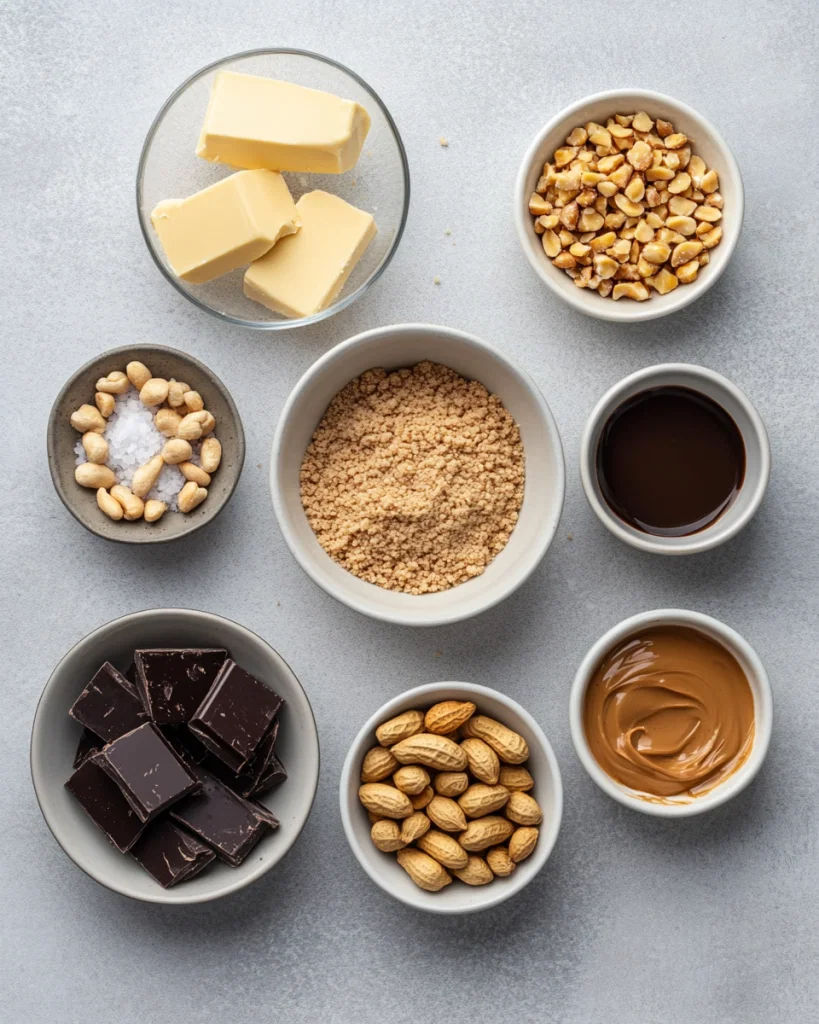
Ingredients
- 1 1/2 cups Graham cracker crumbs or crushed digestive biscuits or gluten-free cookies
- 1/4 cup unsalted butter melted
- 1/4 tsp salt optional, enhances flavor
- 1 cup creamy peanut butter natural or organic preferred
- 1 1/2 cups dark chocolate at least 70%, chopped
- 1 cup heavy cream or coconut cream for dairy-free
Instructions
- Start by crushing the graham crackers into fine crumbs using your food processor, or place them in a bag and crush with a rolling pin. Pour the crumbs into a mixing bowl.
- Mix the melted butter and salt into the graham cracker crumbs until evenly combined. The mixture should resemble damp sand.
- Press this crumb mixture firmly into the bottom of a springform pan, using the bottom of a glass to compact it evenly. Bake in a preheated oven at 180°C (350°F) for about 10 minutes until golden and fragrant. Let cool completely.
- While the crust cools, heat the heavy cream in a saucepan over medium heat until it just begins to simmer, with small bubbles forming around the edges.
- Pour the hot cream over the chopped dark chocolate in a bowl. Let sit for a minute, then stir gently until the ganache is smooth, glossy, and velvety. Allow it to cool slightly but remain pourable.
- Spread a generous layer of peanut butter over the cooled crust, smoothing it out with a spatula for an even base.
- Pour the warm ganache carefully over the peanut butter layer, smoothing the top with a spatula. The ganache should spread evenly, covering the entire surface.
- Place the tart in the fridge and chill for at least 4 hours, preferably overnight, until the ganache is set and shiny.
- Before serving, optionally decorate with chopped peanuts, chocolate shavings, or a sprinkle of flaky sea salt for added texture and visual appeal.
Notes
Nutrition
Cooking Tips & Tricks for a Perfect Tart
- Use room temperature cream for a smoother ganache.
- Press crust firmly for a sturdy base; use the bottom of a glass to pack it.
- Chill layers separately to prevent mixing and ensure sharp layers.
- Warm the peanut butter slightly to spread easily.
- Use a hot knife for clean slices, wiping between cuts.
Common Mistakes and How to Fix Them
- FORGOT TO COOL THE CRUST? → Reheat briefly at 150°C (300°F), re-press into pan.
- DUMPED THE GANACHE? → Keep it warm and pour slowly, smoothing with a spatula.
- OVER-TORCHED CHOCOLATE? → Add a splash of hot cream to salvage and stir until smooth.
- CRACKED TOP? → Gently rewarm and smooth with a spatula, then chill again.
Quick Fixes for Common Tart Troubles
- When ganache is too thick, gently warm it to loosen.
- Splash a tiny bit of hot water on the knife for cleaner cuts.
- Patch cracks in the crust with extra crumbs and butter.
- Shield the tart with foil if edges brown too quickly.
- If the tart is too soft, chill longer or add a bit more chocolate to firm up.
What to Serve With Chocolate Peanut Butter Tart
Make-Ahead and Storage Tips
- Crust and filling can be prepared a day ahead; store separately in the fridge.
- Assemble and chill the tart overnight for best flavor and texture.
- Flavors deepen overnight, especially the peanut butter layer.
- Wrap tightly with plastic wrap or store in an airtight container.
- Bring to room temperature before slicing for a softer, more luscious bite.
10 Practical Q&As About Making a Chocolate Peanut Butter Tart
1. What kind of chocolate should I use?
Use good quality dark chocolate, at least 70%, for a rich, smooth ganache that melts beautifully.
2. Can I use natural peanut butter?
Peanut butter should be creamy, not chunky, for an even spread and a silky filling.
3. How do I know when the crust is ready?
Bake the crust until golden and fragrant, about 10 minutes at 180°C (350°F), for a sturdy base.
4. Is overnight chilling necessary?
Chill the tart for at least 4 hours or overnight to set the ganache properly.
5. Can I use a regular pie dish?
Use a springform pan for easy removal and a neat edge when serving.
6. Should the peanut butter be cold or warm?
Warm the peanut butter slightly before mixing for a smoother, creamier filling.
7. How do I get a glossy surface?
For a shiny finish, pour the ganache while still warm but not hot, about 30°C (86°F).
8. What toppings work best?
Decorate with chopped peanuts or chocolate shavings to add texture and visual appeal.
9. How long can I store the tart?
Keep leftovers in the fridge, wrapped well, for up to 3 days; bring to room temp before serving.
10. How do I get clean cuts?
Use a sharp knife dipped in hot water to cut clean slices.
Once you get the hang of this tart, it becomes a quick fix for any craving. The best part? It’s simple enough to throw together on a whim, but fancy enough to serve at a dinner party.
Every slice carries a bit of chaos—cracks, smudges, imperfect edges—and that’s what makes it real. No fuss, just good ingredients, honest effort, and a lot of flavor. It’s the kind of dessert that sticks with you, in the best way.