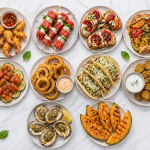
Independence Day is all about backyard fun and fireworks, not laboring over a hot stove while guests mingle. The most memorable holiday starters are those that lean into the vibrant colors of the flag using fresh, seasonal produce.
Lately, I’ve seen a huge trend toward interactive platters and “bite-sized” versions of classic American comfort foods. From savory star-shaped toasts to chilled fruit skewers, these recipes focus on maximum visual impact with minimal prep time.
I’ve selected these specific appetizers because they are currently trending for their portability and patriotic flair. These crowd-pleasers will keep your friends snacking happily until it is finally time to fire up the grill.
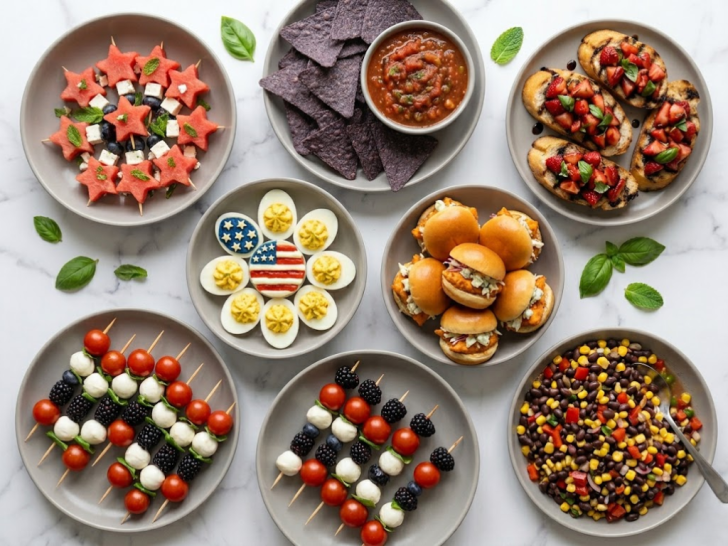
1. Star-Shaped Watermelon and Feta Skewers
Using a themed shape is a practical way to transform a simple three-ingredient snack into a festive appetizer for a summer holiday or a themed lunch. This variation of the classic watermelon and feta combination uses a cookie cutter to create a specific visual appeal that is more structured than standard cubes.
The assembly is fast and involves layering chilled fruit and cheese on a skewer to make a portable, mess-free bite. By choosing a firm watermelon, the star shapes maintain their points during assembly, ensuring the dish looks precise when arranged on a serving platter.
The texture is a refreshing mix of the crisp, watery melon against the firm, slightly grainy texture of the feta. The flavor remains a clean balance of sweet and salty, while a small touch of fresh herbs or a light drizzle can be added to provide a sharp, aromatic finish.
Servings: 12 skewers
Ingredients
- 1/2 large seedless watermelon, sliced into 1-inch thick rounds
- 8 oz block feta cheese, sliced into 1/2-inch thick squares
- 12 fresh blueberries
- 12 small fresh mint leaves
- Optional: A drizzle of honey or balsamic glaze
Instructions
- Slice the watermelon into uniform rounds approximately 1 inch thick.
- Use a small star-shaped cookie cutter to punch out 12 stars from the watermelon slices.
- Cut the block of feta cheese into small squares that are slightly smaller than the diameter of your watermelon stars.
- To assemble, slide a fresh blueberry onto the top of a small wooden skewer or toothpick.
- Slide one star-shaped watermelon piece onto the skewer directly below the blueberry.
- Fold a small mint leaf and place it against the watermelon.
- Finish the skewer by sliding a square of feta cheese onto the bottom to act as a base, allowing the skewer to stand upright if desired.
- Repeat the process until all 12 skewers are assembled.
- Arrange the skewers on a chilled platter to keep the watermelon crisp.
- If desired, add a very light drizzle of honey or balsamic glaze just before serving to enhance the sweetness of the fruit.
- Serve immediately while the fruit and cheese are cold.
2. Blue Corn Tortilla Chips with Fire-Roasted Red Salsa
Serving a vibrant, contrasting snack is an effective way to provide a traditional appetizer with a more modern visual appeal. This combination pairs the deep, earthy hue of blue corn chips with a bright, smoky salsa, making it a practical choice for a weekend gathering or a festive celebration.
The preparation involves a quick charring of the vegetables to unlock their natural sweetness and introduce a hint of smoke, which is then balanced by fresh citrus and herbs. By utilizing blue corn, you offer a slightly nuttier flavor and a sturdier texture compared to standard yellow corn chips, which holds up better against a chunky, fire-roasted dip.
The resulting flavor is a complex mix of charred tomato, sharp onion, and a lingering warmth from the peppers. The texture provides a satisfying crunch from the toasted chips followed by the juicy, rustic consistency of the hand-blended salsa.
Servings: 6 servings
Ingredients
- 1 bag (12 oz) blue corn tortilla chips
- 4 large Roma tomatoes
- 1 small white onion, peeled and halved
- 2 jalapeños (seeded for less heat)
- 3 cloves garlic, unpeeled
- 1/2 cup fresh cilantro, chopped
- 2 tablespoons fresh lime juice
- 1 teaspoon salt
- 1/2 teaspoon ground cumin
Instructions
- Preheat your broiler or set a cast-iron skillet over high heat.
- Place the tomatoes, onion halves, jalapeños, and unpeeled garlic cloves on a baking sheet or in the skillet.
- Char the vegetables for 5 to 7 minutes, turning occasionally, until the skins are blackened and blistered and the vegetables have softened.
- Remove the garlic cloves early if they soften quickly; once cooled, peel the skins off and discard them.
- Place the charred tomatoes, onions, jalapeños, and peeled garlic into a food processor or blender.
- Pulse the mixture several times until you reach your desired consistency—keep it slightly chunky for a more rustic, fire-roasted feel.
- Pour the salsa into a medium bowl and stir in the fresh cilantro, lime juice, salt, and ground cumin.
- Taste and adjust the seasoning with extra salt or lime juice if necessary.
- Let the salsa sit at room temperature for at least 15 minutes to allow the smoky flavors to develop and meld.
- Arrange the blue corn tortilla chips in a large serving bowl or on a platter around a central bowl of the fire-roasted salsa.
- Serve immediately while the salsa is fresh and the chips are crisp.
3. Whipped Ricotta and Strawberry Balsamic Bruschetta
Combining a creamy dairy base with macerated fruit is a sophisticated way to serve a seasonal appetizer for a brunch or an evening social. This recipe elevates the standard bruschetta by using ricotta that has been aerated to a light, cloud-like consistency, providing a delicate foundation for the bold flavors of the topping.
The process involves briefly whisking the cheese to change its structure from grainy to smooth before layering it onto warm, toasted bread. It is a practical dish for entertaining, as the ricotta can be whipped in advance, allowing for quick assembly just as guests arrive.
The resulting bite features a pleasant contrast between the crisp, olive-oil-toasted baguette and the velvety cheese. The flavor profile leads with the natural sweetness of strawberries, followed by the tangy depth of balsamic and a subtle floral note from the honey, creating a balanced and refreshing finish.
Servings: 12 servings
Ingredients
- 1 French baguette, sliced into 1/2-inch rounds
- 1 1/2 cups whole milk ricotta cheese
- 2 cups fresh strawberries, hulled and sliced
- 2 tablespoons balsamic glaze
- 1 tablespoon honey
- 2 tablespoons extra virgin olive oil
- Fresh mint or basil leaves for garnish
- A pinch of flaky sea salt
Instructions
- Preheat the oven to 400°F and place the baguette slices on a large baking sheet.
- Lightly brush both sides of the bread with olive oil and toast for 5 to 6 minutes, or until the edges are golden and crisp.
- While the bread toasts, place the ricotta cheese and honey in a food processor or a medium mixing bowl.
- Blend or whisk the ricotta vigorously for 1 to 2 minutes until it is completely smooth and has a light, whipped texture.
- In a separate small bowl, toss the sliced strawberries with a tiny drizzle of balsamic glaze and let them sit for a few minutes to release their juices.
- Spread a thick, even layer of the whipped ricotta onto each warm baguette slice.
- Top the ricotta with a spoonful of the strawberries, ensuring a few slices sit securely on each piece.
- Arrange the bruschetta on a platter and drizzle the remaining balsamic glaze over the top in a decorative pattern.
- Sprinkle a small pinch of flaky sea salt over the slices to enhance the sweetness of the fruit.
- Garnish with fresh mint or basil and serve immediately to maintain the crunch of the toasted bread.
4. Patriotic Deviled Egg American Flag Platter
Arranging a traditional picnic staple into a themed display is a practical way to contribute to a holiday lunch or a community gathering. This recipe uses standard deviled egg preparation techniques but organizes the final product to create a visual representation of a flag, making it a functional centerpiece that is easy for guests to serve themselves.
The process involves two main components: creating a savory, creamy filling for the “stripes” and using a specific topping to represent the “union” or star field of the flag. By using natural ingredients for color, you maintain a classic flavor profile while achieving a decorative result without the need for artificial dyes.
The texture is consistent with a classic deviled egg—a firm, smooth egg white base paired with a rich, whipped yolk center. The flavor is savory and bright, with the topping of the “blue” section providing a salty, briny contrast to the creamy filling.
Servings: 24 egg halves
Ingredients
- 12 large eggs, hard-boiled and peeled
- 1/2 cup mayonnaise
- 1 tablespoon Dijon mustard
- 1 teaspoon apple cider vinegar
- 1/4 teaspoon salt
- 1/4 teaspoon black pepper
- Paprika (for the red stripes)
- 1/2 cup canned black olives, finely chopped (to represent the blue field)
- Small pieces of white onion or feta cheese (to represent stars)
Instructions
- Slice the hard-boiled eggs in half lengthwise and carefully remove the yolks into a medium mixing bowl.
- Place the empty egg white halves on a large rectangular serving platter, arranging them in a grid of rows and columns.
- Use a fork or a potato masher to mash the egg yolks until they are fine and crumbly.
- Add the mayonnaise, Dijon mustard, apple cider vinegar, salt, and pepper to the yolks, stirring until the mixture is completely smooth and creamy.
- Transfer the yolk mixture into a piping bag or a resealable plastic bag with the corner snipped off.
- Pipe the filling evenly into each of the egg white halves.
- To create the flag design, designate a rectangular area in the top-left corner of the platter (approximately 4 to 6 eggs) to be the “blue” section.
- Cover the tops of the eggs in that corner section with a thick layer of finely chopped black olives.
- Place tiny bits of white onion or small crumbles of feta cheese on top of the olives to mimic stars.
- For the remaining eggs on the platter, sprinkle a generous amount of paprika over the yolk filling of every other row to create “red stripes.”
- Leave the alternate rows plain (yellow/white) to serve as the “white stripes.”
- Chill the platter in the refrigerator for at least 30 minutes before serving to ensure the eggs are firm and cold.
5. Buffalo Chicken Sliders with Blue Cheese Slaw
Combining a spicy protein with a chilled, crunchy topping is a practical way to serve a crowd during a game day or a casual weekend lunch. These sliders take the familiar flavors of buffalo wings and reorganize them into a manageable sandwich format that is easy to assemble in batches.
The process involves using shredded chicken tossed in a classic vinegar-based hot sauce, paired with a quick-made slaw that provides a necessary cooling element. By using small slider buns, you create an appetizer that is substantial enough to be filling but small enough for easy handling at a social gathering.
The texture offers a clear contrast between the soft, toasted bun, the tender sauced chicken, and the crisp snap of the cabbage. Each bite delivers a sharp, spicy heat that is immediately balanced by the creamy, funky notes of the blue cheese dressing.
Servings: 12 sliders
Ingredients
- 1 lb shredded cooked chicken (rotisserie works well)
- 1/2 cup buffalo hot sauce
- 2 tablespoons melted butter
- 12 slider buns (brioche or Hawaiian rolls)
- 2 cups shredded cabbage or coleslaw mix
- 1/4 cup blue cheese dressing
- 1/4 cup blue cheese crumbles
- 1/4 cup sliced celery (optional, for extra crunch)
- 1 tablespoon olive oil
Instructions
- In a medium bowl, whisk together the buffalo hot sauce and melted butter until well combined.
- Add the shredded chicken to the sauce and toss thoroughly until every piece is evenly coated; keep warm over low heat or in the microwave.
- In a separate bowl, combine the shredded cabbage, blue cheese dressing, blue cheese crumbles, and sliced celery to create the slaw.
- Toss the slaw until the cabbage is well-coated, then set it aside in the refrigerator to stay crisp.
- Slice the slider buns in half and lightly brush the cut sides with a small amount of olive oil or butter.
- Place the buns on a baking sheet and toast them under a broiler for 1 to 2 minutes until the edges are golden brown.
- Place a generous spoonful of the warm buffalo chicken onto the bottom half of each toasted bun.
- Top the chicken with a heap of the chilled blue cheese slaw.
- Place the top halves of the buns over the slaw and secure each slider with a toothpick if necessary.
- Serve immediately while the chicken is warm and the slaw is cold for the best temperature contrast.
6. Red, White, and Blue Caprese Salad Skewers
Adapting a traditional Italian salad into a portable format is a practical way to serve fresh produce at a summer gathering. This variation uses the natural colors of tomatoes and cheese, supplemented by dark berries, to create a patriotic theme without the use of artificial additives.
The preparation is efficient, requiring only a few minutes of assembly and no active cooking time. By utilizing small, uniform ingredients like cherry tomatoes and mozzarella pearls, you ensure each skewer is balanced and easy for guests to eat in one or two bites.
The texture features the juicy snap of fresh fruit against the soft, creamy consistency of the cheese. The flavor profile is light and herbaceous, leading with the sweetness of the berries and tomato, followed by the savory richness of the mozzarella and a sharp, tangy finish from a balsamic reduction.
Servings: 12 skewers
Ingredients
- 12 grape or cherry tomatoes
- 12 fresh mozzarella pearls (ciliegine size)
- 12 large fresh blackberries or blueberries
- 12 fresh basil leaves
- 2 tablespoons balsamic glaze
- 1 tablespoon extra virgin olive oil
- A pinch of coarse salt and cracked black pepper
Instructions
- Wash the tomatoes and berries, then pat them dry with a paper towel to ensure the oil and glaze adhere properly.
- Drain the mozzarella pearls and pat them dry as well.
- To assemble, slide a tomato (red) onto a small wooden skewer or toothpick.
- Fold a fresh basil leaf in half and slide it onto the skewer next to the tomato.
- Add a mozzarella pearl (white) directly after the basil.
- Finish the skewer with a blackberry or blueberry (blue) at the top.
- Arrange the completed skewers in a circular pattern or in rows on a serving platter.
- Just before serving, whisk the olive oil with the salt and pepper in a small bowl and lightly drizzle it over the mozzarella and tomatoes.
- Finish the platter with a decorative drizzle of the thick balsamic glaze across all the skewers.
- Serve immediately while the cheese and fruit are chilled for the most refreshing taste.
7. Loaded Cowboy Caviar with Fresh Summer Corn
Preparing a hearty, vegetable-forward dip is a practical way to offer a versatile side dish or appetizer for a summer lunch. This “caviar” is essentially a cross between a bean salad and a chunky salsa, making it a reliable choice for outdoor gatherings where you need a dish that holds up well at room temperature.
The process involves dicing various fresh vegetables to a uniform size to ensure a balanced bite. Using fresh corn cut straight from the cob adds a distinct sweetness and snap that canned alternatives cannot replicate, while the addition of beans provides enough protein to make the dish filling.
The texture is a complex mix of crunchy peppers, creamy avocado, and tender beans. The flavor profile is bright and zesty, driven by a lime-based dressing with a subtle savory kick from cumin and garlic, resulting in a refreshing finish that pairs perfectly with salty chips.
Servings: 8–10 servings
Ingredients
- 2 cups fresh corn kernels (about 2 ears, grilled or raw)
- 1 can (15 oz) black beans, rinsed and drained
- 1 can (15 oz) black-eyed peas, rinsed and drained
- 1 pint cherry tomatoes, quartered
- 1 large orange or red bell pepper, diced
- 1/2 small red onion, finely diced
- 1 large avocado, diced
- 1 jalapeño, seeded and minced
- 1/2 cup fresh cilantro, chopped
For the Dressing:
- 1/3 cup extra virgin olive oil
- 1/4 cup fresh lime juice
- 2 tablespoons honey or agave
- 1 teaspoon ground cumin
- 1 teaspoon salt
- 1/2 teaspoon chili powder
Instructions
- If using grilled corn, char the ears over a flame for 5 minutes before cutting the kernels off the cob; otherwise, slice the raw kernels into a large mixing bowl.
- Add the rinsed black beans, black-eyed peas, tomatoes, bell pepper, red onion, and jalapeño to the bowl with the corn.
- In a separate small jar or bowl, whisk together the olive oil, lime juice, honey, cumin, salt, and chili powder until the dressing is emulsified.
- Pour the dressing over the bean and vegetable mixture and toss gently to ensure everything is evenly coated.
- Fold in the chopped cilantro and the diced avocado last to prevent the avocado from mashing and discoloring the salad.
- Cover the bowl and let the mixture sit in the refrigerator for at least 30 minutes. This allows the vegetables to marinate and the flavors to deepen.
- Give the caviar a final gentle toss before serving to redistribute the dressing.
- Serve in a large bowl with a side of sturdy tortilla chips or as a topping for grilled protein.

hi there,
i’m James
The home cook and food blogger behind Beyond the Bayou Blog. Cooking has always been my happy place.
know more