There’s something about lemon desserts that feels perfect for summer. The bright citrus flavor adds just the right balance of sweetness and freshness, making every bite feel lighter and more refreshing than heavier desserts. They’re the kind of treats that work for everything from backyard gatherings to simple weekend baking.
After looking through both sources, it’s clear that lemon bars, lemon loaf cakes, pies, cheesecakes, and no-bake desserts continue to be the most popular choices. Recent summer dessert trends also show growing interest in chilled lemon treats and easy citrus desserts that feel homemade without requiring complicated prep.
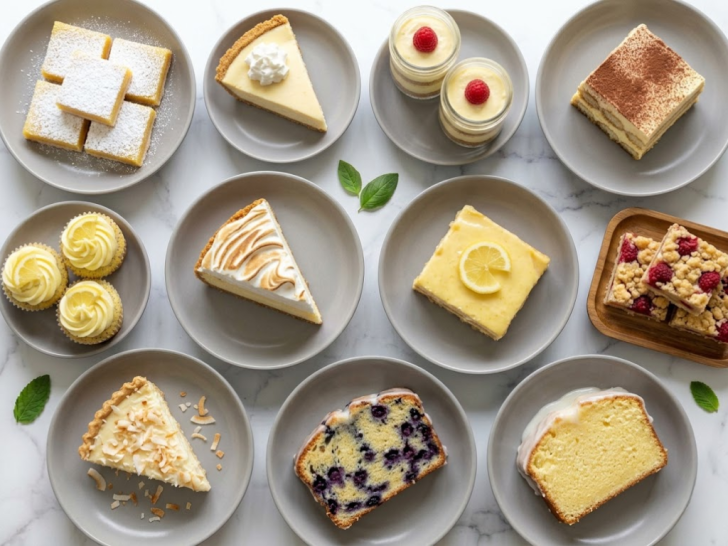
This list combines classic lemon favorites with a few modern twists that are especially popular right now. Each dessert is simple, crowd-pleasing, and packed with the bright citrus flavor that makes summer baking so good.
1. Classic Lemon Bars
Preparing Classic Lemon Bars is a practical way to achieve a high-impact dessert with a short list of pantry staples. This recipe is highly effective because it relies on the chemical reaction between acidic lemon juice and eggs to create a thick, velvety custard that sets perfectly over a buttery shortbread crust. It is a reliable, “bright” finish to any meal, offering a sharp citrus punch that cuts through the richness of grilled meats.
The process is a straightforward two-step bake. The shortbread base is par-baked to ensure it stays crisp under the weight of the lemon filling, preventing the “soggy bottom” that can plague lesser fruit bars.
Servings: 16 squares
Ingredients
- The Shortbread Crust:
- 1/2 cup unsalted butter, melted
- 1/4 cup granulated sugar
- 1 teaspoon vanilla extract
- 1/4 teaspoon salt
- 1 cup all-purpose flour
The Lemon Filling:
- 1 cup granulated sugar
- 2 tablespoons all-purpose flour
- 3 large eggs
- 1/2 cup fresh lemon juice (approx. 2–3 lemons)
- 1 tablespoon lemon zest
- The Finisher:
- Powdered sugar for dusting
Instructions
- The Prep: Preheat your oven to 175°C (350°F). Line an 8×8 inch baking pan with parchment paper, leaving an overhang on the sides for easy removal.
- The Crust: In a medium bowl, stir together the melted butter, sugar, vanilla, salt, and flour until a soft dough forms. Press it firmly into the bottom of the prepared pan.
- The First Bake: Bake the crust for 18–20 minutes or until the edges are very lightly golden.
- The Filling: While the crust bakes, whisk the sugar and flour together in a bowl. Add the eggs, lemon juice, and lemon zest. Whisk vigorously until no flour lumps remain.
Pro Tip: Use fresh lemons! Bottled lemon juice lacks the essential oils found in the zest and the bright acidity of fresh fruit, which is what makes these bars “classic.” - The Second Bake: Pour the lemon mixture over the hot crust. Reduce the oven temperature to 150°C (300°F) and bake for another 20–22 minutes.
The “Set” Test: The bars are done when the center is no longer jiggly and the edges are slightly puffed. - The Chill: Let the bars cool completely at room temperature, then refrigerate for at least 2 hours.
Crucial Step: Slicing these while warm will result in a mess. Cold temperature is what gives them their clean, professional edge. - The Finish: Lift the bars out using the parchment overhang. Dust generously with powdered sugar and slice into 16 squares.
2. Lemon Blueberry Loaf Cake
Preparing a Lemon Blueberry Loaf Cake is a practical way to achieve a “bakery-style” result with a single mixing bowl. This recipe is highly effective because the acidity of the lemon zest and juice reacts with the leavening agents to create a tight, moist crumb that holds up the weight of the berries. It is an efficient, crowd-pleasing dessert that transitions perfectly from a post-grill treat to a next-day breakfast slice.
The primary challenge with blueberry loaves is the “sink factor.” By tossing the berries in a light coating of flour before folding them in, you ensure they remain suspended throughout the cake rather than huddling at the bottom.
Servings: 8–10 slices
Ingredients
- The Batter:
- 1 1/2 cups all-purpose flour
- 1 teaspoon baking powder
- 1/2 teaspoon salt
- 1/2 cup unsalted butter, softened
- 1 cup granulated sugar
- 2 large eggs
- 1/2 cup Greek yogurt or sour cream (for moisture)
- 2 tablespoons lemon zest (about 2 lemons)
- 2 tablespoons fresh lemon juice
- 1 1/2 cups fresh blueberries
The Lemon Glaze:
- 1 cup powdered sugar
- 2 tablespoons fresh lemon juice
Instructions
- The Prep: Preheat your oven to 175°C (350°F). Grease a 9×5 inch loaf pan and line the bottom with parchment paper.
- The Berry Trick: Toss your blueberries with 1 tablespoon of the measured flour in a small bowl until coated. Set aside.
Pro Tip: This flour coating acts like “velcro,” helping the berries stick to the batter so they don’t sink during the bake. - The Creaming: In a large bowl, cream together the softened butter and sugar until light and fluffy. Beat in the eggs one at a time, followed by the lemon zest, lemon juice, and Greek yogurt.
- The Dry Mix: Gently fold in the remaining flour, baking powder, and salt. Do not overmix; stop as soon as no white streaks remain.
- The Fold: Gently fold the floured blueberries into the batter using a spatula.
- The Bake: Pour the batter into the pan and bake for 55–65 minutes.
- The Test: A toothpick inserted into the center should come out clean or with just a few moist crumbs.
- The Glaze: While the cake cools, whisk the powdered sugar and lemon juice until smooth. Drizzle over the cake once it is completely cool.
3. No-Bake Lemon Cheesecake Cups
Preparing No-Bake Lemon Cheesecake Cups is a practical way to enjoy the decadence of a cheesecake without the stress of water baths or oven-induced cracks. This recipe is highly effective because it relies on the natural thickening power of heavy cream and the setting properties of chilled cream cheese to create a stable, mousse-like texture. It is an efficient “no-cook” dessert that is perfect for summer, as it keeps your kitchen cool.
The individual serving format is a strategic choice; it allows for a higher ratio of buttery graham cracker crust to creamy filling in every bite, while eliminating the difficulty of slicing a traditional cheesecake.
Servings: 6 individual cups
Ingredients
The Crust:
- 1 cup graham cracker crumbs (approx. 8–9 full crackers)
- 2 tablespoons unsalted butter, melted
- 1 tablespoon granulated sugar
The Cheesecake Filling:
- 8 oz. (1 block) cream cheese, softened to room temperature
- 1/2 cup powdered sugar
- 1/2 cup heavy whipping cream, cold
- 2 tablespoons fresh lemon juice
- 1 tablespoon lemon zest
- 1 teaspoon vanilla extract
The Topping:
- Extra lemon zest or a thin lemon slice
- Optional: A dollop of whipped cream or a fresh blueberry
Instructions
- The Crust: In a small bowl, combine graham cracker crumbs, melted butter, and sugar. Mix until it feels like wet sand.
- The Base Layer: Press about 2 tablespoons of the crumb mixture into the bottom of 6 small jars or dessert cups. Use the back of a spoon to pack it down firmly.
- The Cream Cheese Base: In a large bowl, beat the softened cream cheese and powdered sugar together until smooth and creamy. Stir in the lemon juice, zest, and vanilla.
- The “Fluff” Factor: In a separate chilled bowl, whip the heavy cream until stiff peaks form.
Pro Tip: Stiff peaks are essential for no-bake cheesecake. If the cream is too soft, the cups will be “soupy” rather than firm. The cream should stand straight up when you lift your beaters. - The Fold: Gently fold the whipped cream into the lemon-cream cheese mixture using a spatula. Do this slowly to keep the air in the mixture.
- The Assembly: Spoon or pipe the filling into the cups over the crust.
- The Chill: Refrigerate for at least 2 hours (or overnight) to allow the filling to set.
- The Finish: Garnish with extra zest or a fresh berry just before serving.
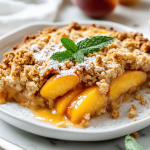
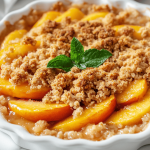
4. Lemon Raspberry Crumb Bars
Preparing Lemon Raspberry Crumb Bars is a practical way to achieve a “bakery-case” aesthetic with a very efficient technique: the dough for the crust doubles as the crumble topping. This recipe is highly effective because the tartness of the fresh raspberries cuts through the buttery richness of the shortbread, while the lemon zest ensures the fruit flavor remains bright and distinct.
This is a strategic “one-dough” bake. By reserving a portion of the base mixture and crumbling it over a layer of fruit and lemon-sugar, you create a multi-textured dessert crunchy on top, jammy in the middle, and sturdy on the bottom, without the need for separate prep steps.
Servings: 16 bars
Ingredients
The Crust & Crumble:
- 1 cup unsalted butter, cold and cubed
- 1 cup granulated sugar
- 3 cups all-purpose flour
- 1 teaspoon baking powder
- 1/4 teaspoon salt
- 1 large egg
The Fruit Filling:
- 2 cups fresh raspberries
- 1/2 cup granulated sugar
- 2 teaspoons cornstarch (to thicken the juices)
- 1 tablespoon lemon zest
- 1 tablespoon fresh lemon juice
Instructions
- The Prep: Preheat your oven to 190°C (375°F). Grease a 9×13 inch baking pan or line it with parchment paper.
- The Dough: In a large bowl, whisk together the flour, 1 cup sugar, baking powder, and salt. Use a pastry cutter or your fingers to work in the cold butter and the egg until the mixture resembles coarse crumbs.
- The Base: Press two-thirds of the crumb mixture firmly into the bottom of the prepared pan to create an even crust.
- The Filling: In a medium bowl, gently toss the raspberries with the 1/2 cup sugar, cornstarch, lemon zest, and lemon juice.
Pro Tip: Don’t over-mix the berries; you want them to stay mostly whole so they create “pockets” of jam rather than a thin purple layer. - The Topping: Spread the raspberry mixture over the crust. Sprinkle the remaining one-third of the crumb mixture evenly over the top.
- The Bake: Bake for 40–45 minutes, or until the top is light golden brown and the fruit is bubbling.
- The Cool: Let the bars cool completely in the pan before slicing.
Note: The fruit filling needs time to “set.” If you cut them while warm, the raspberry layer will be runny.
5. Lemon Icebox Pie
Preparing a Lemon Icebox Pie is a practical way to create a show-stopping dessert that feels vintage yet timeless. This recipe is highly effective because it relies on the chemical reaction between the acidity of lemon juice and the proteins in sweetened condensed milk a process that “cooks” the filling into a dense, velvety custard without the need for a stove or a temperamental water bath.
The “Icebox” method is an efficient summer strategy; it utilizes the refrigerator (the “icebox”) to do the heavy lifting. By pairing a tart, creamy filling with a buttery graham cracker crust, you achieve a balance of sharp citrus and sweet cream that is incredibly refreshing.
Servings: 8 slices
Ingredients
The Crust:
- 1 1/2 cups graham cracker crumbs (approx. 10–12 full crackers)
- 1/3 cup unsalted butter, melted
- 2 tablespoons granulated sugar
The Filling:
- 2 cans (14 oz each) sweetened condensed milk
- 1 cup fresh lemon juice (approx. 4–5 large lemons)
- 1 tablespoon lemon zest
- 3 large egg yolks (optional, for a traditional “set”)
The Topping:
- 1 cup heavy whipping cream, chilled
- 2 tablespoons powdered sugar
- Thin lemon slices for garnish
Instructions
- The Crust: Mix graham cracker crumbs, melted butter, and sugar. Press firmly into a 9-inch pie plate. Bake at 175°C (350°F) for 8–10 minutes to set. Let it cool completely.
- The Filling: In a large bowl, whisk together the sweetened condensed milk, lemon juice, lemon zest, and egg yolks (if using) until the mixture begins to thicken and look glossy.
Pro Tip: The mixture will naturally start to “tighten” almost immediately. This is the lemon juice reacting with the milk. Ensure you whisk thoroughly to incorporate the zest for maximum aroma. - The Assembly: Pour the filling into the cooled crust. Smooth the top with a spatula.
- The “Bake” (Optional but Recommended): Bake the filled pie for 15 minutes at 175°C (350°F). This ensures the egg yolks are safe and creates a firmer, more stable slice.
No-Bake Alternative: If omitting egg yolks, simply pour the mix into the crust and proceed to the chill step. - The Deep Chill: Refrigerate the pie for at least 6 hours, though overnight is best.
- The Finish: Before serving, whip the heavy cream and powdered sugar until stiff peaks form. Spread or pipe onto the pie and garnish with lemon slices.
6. Glazed Lemon Pound Cake
Preparing a Glazed Lemon Pound Cake is a practical way to achieve a dense, buttery crumb that feels sophisticated but relies on standard pantry staples. This recipe is highly effective because it follows the traditional “pound” logic equal parts weight but adds the structural insurance of baking powder and the moisture of sour cream. It is an efficient, high-yield dessert that stays fresh for days and travels easily.
The secret to this specific cake is the “double-lemon” hit: zest and juice are baked into the batter, while a hot lemon syrup is poured over the cake while it’s still warm to lock in moisture and flavor.
Servings: 10–12 slices
Ingredients
The Cake:
- 1 1/2 cups all-purpose flour
- 1/2 teaspoon baking powder
- 1/4 teaspoon baking soda
- 1/2 teaspoon salt
- 3/4 cup unsalted butter, softened
- 1 cup granulated sugar
- 3 large eggs, room temperature
- 1/2 cup sour cream (or full-fat Greek yogurt)
- 2 tablespoons lemon zest (approx. 2–3 lemons)
- 1 tablespoon fresh lemon juice
- 1 teaspoon vanilla extract
The Lemon Glaze:
- 1 cup powdered sugar
- 2–3 tablespoons fresh lemon juice
Instructions
- The Prep: Preheat your oven to 175°C (350°F). Grease and flour a 9×5 inch loaf pan (or use parchment paper for easy removal).
- The Creaming: In a large bowl, cream the softened butter and granulated sugar together for at least 3–5 minutes.
Pro Tip: Don’t rush this. Creaming creates tiny air pockets in the fat, which is the only way to get a “light” pound cake. The mixture should look pale and fluffy, not yellow and grainy. - The Eggs: Add eggs one at a time, beating well after each addition. Mix in the lemon zest, lemon juice, vanilla, and sour cream.
- The Dry Mix: Sift the flour, baking powder, baking soda, and salt. Gradually add to the wet ingredients, mixing just until combined.
- The Bake: Pour the batter into the pan and smooth the top. Bake for 50–60 minutes.
- The Test: A skewer should come out clean. If the top is browning too fast, tent it loosely with foil at the 40-minute mark.
- The Soak (Optional): For an extra moist cake, whisk 2 tablespoons sugar and 2 tablespoons lemon juice. Poke holes in the warm cake and brush this over the top before removing it from the pan.
- The Glaze: Once the cake is completely cool, whisk the powdered sugar and lemon juice into a thick but pourable glaze. Drizzle it over the top, letting it drip down the sides.
7. Lemon Coconut Cream Tart
Preparing a Lemon Coconut Cream Tart is a practical way to combine the sharp acidity of citrus with the mellow, tropical richness of coconut. This recipe is highly effective because it uses a pressed “macaroon-style” crust, which provides a chewy, toasted texture that contrasts beautifully with a silky lemon curd filling. It is an efficient, naturally gluten-friendly dessert (if using certified GF oats/coconut) that looks like it came from a professional patisserie.
The strategy here is layering. By using coconut milk in the filling, you create a “creamsicle” effect where the fat from the coconut softens the bite of the lemon, resulting in a tart that is bright but surprisingly smooth.
Servings: 8–10 slices
Ingredients
- The Coconut Crust:
- 2 cups shredded sweetened coconut
- 1/4 cup almond flour (or all-purpose flour)
- 1/4 cup unsalted butter, melted
- 1 egg white
- 1 tablespoon granulated sugar
The Lemon Coconut Filling:
- 1 cup full-fat canned coconut milk (shake the can first)
- 1/2 cup fresh lemon juice
- 1/2 cup granulated sugar
- 3 large egg yolks
- 2 tablespoons cornstarch
- 1 tablespoon lemon zest
The Garnish:
- Toasted coconut flakes
- Whipped cream or coconut cream
Instructions
- The Crust: Preheat your oven to 165°C (325°F). In a bowl, mix the shredded coconut, almond flour, melted butter, egg white, and sugar.
- The Press: Press the mixture firmly into the bottom and up the sides of a 9-inch tart pan (preferably with a removable bottom).
- The First Bake: Bake for 15–20 minutes or until the edges are golden brown. Let the crust cool completely before filling.
Pro Tip: If the crust puffs up during baking, gently press it back down with the back of a spoon while it is still warm. - The Filling: In a medium saucepan (off the heat), whisk together the sugar and cornstarch. Add the egg yolks, coconut milk, and lemon juice.
- The Thickening: Place the pan over medium heat. Whisk constantly until the mixture thick with a pudding-like consistency and begins to bubble.
Note: Do not walk away! Egg-based curds can scramble quickly. Constant whisking ensures a smooth, professional finish. - The Finish: Remove from heat and stir in the lemon zest. Pour the warm filling into the cooled crust.
- The Set: Refrigerate for at least 3 hours to allow the tart to firm up.
- The Presentation: Top with toasted coconut and a dollop of whipped cream just before serving.
8. Lemon Poppy Seed Cupcakes
Preparing Lemon Poppy Seed Cupcakes is a practical way to serve a classic flavor profile in a portion-controlled, handheld format. This recipe is highly effective because the poppy seeds provide a delicate “crunch” that breaks up the softness of the cake, while the addition of sour cream ensures the crumb remains moist and springy. It is an efficient choice for gatherings where you want a “gourmet” look without the complexity of slicing a large cake.
The strategy here is to infuse lemon at every level—zest in the batter, juice in the syrup, and oil in the frosting—ensuring that the citrus flavor isn’t lost during the baking process.
Servings: 12 cupcakes
Ingredients
The Batter:
- 1 1/2 cups all-purpose flour
- 1 1/2 tablespoons poppy seeds
- 1 teaspoon baking powder
- 1/4 teaspoon baking soda
- 1/2 teaspoon salt
- 1/2 cup unsalted butter, softened
- 3/4 cup granulated sugar
- 2 large eggs
- 1/2 cup sour cream
- 2 tablespoons lemon zest
- 1 tablespoon fresh lemon juice
The Lemon Buttercream:
- 1/2 cup unsalted butter, softened
- 2 cups powdered sugar
- 1 tablespoon fresh lemon juice
- 1 teaspoon lemon zest
Instructions
- The Prep: Preheat your oven to 175°C (350°F). Line a 12-cup muffin tin with paper liners.
- The Dry Mix: In a medium bowl, whisk together the flour, poppy seeds, baking powder, baking soda, and salt.
Pro Tip: Whisking the poppy seeds with the flour prevents them from clumping together in the wet batter, ensuring an even distribution of “speckles” in every cupcake. - The Creaming: In a large bowl, cream the butter and sugar until light and fluffy. Add the eggs one at a time, then stir in the lemon zest, juice, and sour cream.
- The Combine: Gradually add the dry ingredients to the wet. Mix until just combined, overmixing will lead to a tough, bready cupcake rather than a light one.
- The Bake: Fill each liner about two-thirds full. Bake for 18–22 minutes. A toothpick should come out clean.
- The Frosting: While the cupcakes cool completely, beat the butter and powdered sugar together. Add lemon juice and zest, whisking until light and airy.
- The Finish: Pipe or swirl the frosting onto the cooled cupcakes.
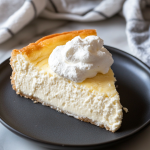
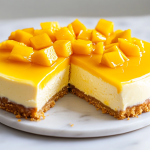
9. Lemon Meringue Cheesecake
Preparing a Lemon Meringue Cheesecake is the ultimate practical way to combine two iconic desserts into one show-stopping centerpiece. This recipe is highly effective because the dense, creamy richness of the cheesecake acts as a structural anchor for the light, airy meringue topper. It is an efficient “wow-factor” dessert because it can be made in stages: the cheesecake base actually benefits from being made a day in advance, leaving only the meringue torching for the moment of service.
The strategy here is contrast. By using a tart lemon curd layer between the cheesecake and the meringue, you prevent the dessert from being overly sweet, ensuring each bite has a balanced, “cleansing” citrus finish.
Servings: 12 slices
Ingredients
The Graham Crust:
- 1 1/2 cups graham cracker crumbs
- 1/4 cup granulated sugar
- 6 tablespoons unsalted butter, melted
The Lemon Cheesecake:
- 24 oz. (3 blocks) cream cheese, softened
- 1 cup granulated sugar
- 3 large eggs
- 1/2 cup sour cream
- 1/4 cup fresh lemon juice + 2 tablespoons lemon zest
The Lemon Curd Layer:
- 1/2 cup store-bought or homemade lemon curd
The Toasted Meringue:
- 4 large egg whites, room temperature
- 1 cup granulated sugar
- 1/4 teaspoon cream of tartar
Instructions
- The Base: Preheat oven to 165°C (325°F). Mix crust ingredients and press into a 9-inch springform pan. Bake for 10 minutes.
- The Filling: Beat cream cheese and sugar until smooth. Add sour cream, lemon juice, and zest. Incorporate eggs one at a time on low speed.
Pro Tip: Do not overbeat the eggs! Incorporating too much air will cause the cheesecake to puff up and then crack as it cools. - The Bake: Pour filling onto crust. Bake for 55–65 minutes until the edges are set but the center has a slight “jiggle.”
- The Cool/Chill: Turn off the oven and leave the door ajar for 1 hour. Then, refrigerate for at least 6 hours (overnight is best).
- The Curd: Once chilled, spread a thin, even layer of lemon curd over the top of the cheesecake.
- The Meringue: In a clean bowl, whisk egg whites and cream of tartar to soft peaks. Gradually add sugar, whisking until stiff, glossy peaks form.
- The Finish: Pile the meringue onto the cheesecake. Use a kitchen torch to toast the peaks until golden brown (or pop under a broiler for 1–2 minutes—watch it like a hawk!).
10. Chilled Lemon Tiramisu
Preparing Chilled Lemon Tiramisu (often called Limoncello Tiramisu) is a practical, no-bake way to enjoy a bright, summery twist on the Italian classic. This recipe is highly effective because it swaps the heavy espresso and cocoa for a zesty lemon syrup and creamy mascarpone-lemon curd, making it a much more efficient palate cleanser for a hot day.
The strategy here is the “soak.” By dipping ladyfingers into a lemon-sugar syrup (with or without Limoncello), you create a cake-like texture that remains light and aerated. It’s an ideal “make-ahead” dessert because it actually improves after 24 hours in the fridge.
Servings: 9–12 servings
Ingredients
The Lemon Soak:
- 1 cup water
- 1/2 cup granulated sugar
- 1/2 cup fresh lemon juice
- Optional: 1/4 cup Limoncello liqueur
The Cream Filling:
- 16 oz. (2 containers) Mascarpone cheese, softened
- 1 cup lemon curd (divided)
- 1 1/2 cups heavy whipping cream, cold
- 1/2 cup powdered sugar
- 1 teaspoon vanilla extract
The Foundation:
- 1 package (approx. 24–30) Savoiardi (Italian Ladyfingers)
- Extra lemon zest for garnish
Instructions
- The Syrup: In a small saucepan, combine water and sugar. Heat until sugar dissolves. Remove from heat and stir in the lemon juice (and Limoncello). Let it cool completely.
- The Base Cream: In a large bowl, whisk the mascarpone and 1/2 cup of the lemon curd together until smooth.
- The “Fluff”: In a separate bowl, whip the heavy cream, powdered sugar, and vanilla until stiff peaks form. Gently fold the whipped cream into the mascarpone mixture.
- The Assembly: Quickly dip each ladyfinger into the lemon syrup (don’t soak them, or they’ll turn to mush!) and line the bottom of an 8×8 or 9×9 inch dish.
Pro Tip: A 2-second dip per side is all you need. The ladyfingers will continue to soften as the dessert rests in the fridge. - The Layers: Spread half of the cream mixture over the ladyfingers. Drizzle the remaining 1/2 cup of lemon curd over the cream.
- Repeat: Add another layer of dipped ladyfingers and top with the remaining cream.
- The Chill: Refrigerate for at least 6 hours (overnight is highly recommended).
- The Finish: Just before serving, top with fresh lemon zest or white chocolate shavings.

hi there,
i’m James
The home cook and food blogger behind Beyond the Bayou Blog. Cooking has always been my happy place.
know more