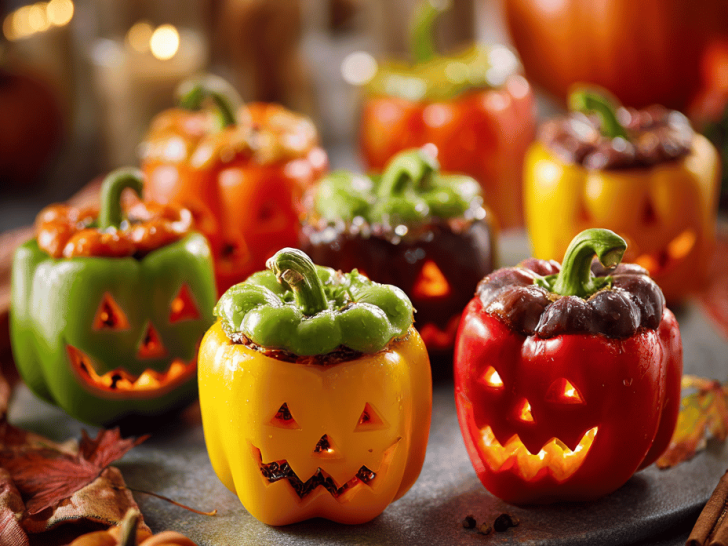
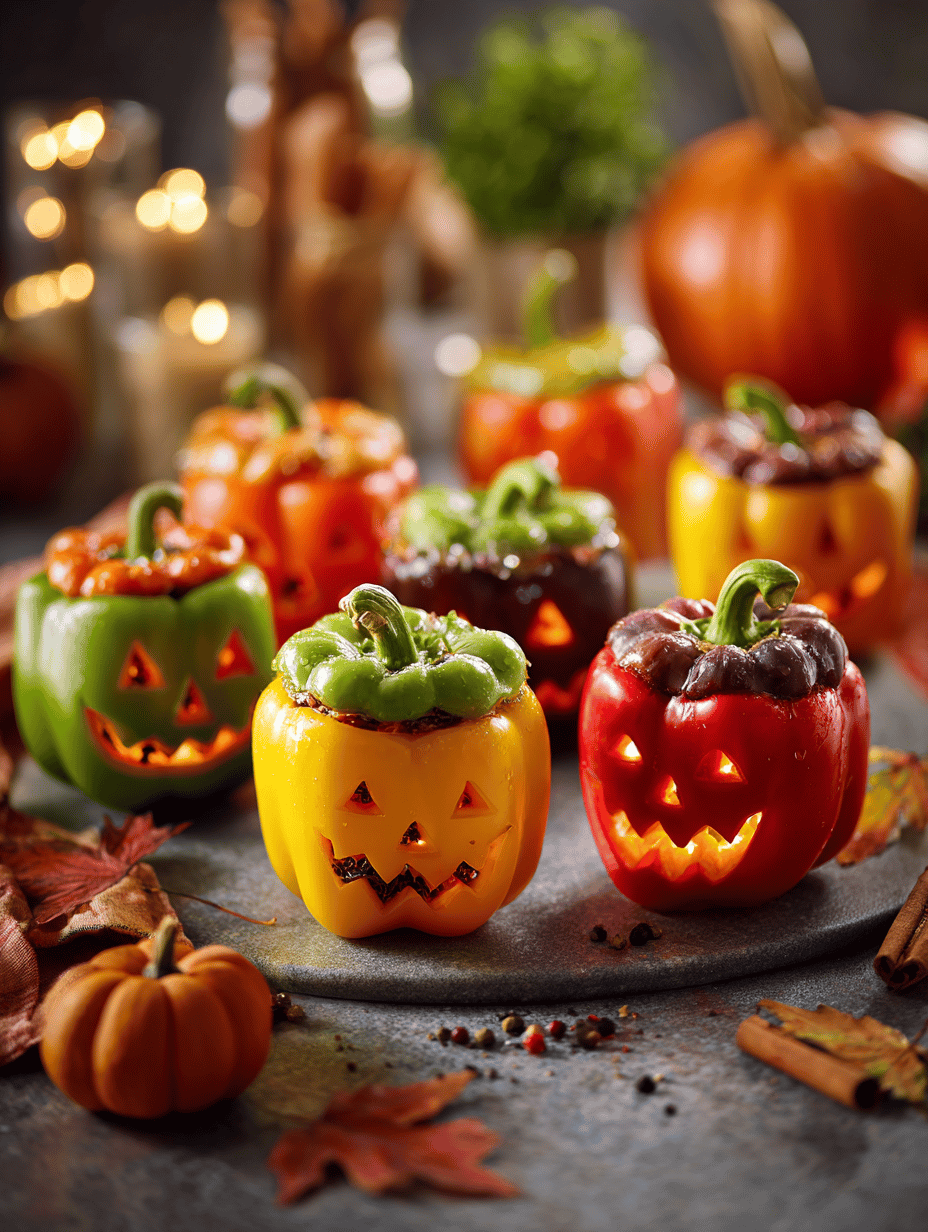
When I first made these jack-o’-lantern peppers, I wasn’t aiming for perfect carving. Instead, I loved the idea of turning something familiar into a playful centerpiece that still packs a punch of flavor. It’s chaos in the kitchen—melty cheese, roasted peppers, bits of spice—but I swear, that mess is part of the charm. These peppers feel like a small act of rebellion—fun, a little messy, but so worth it when you see kids’ eyes light up. Plus, they make you slow down, carve with care, and savor every cheesy, smoky bite.
I find it’s the little details that turn this into a memorable dish—those crispy edges on the peppers, the oozy filling, the way the cheese bubbles and crackles. It’s not just about Halloween; it’s about reclaiming the kitchen as a place for playful, imperfect art. And honestly, these peppers have a way of making me smile, even on the busiest days.
Making these jack-o’-lantern peppers is a small act of celebration. It’s perfect if you want something festive but simple, with a hint of chaos that makes cooking feel alive. They’re a reminder that sometimes, the best dishes come from a little mess and a lot of heart.
Why I Love These Little Carved Wonders
- I get to combine my love for carving and cooking in one goofy, cheesy project—such a fun twist on holiday dishes.
- Watching family or friends light up when they see the goofy faces makes all the slicing worth it.
- It’s chaos, sure, but that’s where the magic happens—messy carving, cheesy filling, crispy edges.
- They taste like roasted peppers, gooey cheese, and a pinch of spice—comfort wrapped in a playful costume.
- These peppers are a reminder that cooking doesn’t always have to be neat—sometimes it’s about the joy of improvising.
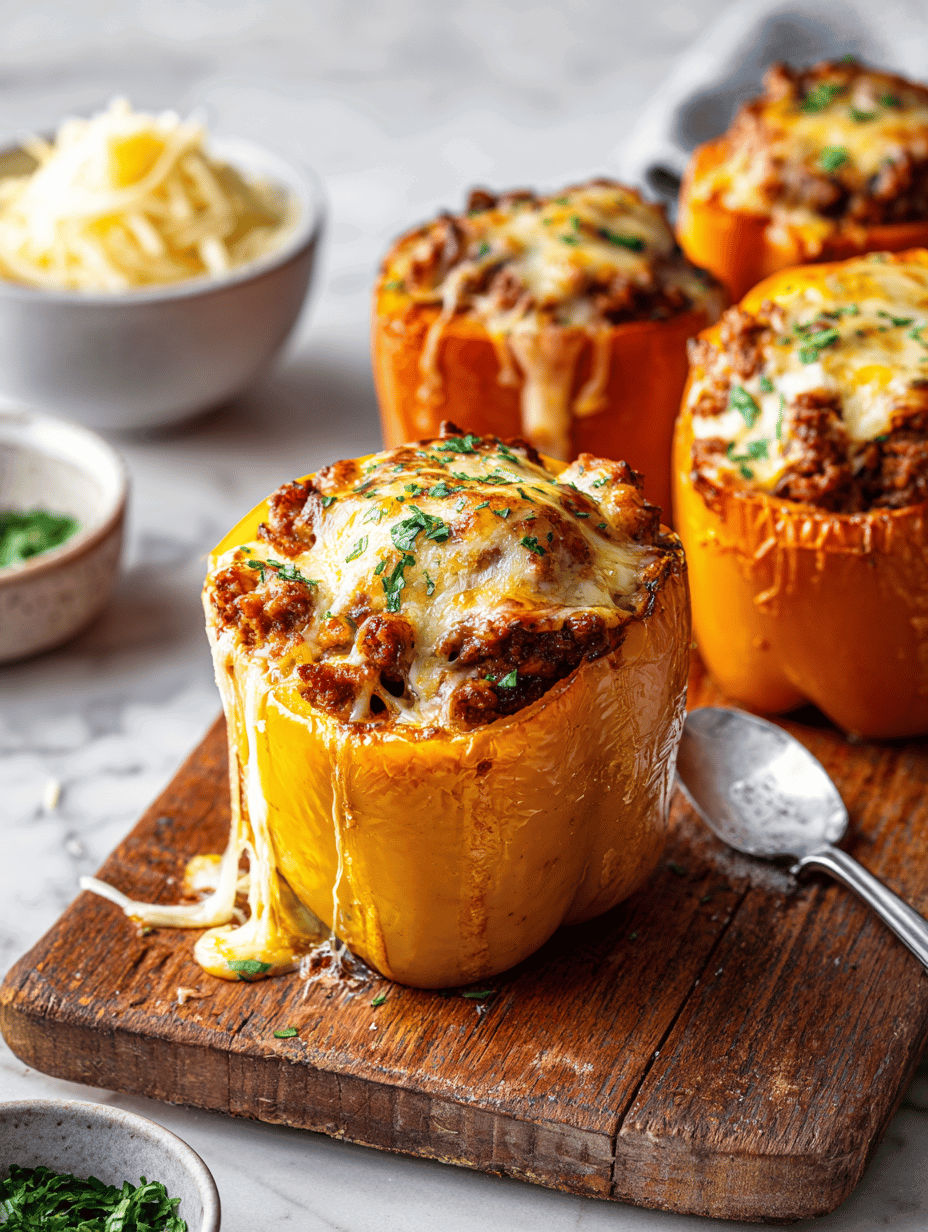
Ingredient Breakdown: What’s Inside the Pumpkin Face
- Bell Peppers: Bright orange or deep green—they’re sturdy enough for carving and hold filling well. Use fresh, firm peppers so they don’t collapse or leak. Swap in large zucchinis if you want a different shape, but expect softer edges.
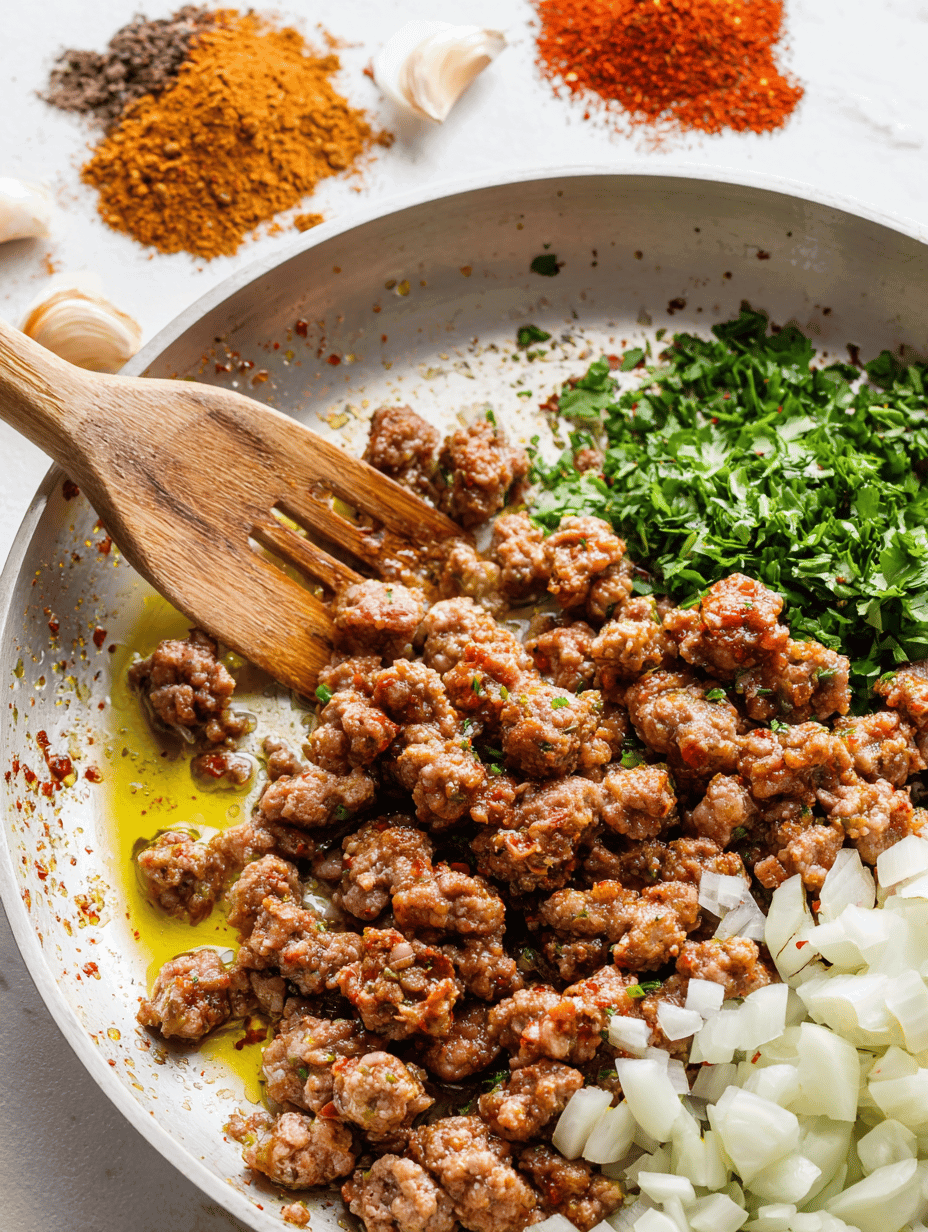
- Ground Meat: Beef, turkey, or plant-based—whatever you prefer. I like beef for its richness, but turkey keeps it lean and lighter. Cook until nicely browned, with a savory aroma filling the kitchen.
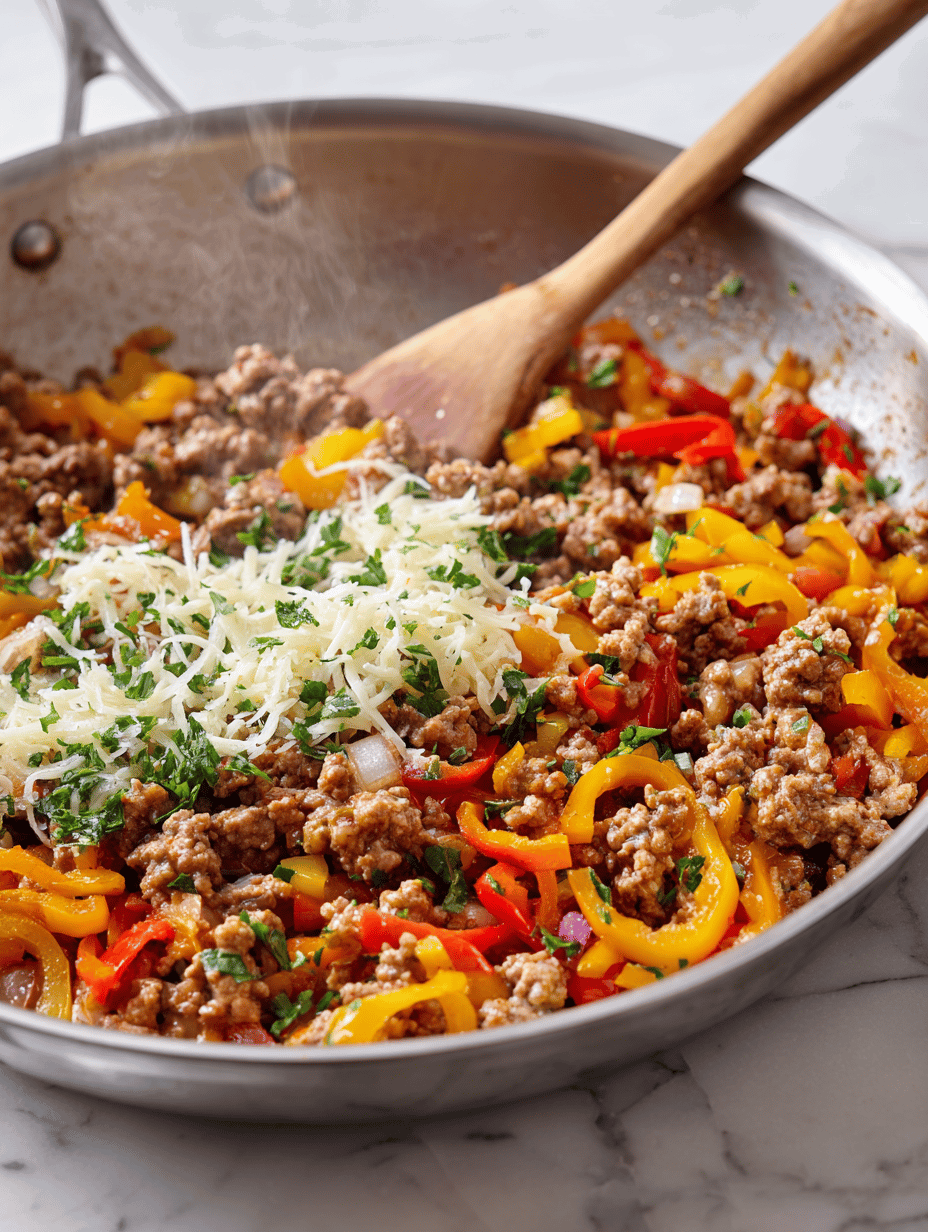
- Cheese: Sharp cheddar melts beautifully, making that crispy, gooey top. Switch to Monterey Jack if you want a milder, creamier finish. Grate just before using for the best melt and flavor release.
- Onions & Garlic: Sautéed until fragrant, these build flavor and give a gentle sweetness. Skip if you’re in a rush, but it makes the filling more layered and aromatic.
- Spices & Herbs: Cumin, smoked paprika, and a pinch of chili powder give warmth and smoky depth. Fresh parsley or cilantro add a fresh, herbal brightness—sprinkle on just before serving for color and freshness.
- Olive Oil: For roasting and sautéing—use a good drizzle for that crispy edge and deep flavor. If you’re out, any neutral oil works—just avoid butter, which can burn.
Step-by-Step Guide to Carving and Filling Your Jack-o’-Lantern Peppers
Equipment & Tools
- Sharp paring knife—crucial for carving faces and cutting tops cleanly
- Small spoon or melon baller—removes seeds and inner membranes smoothly
- Mixing bowls—combine filling ingredients comfortably
- Baking dish—preferably with a lip to catch drips
- Oven thermometer—helps keep temps steady for even roasting
Steps
- Preheat your oven to 200°C (400°F). Line your baking dish with parchment or a silicone mat for easy cleanup.
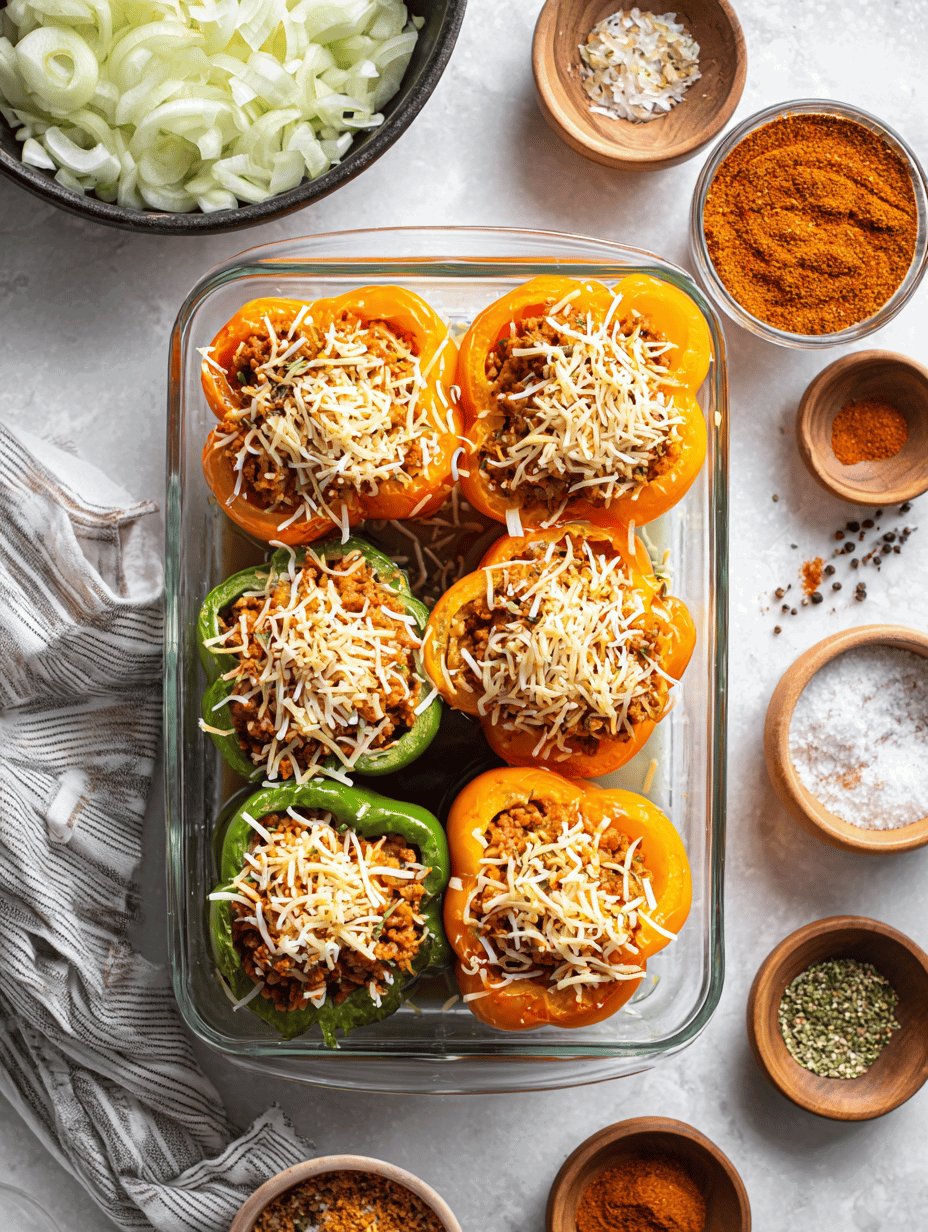
- Wash peppers thoroughly. Slice off the tops, about 1/4 from the stem, to create the “lid.” Scoop out seeds and membranes—try to keep the shape intact.
- Carve faces into the peppers. Keep it simple—triangular eyes and jagged mouths work best. Don’t press too hard, or the walls might crack.
- In a skillet over medium heat (about 180°C/350°F), sauté chopped onions and garlic in olive oil until fragrant—about 2 minutes. Add ground meat, cook until browned and crumbly—about 8 minutes. Season generously with spices and salt.
- Mix cooked meat with shredded cheese and herbs. Adjust seasoning—taste and make sure it’s flavorful and savory.
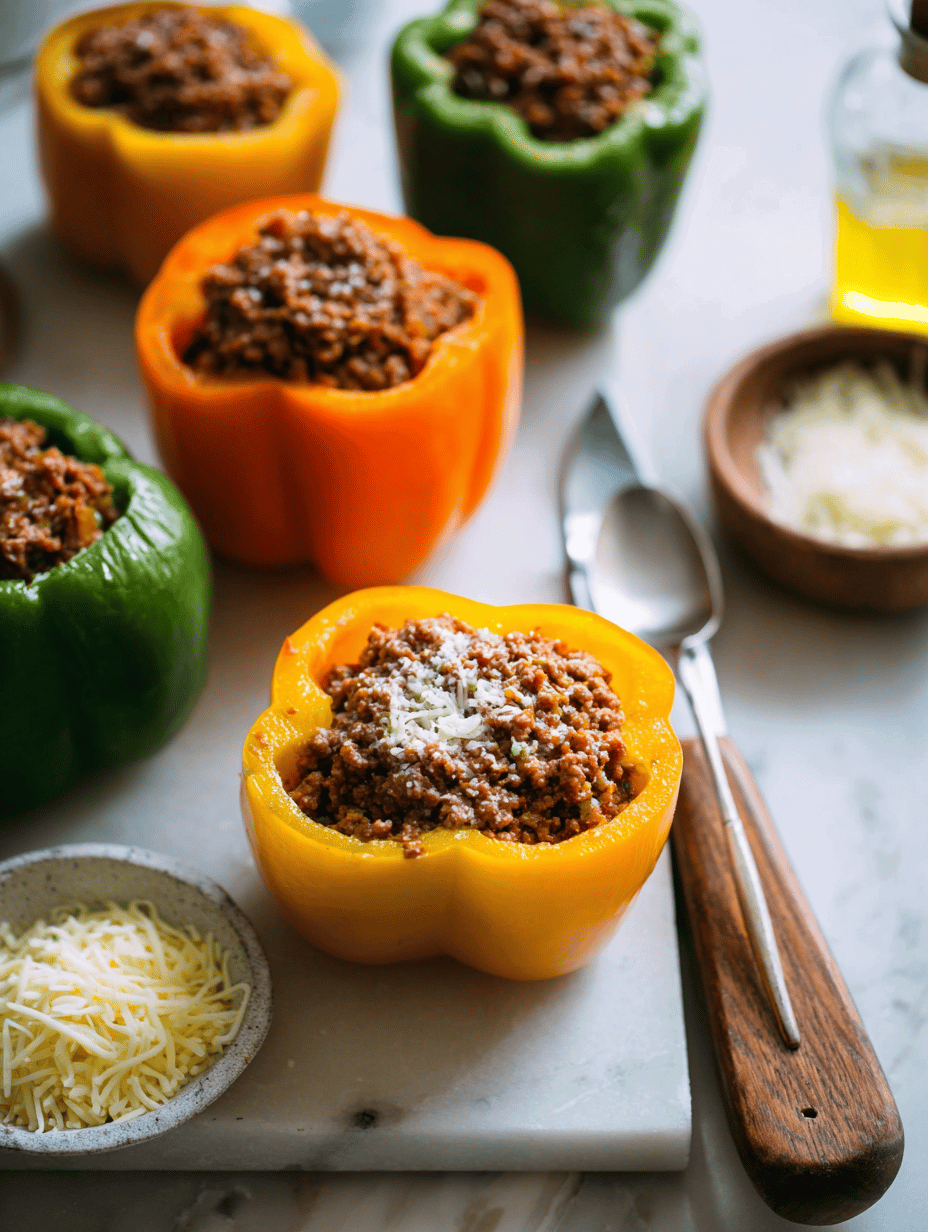
- Stuff each carved pepper with the filling—press down gently so it’s snug. Replace the carved lid if you like, or leave it off for a more rustic look.
- Place peppers upright in your baking dish. Bake for 30–35 minutes, until peppers are tender and cheese is bubbly. The tops should be golden and slightly crispy.
- Rest for 5 minutes before serving. This lets the cheese set a bit, so filling stays put.
Checkpoints & How to Know It’s Done
- Peppers are tender when pierced easily with a fork.
- Cheese is melted and bubbling—listen for that crackle when you spoon into the filling.
- Peppers have a roasted aroma, and edges are slightly charred for that smoky finish.
Common Mistakes and How to Fix Them
- FORGOT to preheat the oven? It causes uneven cooking. Always preheat for at least 15 minutes.
- DUMPED too much filling? It overflows or makes carving tricky. Fill just enough to mound slightly—no overflowing.
- OVER-TORCHED cheese? It gets bitter. Keep an eye for golden edges and cover loosely with foil if browning too fast.
- SEEDS left inside peppers? They can burn and add bitterness. Scoop them out thoroughly for cleaner roasting.
Quick Fixes for Kitchen Surprises
- When peppers are too soft, splash them with cold water to stop cooking immediately and cool down.
- Patch cracked peppers with toothpicks if they threaten to fall apart during carving.
- Shield cheese with foil if it’s browning too quickly—crackling edges are fine, burnt ones aren’t.
- When filling is too dry, stir in a splash of broth or tomato sauce to keep it moist and flavorful.
- If cheese isn’t melting well, bump up oven temp by 10°C (20°F) for a few minutes and check frequently.
These carved peppers aren’t just for Halloween—they’re a playful way to enjoy dinner with a little chaos and a lot of flavor. Sometimes, the best moments in the kitchen come from embracing the mess, the imperfect carving, and that oozy, cheesy goodness. It’s a small act of celebration, turning everyday ingredients into something a little wild and totally delicious.
Jack-o'-Lantern Stuffed Peppers
Equipment
- Sharp paring knife
- Small spoon or melon baller
- Baking Dish
- Oven thermometer
Ingredients
- 4 large bell peppers preferably orange or green for a festive look
- 1/2 pound ground meat beef, turkey, or plant-based
- 1 cup shredded cheese cheddar or Monterey Jack
- 1 small onion finely chopped
- 2 cloves garlic minced
- 1 teaspoon cumin
- 1/2 teaspoon smoked paprika
- 1/4 teaspoon chili powder
- 2 tablespoons olive oil
- to taste salt and pepper
Instructions
- Preheat your oven to 200°C (400°F) and line a baking dish with parchment paper or a silicone mat.

- Wash the peppers thoroughly, then slice off the tops about 1/4 from the stem to create a lid. Carefully scoop out the seeds and membranes with a small spoon or melon baller, keeping the shape intact.

- Using a sharp paring knife, carve simple faces into each pepper—triangular eyes and jagged mouths work well. Keep the cuts light to avoid cracking the walls.

- In a skillet over medium heat, add olive oil and sauté the chopped onion and minced garlic until fragrant, about 2 minutes. The onions should turn translucent and smell sweet.

- Add the ground meat to the skillet, breaking it apart with a spatula, and cook until browned and crumbly, roughly 8 minutes. Season with salt, pepper, cumin, smoked paprika, and chili powder.
- Remove the skillet from heat and stir in the shredded cheese and chopped herbs, mixing until the cheese starts melting and everything is well combined.
- Stuff each carved pepper with the savory filling, pressing down gently to pack it in. Replace the carved lid if desired, or leave it off for a rustic look.
- Place the filled peppers upright in your prepared baking dish. Bake in the preheated oven for 30–35 minutes, until the peppers are tender and the cheese is bubbly and golden brown on top.
- Once done, remove from the oven and let rest for 5 minutes to allow the filling to set slightly. The cheese should be bubbling and edges slightly crispy.
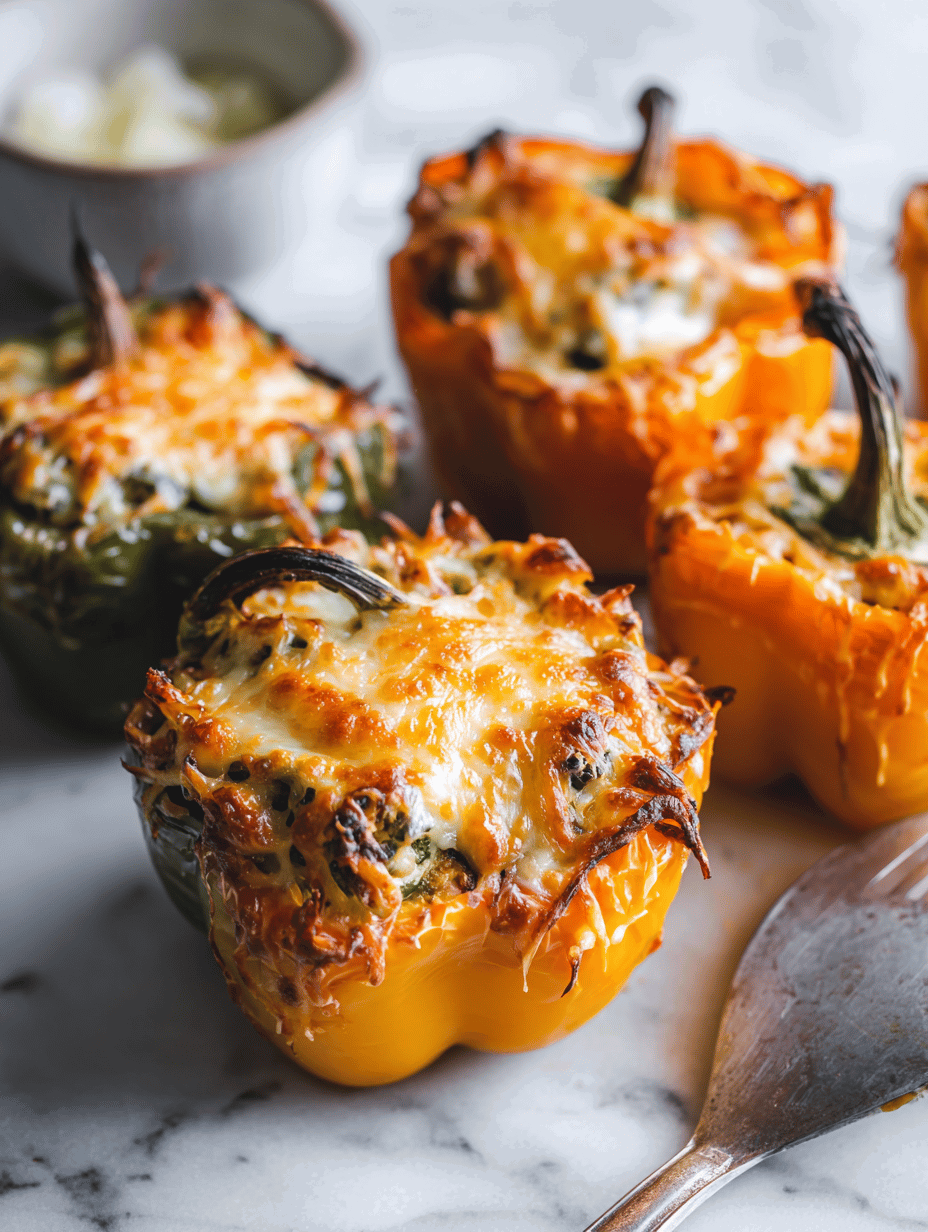
- Serve the peppers warm, with a side of your choice. Enjoy the gooey, cheesy filling and crispy edges that make this dish both fun and delicious!