When the heat really kicks in, nothing feels better than a cold, fruity popsicle straight from the freezer. Homemade versions are even better because you can control the ingredients, skip the artificial stuff, and get creative with flavors. They’re simple, refreshing, and perfect for both kids and adults.
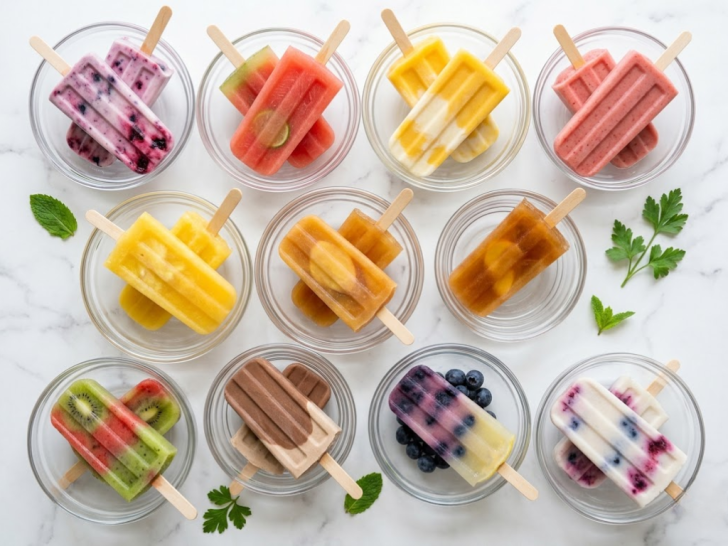
Looking at both sources, fresh fruit pops, yogurt-based creamy popsicles, and juice blends are the most popular choices. Ingredients like berries, mango, watermelon, and citrus show up again and again because they freeze well and taste naturally sweet. You’ll also see a mix of icy and creamy textures trending.
This list brings together easy, crowd-favorite combinations along with a few fun twists. Each one is quick to prep, uses simple ingredients, and is perfect for keeping cool on hot summer days.
Fresh Mixed Berry Yogurt Popsicles
Preparing fresh mixed berry yogurt popsicles is a practical and health-conscious way to combat summer heat. This “frozen snack” is highly effective because it relies on the natural sweetness of ripe fruit and the creamy protein of yogurt, making it a “guilt-free” alternative to traditional high-sugar ice cream bars. Unlike store-bought popsicles that often contain artificial dyes, these boast a vibrant, marbleized aesthetic that comes purely from the berries themselves.
The process is incredibly efficient, requiring only about 10 minutes of active prep time. It’s an ideal project for batch-preparing on a Sunday to have a week’s worth of grab-and-go treats ready in the freezer. By using a “partial-blend” technique, you create a beautiful “swirl” effect that looks like it came from a high-end artisanal shop.
The texture is a delightful transition from a “frosty crunch” on the outside to a “creamy melt” on the inside. The flavor profile is a bright, tangy-sweet symphony of summer strawberries, blueberries, and raspberries balanced by the mellow richness of vanilla yogurt.
Servings: 6–8 popsicles (depending on mold size)
Ingredients
- 2 cups mixed fresh berries (strawberries, blueberries, raspberries, blackberries)
- 2 cups Greek yogurt (plain or vanilla)
- 2–3 tablespoons honey or maple syrup (adjust based on berry sweetness)
- 1 teaspoon vanilla extract (if using plain yogurt)
- 1 tablespoon fresh lemon juice (to keep colors bright)
- Optional: A handful of whole berries to drop into the molds for texture
Instructions
- Prepare the Berry Base: In a blender or food processor, combine 1 ½ cups of the mixed berries with the lemon juice and half of the honey. Pulse until you have a thick, chunky puree.
Pro Tip: Don’t over-blend! Keeping some small fruit chunks creates “flavor bursts” when the popsicle starts to melt. - Prepare the Yogurt: In a separate bowl, whisk together the Greek yogurt, vanilla extract, and the remaining honey until smooth.
- The “Swirl” Technique: Gently fold the berry puree into the yogurt bowl. Use a spoon to swirl them together only 2–3 times.Aesthetic
Note: You want distinct streaks of white and purple/red. If you mix too much, you’ll end up with a solid lavender popsicle still delicious, but less “photo-ready.” - Fill the Molds: Spoon the mixture into your popsicle molds. Every few spoonfuls, drop in a couple of the reserved whole berries.
- De-bubble: Tap the molds firmly on the counter a few times to remove any trapped air pockets.
- Freeze: Insert the popsicle sticks and freeze for at least 4–6 hours, or until completely solid.
- Unmold: To release, run the outside of the mold under warm water for 10–15 seconds. Gently pull on the stick to slide the popsicle out.
Watermelon Lime Ice Pops
Preparing Watermelon Lime Ice Pops is the ultimate practical solution for peak-summer hydration. While the berry popsicles we just made lean into “creamy and indulgent,” these are “crisp and ultra-refreshing.” They are exceptionally effective because watermelon is roughly 92% water, meaning these popsicles act as delicious, frozen electrolyte boosters.
The process is remarkably efficient, essentially a “blitz and freeze” operation. Because watermelon provides its own liquid, you don’t need to make a complex syrup or base. By adding a hit of fresh lime, you transform a simple fruit juice into a sophisticated “agua fresca” on a stick. It’s the perfect way to use up a giant watermelon that’s taking up too much room in your fridge.
The texture is “icy and clean,” reminiscent of a high-end granita. The flavor profile is a vibrant explosion of sun-ripened sweetness followed by a sharp, citrusy zing.
Servings: 6–10 popsicles
Ingredients
- 4–5 cups fresh watermelon, cubed (seeds removed)
- 2 tablespoons fresh lime juice (about 1 large lime)
- 1 tablespoon honey or agave nectar (optional, depending on the melon’s sweetness)
- 1 teaspoon lime zest (for extra aromatic punch)
- Optional: A pinch of sea salt or Tajín to bring out the sweetness
Instructions
- The Blitz: Place the watermelon cubes, lime juice, and honey into a blender. Blend on high until completely liquefied.
- The “Clean” Finish: If you prefer a crystal-clear popsicle without any pulp, pour the liquid through a fine-mesh strainer into a pitcher.
Pro Tip: Keep the pulp if you want a more “fruit-forward” texture that feels like eating the actual melon! - Zest it Up: Stir in the lime zest by hand. This ensures the tiny flecks of green are distributed throughout the popsicle rather than being pulverized by the blender.
- The Pour: Pour the mixture into your popsicle molds, leaving about a 1/4-inch of space at the top, as the liquid will expand slightly when it freezes.
- The “Seed” Illusion (Optional): If you want to get fancy, drop 2 or 3 mini chocolate chips or blueberries into each mold to look like “seeds.”
- Freeze: Insert the sticks and freeze for at least 4–6 hours.
- The Release: Dip the molds in warm water for a few seconds to loosen them, then slide the pops out.
Mango Coconut Cream Popsicles
Preparing Mango Coconut Cream Popsicles is a practical way to transport your taste buds to the tropics without leaving your kitchen. This recipe is highly effective because it utilizes the natural “fatty richness” of coconut milk to mimic the texture of premium ice cream, all while remaining completely dairy-free and vegan. Unlike the “icy” watermelon pops we just made, these are dense, smooth, and decadent.
The process is efficient because it relies on the natural synergy between mango and coconut. By layering the two components rather than fully blending them, you create a “sunset” visual effect that is visually stunning for any summer gathering. It’s a brilliant way to use overripe, “perfumy” mangoes that are too soft for a fruit salad but perfect for a creamy puree.
The texture is “velvety and luscious,” almost like a frozen panna cotta. The flavor profile is a bold, sunny sweetness from the mango balanced by the nutty, mellow undertones of the coconut.
Servings: 6–8 popsicles
Ingredients
- 2 ripe mangoes, peeled and cubed (approx. 2 cups)
- 1 can (13.5 oz) full-fat coconut milk (unsweetened)
- 3 tablespoons maple syrup or agave (divided)
- 1 tablespoon fresh lime juice
- 1/2 teaspoon shredded coconut (optional, for garnish)
- A pinch of sea salt
Instructions
- The Mango Puree: Place the mango cubes, lime juice, and 1 tablespoon of sweetener into a blender. Blend until completely smooth.
Texture Tip: If your mangoes are particularly fibrous, pass the puree through a sieve for a “silkier” finish. - The Coconut Base: In a bowl or measuring cup, whisk together the coconut milk, the remaining 2 tablespoons of sweetener, and a pinch of salt.
Note: Make sure to shake the can of coconut milk well before opening to incorporate the cream layer that settles at the top. - The Layering: To get that beautiful “marbled” look, pour a little mango puree into the bottom of the molds, followed by the coconut mixture. Repeat until the molds are full.
- The Swirl: Take a skewer or a thin knife and gently swirl the layers together once or twice. Don’t over-mix, or you’ll lose the distinct colors!
- Freeze: Insert the popsicle sticks. If you want extra texture, sprinkle some shredded coconut at the base (which will become the top once unmolded). Freeze for at least 6 hours.
- Unmold: Run the mold under warm water for 10 seconds and enjoy your tropical escape.
Strawberry Banana Smoothie Pops
Preparing Strawberry Banana Smoothie Pops is a practical way to rescue those overripe bananas on your counter and turn them into a frozen breakfast or snack. This recipe is highly effective because bananas act as a “natural emulsifier” when frozen, they provide a creamy, soft-serve texture without the need for heavy cream or eggs. It’s essentially your favorite morning smoothie, just “immobilized” on a stick.
The process is efficient because it’s a “dump-and-blend” task. Since the ingredients are already sweet, you can often skip added sugars entirely, making these a favorite for parents and health-conscious snackers alike. It’s the ultimate “zero-waste” kitchen hack for fruit that’s just past its prime but at its peak sweetness.
The texture is “creamy-smooth” and slightly dense, while the flavor profile is the classic, beloved pairing of sweet, floral strawberries and mellow, tropical banana.
Servings: 6–8 popsicles
Ingredients
- 2 ripe bananas (the spottier, the better)
- 2 cups fresh or frozen strawberries, hulled
- 1/2 cup Greek yogurt or almond milk (for creaminess)
- 1 tablespoon honey or agave (optional, based on fruit ripeness)
- 1/2 teaspoon vanilla extract
- Optional: A tablespoon of chia seeds for a “superfood” boost
Instructions
- The Blend: Toss the bananas, strawberries, yogurt/milk, vanilla, and sweetener into the blender.
- Smoothie Consistency: Blend on high until the mixture is completely uniform and thick.
Pro Tip: If you want a “chunkier” vibe, pulse the blender a few times at the very end with two extra strawberries to get small bits of fruit throughout the pop. - The Pour: Pour the mixture into your popsicle molds. Because this mixture is thicker than the watermelon or mango versions, you might need to use a small spoon to help it settle into the corners.
- Tap and Set: Tap the molds on the counter to release any air bubbles. Insert the sticks.
- Freeze: Freeze for at least 4–5 hours.
Note: Because of the banana content, these don’t get as “hard” as juice-based popsicles, making them much easier for kids to eat without a mess. - Unmold: Give the molds a quick warm-water bath and pull them out.
Pineapple Orange Banana Pops
Preparing Pineapple Orange Banana Pops is a practical way to capture “sunshine on a stick.” Often referred to as “Lava Flow” or “Tropical Sunrise” pops, this recipe is highly effective because it combines the acidic brightness of citrus with the structural creaminess of banana. The pineapple provides a distinct, “tangy-sweet” tropical punch that makes these popsicles feel more like a vacation than a kitchen experiment.
The process is remarkably efficient essentially a three-ingredient “citrus blast.” Because pineapple contains natural enzymes that can sometimes make dairy taste bitter if left too long, these water-based or juice-based popsicles are the perfect way to enjoy that fruit combo without the risk. It is a fantastic way to use up that half-can of pineapple rings or that one lone orange sitting in the fruit bowl.
The texture is “icy-smooth,” with a slight “chew” from the banana fibers. The flavor profile is a bold, zesty, and refreshing trio of tropical classics.
Servings: 6–8 popsicles
Ingredients
- 2 cups fresh or canned pineapple (with a splash of the juice)
- 1 large ripe banana
- 1/2 cup fresh-squeezed orange juice (about 2 oranges)
- 1 teaspoon lime juice (to balance the sugar)
- Optional: A few drops of coconut extract for a “Piña Colada” twist
Instructions
- The Prep: If using fresh pineapple, ensure it is very ripe for the best sugar content. If using canned, keep about 2 tablespoons of the syrup.
- The Blend: Combine the pineapple, banana, orange juice, and lime juice in your blender.
- Consistency Check: Blend until completely smooth.
Pro Tip: If you want a “layered” sunrise look, blend the banana and orange juice first and fill the molds halfway. Then, blend the pineapple separately and pour it on top. They will naturally swirl together into a gradient! - The Pour: Fill your popsicle molds, leaving a small gap for expansion.
- Freeze: Insert the sticks and freeze for at least 5–6 hours.
Note: Because orange juice has a high acid content, these may take slightly longer to freeze solid than the creamy strawberry-banana version. - Unmold: Use the warm-water trick (10–15 seconds) to slide them out of the molds.
Peach Iced Tea Popsicles
Preparing Peach Iced Tea Popsicles is a practical way to combine your favorite summer beverage with a frozen treat. This recipe is highly effective because it acts as a “sophisticated refresher” it isn’t as heavy as a smoothie pop or as sugary as a pure fruit pop. It’s essentially a “handheld iced tea” that’s perfect for cooling down on a porch or patio.
The process is efficient because it utilizes the “steeping time” of the tea to prep your fruit. By placing thin slices of fresh peach directly into the mold, you create a stunning visual that looks like something from a high-end café. It’s a brilliant way to use up tea that you’ve already brewed or to experiment with different herbal infusions like mint or hibiscus.
The texture is “crisp and icy,” with the occasional “tender” bite of frozen peach. The flavor profile is a mellow, tannic tea base brightened by the floral sweetness of ripe peaches and a zesty honey-lemon finish.
Servings: 6–8 popsicles
Ingredients
- 2 cups water
- 3 black tea bags (or green tea for a lighter flavor)
- 2 ripe peaches, thinly sliced
- 3 tablespoons honey or agave (adjust to your sweetness preference)
- 1 tablespoon fresh lemon juice
- Optional: A few fresh mint leaves to put inside the molds
Instructions
- Brew the Base: Bring the 2 cups of water to a boil, remove from heat, and add the tea bags. Steep for 5–7 minutes.
Pro Tip: Make the tea slightly stronger than you’d normally drink it. Freezing dulls the intensity of flavors, so a bold brew ensures the “tea” taste doesn’t disappear. - Sweeten: Remove the tea bags and stir in the honey and lemon juice while the liquid is still warm so it dissolves completely. Let the mixture cool to room temperature.
- The Fruit Prep: While the tea cools, slice your peaches into thin, beautiful half-moons.
- The “Art” of the Mold: Slide 2 or 3 peach slices into each popsicle mold. If using mint leaves, tuck them in against the side of the mold so they are visible from the outside.
- The Pour: Pour the cooled tea mixture over the peaches, leaving a 1/4-inch space at the top.
- Freeze: Insert the sticks. Freeze for at least 6 hours or overnight.
- Unmold: Dip the molds in warm water for 10 seconds and enjoy.
Kiwi Strawberry Smoothie Pops
Preparing Kiwi Strawberry Smoothie Pops is a practical way to enjoy a “classic duo” in a visually striking format. This recipe is highly effective because it plays with the natural color contrast of emerald green and ruby red. Beyond the aesthetics, kiwis provide a sharp, tropical tartness that perfectly offsets the mellow sweetness of strawberries, creating a more complex flavor than a strawberry-only pop.
The process is efficient and can be done in two ways: you can blend them together for a uniform pinkish-green pop, or you can “layer” them for a professional, striped look. Since kiwis are packed with Vitamin C and strawberries with antioxidants, these are essentially “immunity-boosters” on a stick.
The texture is “smooth and slightly seedy” those tiny, crunchy kiwi seeds add a fun, natural texture that mimics a real fruit smoothie. The flavor profile is a zesty, bright, and refreshing tang.
Servings: 6–8 popsicles
Ingredients
- 3 ripe kiwis, peeled
- 2 cups fresh strawberries, hulled
- 1/2 cup apple juice or coconut water (to help with blending)
- 1 tablespoon honey or maple syrup (optional)
- Optional: Thinly sliced kiwi rounds to press against the sides of the mold
Instructions
- The Kiwi Layer: Place the peeled kiwis and a splash of your liquid (apple juice or coconut water) into the blender. Pulse until smooth but don’t over-process (you want the seeds intact!).
Pro Tip: If you want the “striking” look, pour the kiwi mixture into the bottom third of your molds and freeze for 30 minutes before adding the next layer. - The Strawberry Layer: Rinse the blender and add the strawberries, the remaining liquid, and the sweetener. Blend until smooth.
- The Assembly: If you did the “pre-freeze” for the kiwi, pour the strawberry mixture on top. If not, just pour them in together and give a slight swirl with a toothpick.
- The “Window” Trick: For a gourmet look, slide a very thin round of kiwi down the side of the mold before pouring in the liquid. It will look like a window into the fruit!
- Freeze: Insert the sticks and freeze for at least 5–6 hours.
- Unmold: Warm water bath for 10 seconds, then gently pull.
Chocolate Dipped Banana Cream Pops
Preparing Chocolate Dipped Banana Cream Pops is a practical way to enjoy a “frozen candy bar” that is actually made from wholesome ingredients. This recipe is highly effective because it uses the natural creaminess of frozen bananas often called “nice cream” as the base, providing a decadent, custard-like texture without the need for an ice cream maker.
The process is efficient because it’s a two-stage masterpiece: a simple blend-and-freeze followed by a quick dip in a “magic shell” chocolate coating. It’s the ultimate “reward” treat that feels like something you’d buy at a high-end boardwalk stand. By dipping them ourselves, we control the quality of the chocolate and can add custom toppings like sea salt or crushed nuts.
The texture is a brilliant “snap” of cold chocolate followed by a “velvety, buttery” banana interior. The flavor profile is a nostalgic, rich combination of caramelized banana and deep cocoa.
Servings: 6–8 popsicles
Ingredients
- 3 very ripe bananas (spotted bananas provide the best flavor)
- 1/2 cup Greek yogurt or full-fat coconut milk
- 1 teaspoon vanilla extract
- 1 tablespoon honey or maple syrup
For the Chocolate Dip:
- 1 cup semi-sweet or dark chocolate chips
- 2 tablespoons coconut oil (this is what makes it a “snappy” shell)
- Optional Toppings: Crushed peanuts, toasted coconut, or flaky sea salt
Instructions
- The Creamy Base: Blend the bananas, yogurt (or coconut milk), vanilla, and sweetener until completely smooth and thick.
- Freeze the Pops: Pour the mixture into your popsicle molds and insert sticks. Freeze for at least 6 hours or until rock-solid.
Crucial Tip: These must be completely frozen before dipping, or they will melt into the warm chocolate! - Prepare the “Magic Shell”: Place the chocolate chips and coconut oil in a microwave-safe bowl. Microwave in 30-second intervals, stirring in between, until silky smooth.
- The Setup: Let the chocolate cool for about 5 minutes. It should be liquid but not “hot.” Pour the chocolate into a tall, narrow glass (this makes dipping much easier).
- The Dip: Remove a popsicle from the mold. Quickly dip it into the chocolate, hold it over the glass for a few seconds to let the excess drip off, and then immediately sprinkle with your toppings.
Note: The chocolate will harden within 20–30 seconds because of the coconut oil and the cold popsicle! - The Final Set: Place the dipped pops on a tray lined with parchment paper and return them to the freezer for 10 minutes to fully set.
Blueberry Lemonade Ice Pops
Preparing Blueberry Lemonade Ice Pops is a practical way to capture the “electric” purple hue of summer berries in a format that is incredibly cooling. This recipe is highly effective because it plays on the “sweet-tart” dynamic: the deep, jammy flavor of blueberries is perfectly sharpened by the citrusy punch of homemade lemonade. It’s a sophisticated step up from a standard lemon ice pop, offering more antioxidants and a much more striking visual.
The process is efficient because it uses a “dual-texture” approach. By partially mashing some berries and leaving others whole, you create a popsicle that is both a refreshing drink and a fruit snack in one. It’s an ideal way to use up a pint of blueberries that might be getting a little soft, as the freezing process preserves their flavor perfectly.
The texture is “icy and refreshing” with “juicy bursts” from the whole berries. The flavor profile is a bright, zesty lemonade base smoothed out by the earthy sweetness of blueberries.
Servings: 6–8 popsicles
Ingredients
- 1 ½ cups fresh or frozen blueberries
- 1 ½ cups water
- 1/2 cup fresh lemon juice (about 3–4 large lemons)
- 1/3 cup honey or granulated sugar (adjust to your preferred tartness)
- 1 teaspoon lemon zest
- Optional: A few fresh mint leaves, finely chopped
Instructions
- The Berry Puree: Place 1 cup of the blueberries and 2 tablespoons of the water in a small saucepan. Heat over medium for 3–5 minutes, mashing the berries with a fork until they burst and release their deep purple juice. Let this cool.
- The Lemonade Base: In a pitcher or large measuring cup, whisk together the remaining water, lemon juice, lemon zest, and sweetener until the sugar/honey is completely dissolved.
- The Marbling: Stir the cooled blueberry mixture into the lemonade.
Pro Tip: If you want a “swirled” look, don’t stir completely. If you want a solid purple popsicle, give it a good whisk! - The Texture: Drop the remaining 1/2 cup of whole blueberries into your popsicle molds.
- The Pour: Pour the blueberry lemonade mixture over the whole berries in the molds.
- Freeze: Insert the sticks and freeze for at least 6 hours.
Note: Citrus-based pops take a bit longer to freeze solid than creamy ones, so overnight is usually best. - Unmold: Run the mold under warm water for 10–15 seconds and enjoy the ultimate summer refresher.
Coconut Milk Berry Pops
Preparing Coconut Milk Berry Pops is a practical way to achieve a “gourmet dairy-free” treat. While the yogurt-based pops we made earlier offer a tangy profile, these are characterized by the tropical, buttery richness of full-fat coconut milk. This recipe is highly effective because it mimics the mouthfeel of heavy cream but remains entirely plant-based and vegan-friendly.
The process is efficient because it relies on simple layering or swirling techniques that make the final product look like a high-end artisanal dessert. It’s the perfect use for that can of coconut milk sitting in your pantry and any assortment of berries—blueberries, raspberries, or strawberries—that you have on hand. It’s “clean eating” disguised as an indulgent summer dessert.
The texture is “ultra-creamy and dense,” while the flavor profile is a delicate balance of toasted coconut notes and sweet, jammy fruit.
Servings: 6–8 popsicles
Ingredients
- 1 can (13.5 oz) full-fat coconut milk (canned is essential for creaminess)
- 1 ½ cups mixed berries (blueberries, raspberries, and/or chopped strawberries)
- 3 tablespoons maple syrup or honey (divided)
- 1 teaspoon vanilla extract
- A pinch of sea salt
- Optional: 1/2 teaspoon ground cinnamon for a warm finish
Instructions
- The Creamy Base: In a bowl, whisk together the coconut milk, vanilla extract, a pinch of salt, and 2 tablespoons of the sweetener.
Pro Tip: If the coconut milk has separated in the can, give it a quick pulse in the blender first to ensure a silky-smooth base. - The Berry Puree: In a small blender or food processor, pulse the berries with the remaining 1 tablespoon of sweetener. Stop before it’s a total liquid—leaving some small chunks of fruit makes for a better popsicle texture.
- The Assembly:
- For a Swirled Look: Pour the coconut mixture into the molds until they are 3/4 full. Spoon a tablespoon of the berry puree into each mold. Use a thin skewer or knife to gently swirl the purple puree into the white coconut milk.
- For a Layered Look: Pour the berry puree into the bottom third of the molds. Freeze for 20 minutes, then pour the coconut milk on top.
- The “Whole Fruit” Finish: Drop a few whole blueberries or raspberry halves into the molds. They will “suspend” in the thick coconut milk, creating a beautiful stained-glass effect.
- Freeze: Insert the sticks and freeze for at least 6 hours or overnight.
- Unmold: Run the mold under warm water for 10 seconds to release.

hi there,
i’m James
The home cook and food blogger behind Beyond the Bayou Blog. Cooking has always been my happy place.
know more