Perfect Chicken Spring Rolls Recipe!
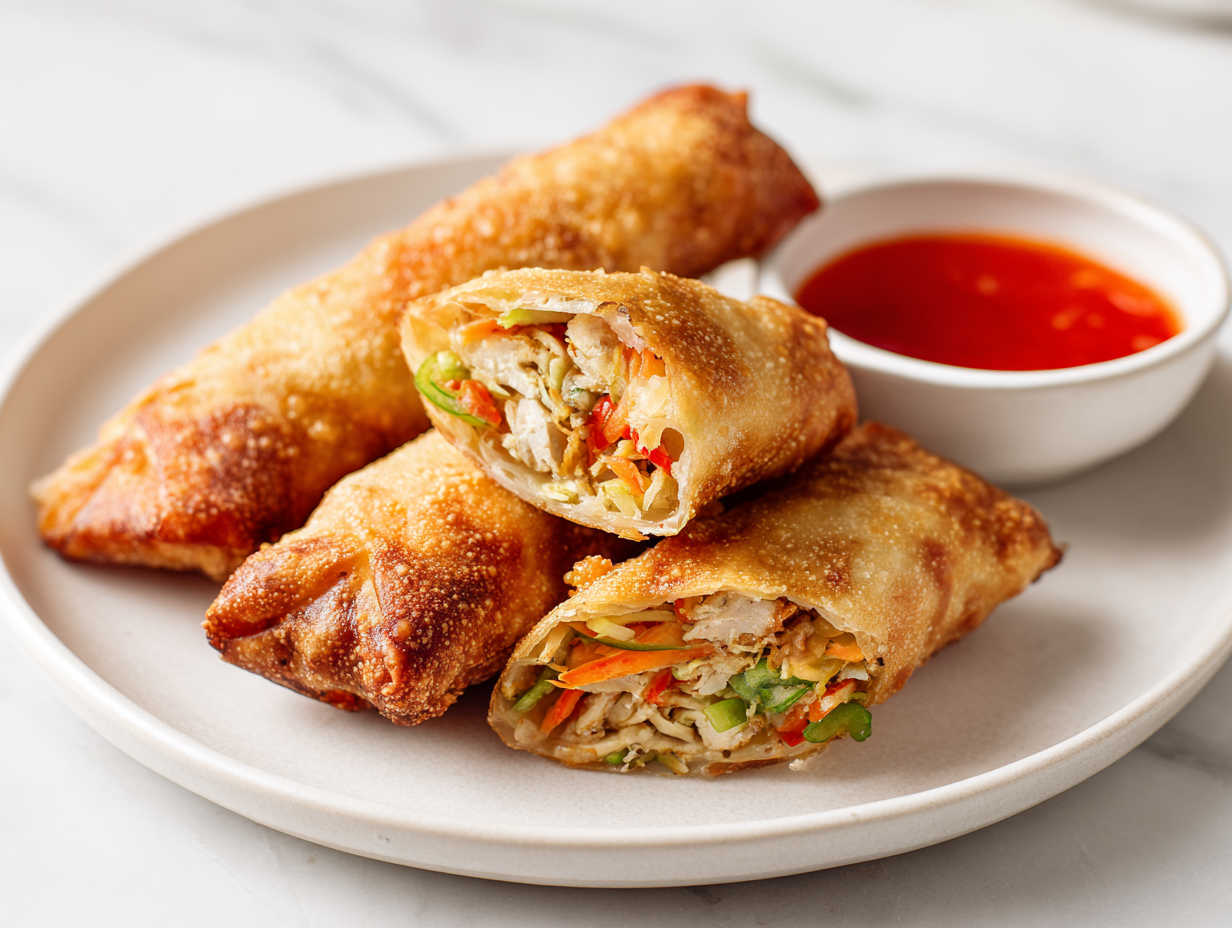
There’s something deeply satisfying about that first bite into a golden, crispy spring roll—the delicate crunch followed by a juicy, savory filling hits all the right notes. This Chicken Spring Rolls recipe has been my go-to for both casual snacks and crowd-pleasing appetizers.
The rolls are packed with tender chicken, sweet bell peppers, crunchy cabbage, and just the right amount of soy and vinegar to make every bite zing with flavor. What makes this version a standout isn’t just the texture, but how light yet satisfying they feel.
Unlike deep-fried snacks that weigh you down, these are protein-rich and veggie-loaded, perfect for anyone trying to keep things lighter without sacrificing taste.
Pair them with this umami-rich Katsu Sauce or a refreshing Guava Margarita to round out the experience. It’s an ideal combo—zesty, sweet, savory, and crisp all in one meal.
Chicken spring rolls are trending for a reason—they’re freezer-friendly, portable, and versatile across cultures. Plus, with more people leaning into homemade versions of their favorite takeout foods, this recipe delivers that same joy at home.
They’re fun to roll, quick to fry, and seriously hard to resist.
Have your own twist? Add it in the comments—I’d love to see your version of this crispy favorite!
Why You’ll Want to Make This Again and Again!

- Rotisserie Chicken = Instant Flavor Boost: I often use leftover rotisserie chicken, and honestly, it makes the filling so much richer. Plus, it's a total time-saver on busy days.
- Big-Batch Friendly & Freezer-Ready: One of my favorite things? These spring rolls freeze like a dream. I prep a whole batch on the weekend and just fry them up whenever snack cravings strike.
- Just the Right Balance: The veggie-to-chicken ratio hits that perfect mark—you get full, not heavy. And every bite has that addictive crunch!
- Sauce Versatility Is a Win: While my family loves spicy ketchup, I’ve served them with Katsu Sauce too—always a hit. They’re super versatile with dips.
- A Smarter Snack Option: They satisfy those salty, crispy cravings without resorting to junk. Homemade, wholesome, and absolutely addictive.
Chicken Spring Rolls Recipe
Equipment
- Large skillet or wok
- Tongs
- Knife and chopping board
- Small bowl (for flour paste)
- Deep frying pan or kadai
- Kitchen paper or wire rack (for draining)
Ingredients
- Oil - 2 tblspn + for deep frying
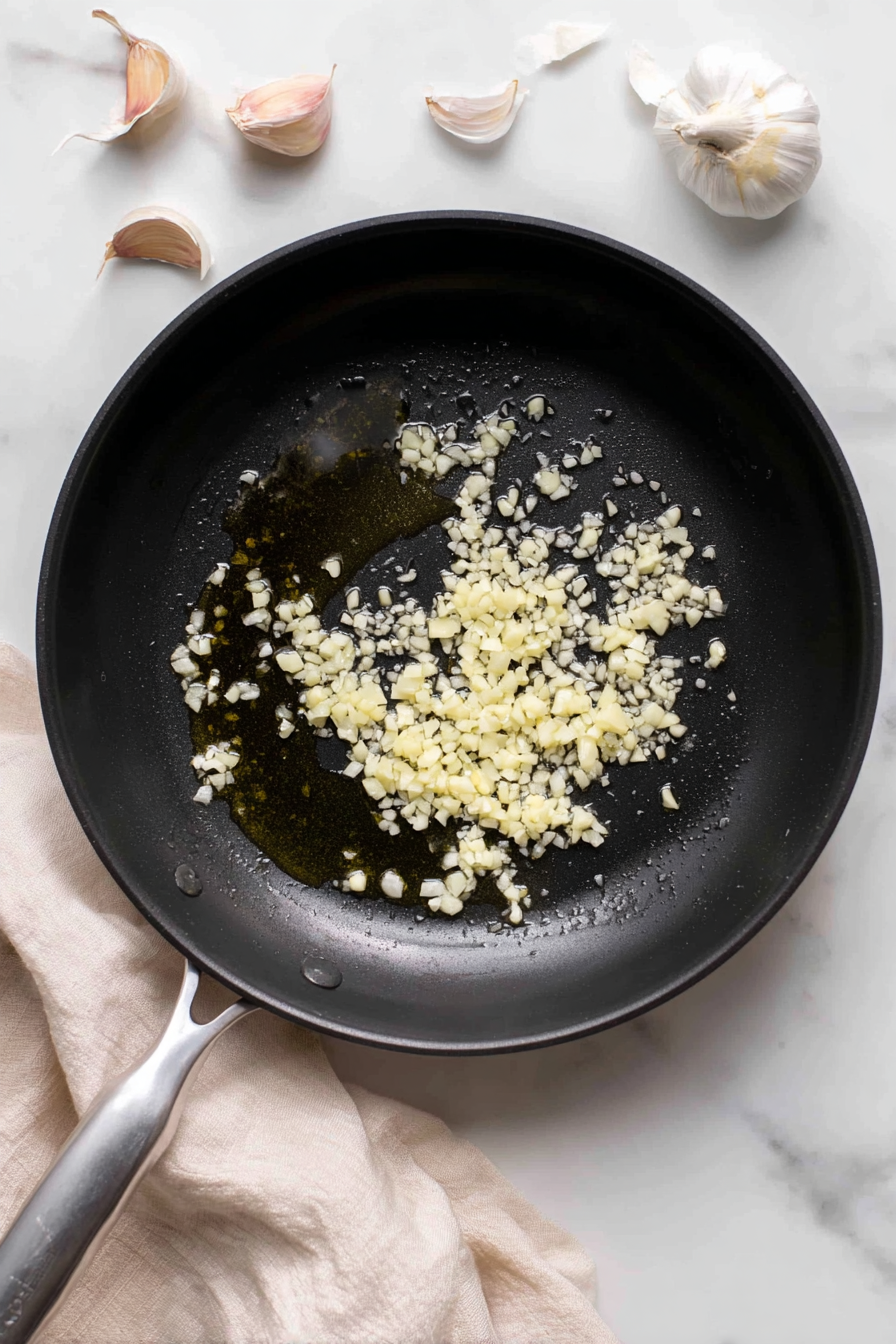
- Garlic - 6 cloves chopped finely
- Boneless Chicken Breast - 2 sliced thinly
- Onion - 1 large sliced thinly
- Cabbage - 3 cups sliced thinly
- Carrots - 1 large sliced thinly
- Capsicum / Bell Pepper - 1 sliced thinly
- Soy Sauce - 2 tblspn
- Vinegar - 1 tblspn
- Salt to taste
- Sugar - 1 tblspn
- Black Pepper - 2 tsp
- Spring Roll sheets - 20
- All Purpose Flour / Maida - ¼ cup
- Water little for making paste
Instructions
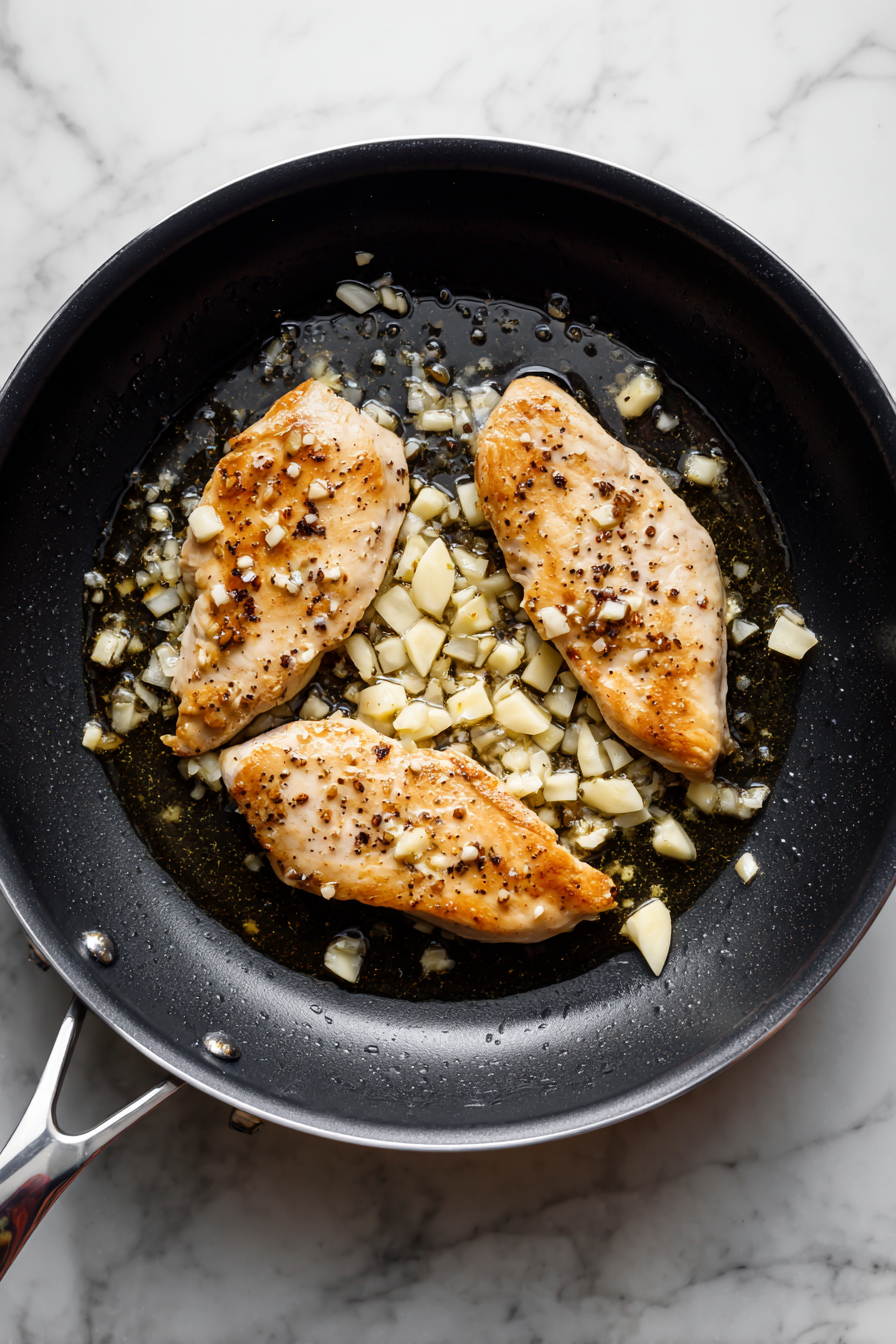
- Heat 2 tbsp oil in a skillet, add chopped garlic and sauté until golden.
- Add sliced chicken and cook until no longer pink.
- Toss in onions, cabbage, carrots, and capsicum; stir-fry for 5–6 minutes.

- Add soy sauce, vinegar, salt, sugar, and black pepper; cook until well combined and moisture evaporates.
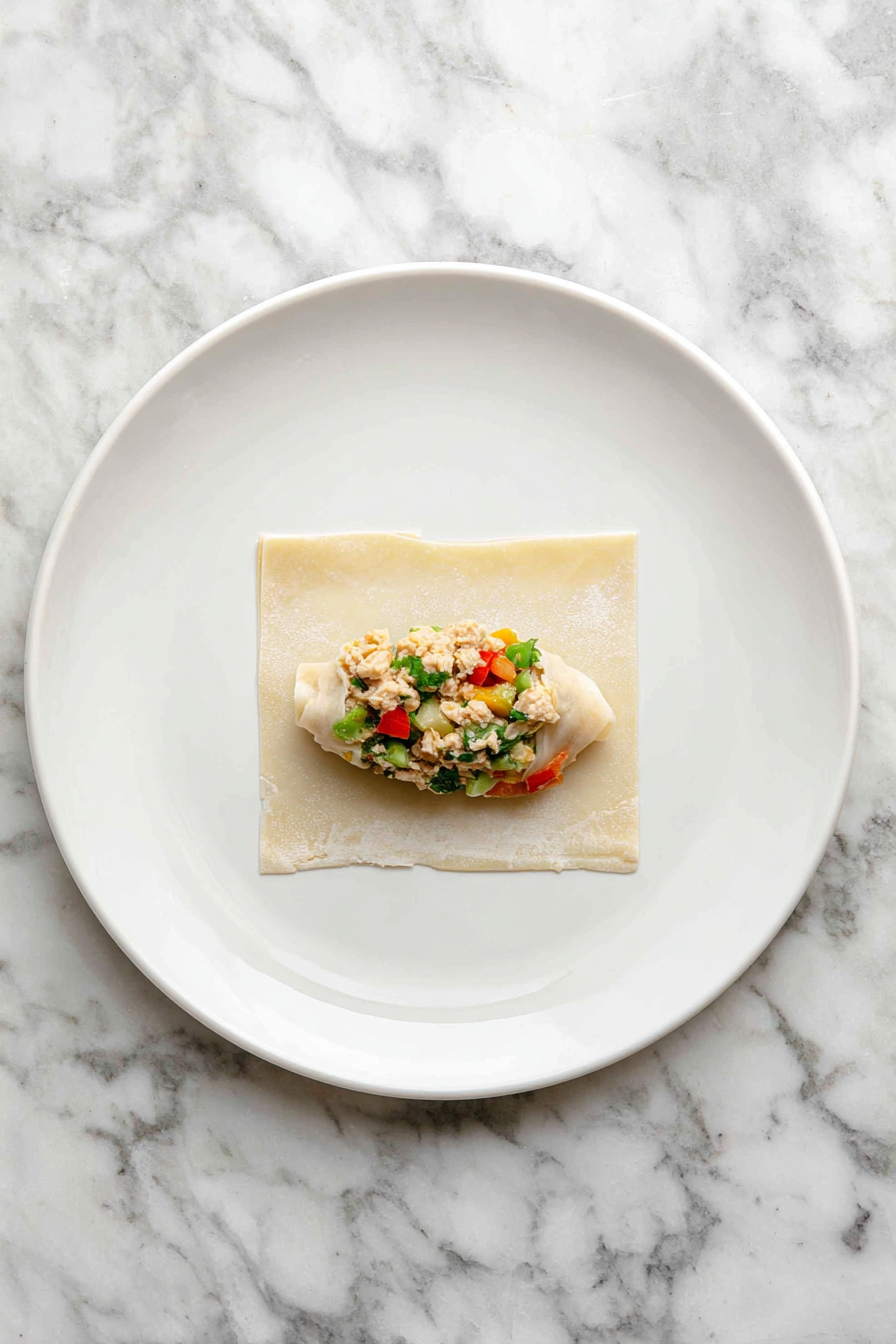
- Let the mixture cool. Mix flour with a little water in a small bowl to make a sealing paste.
- Place a spoonful of filling on each spring roll sheet, roll tightly, and seal the edge with the paste.
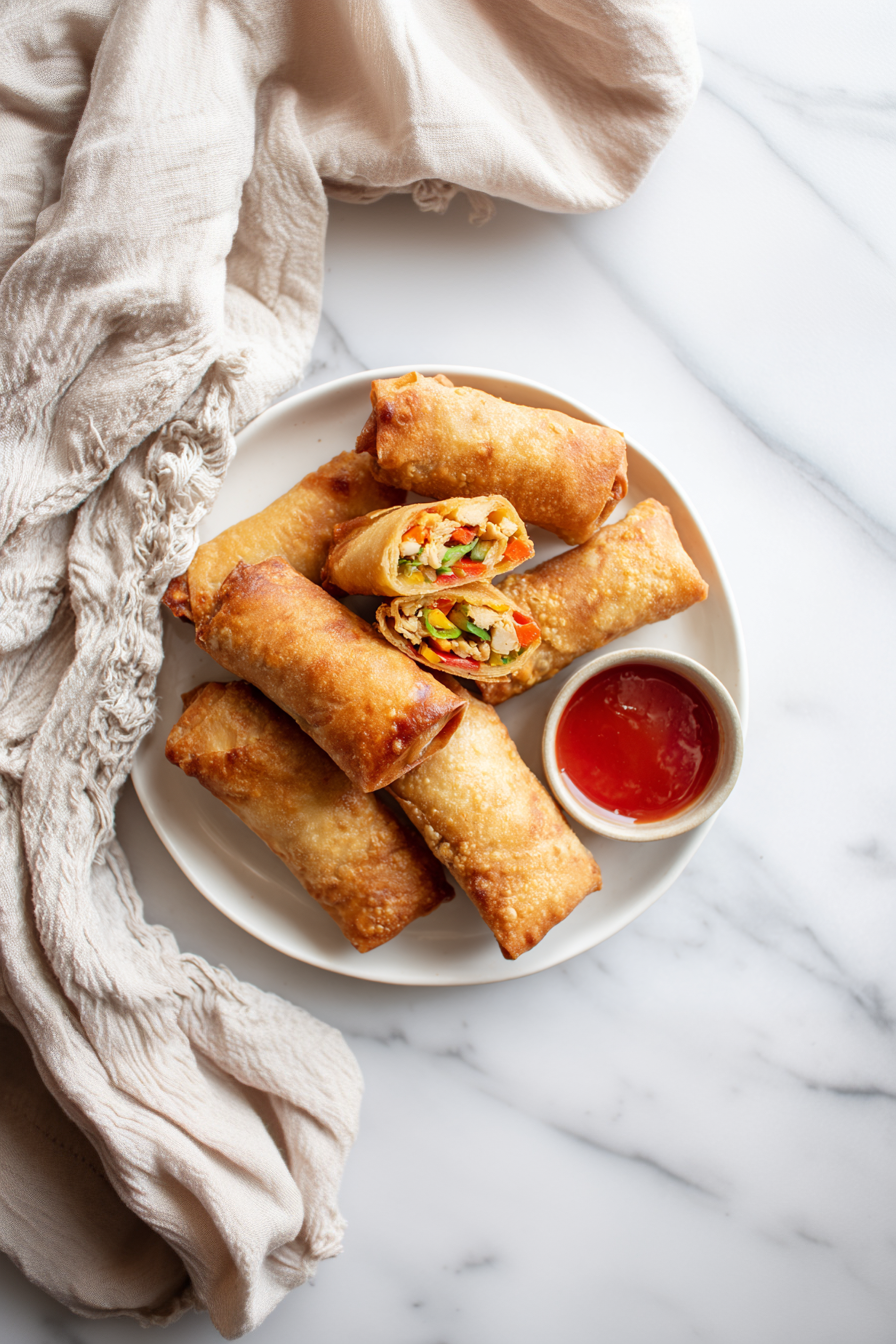
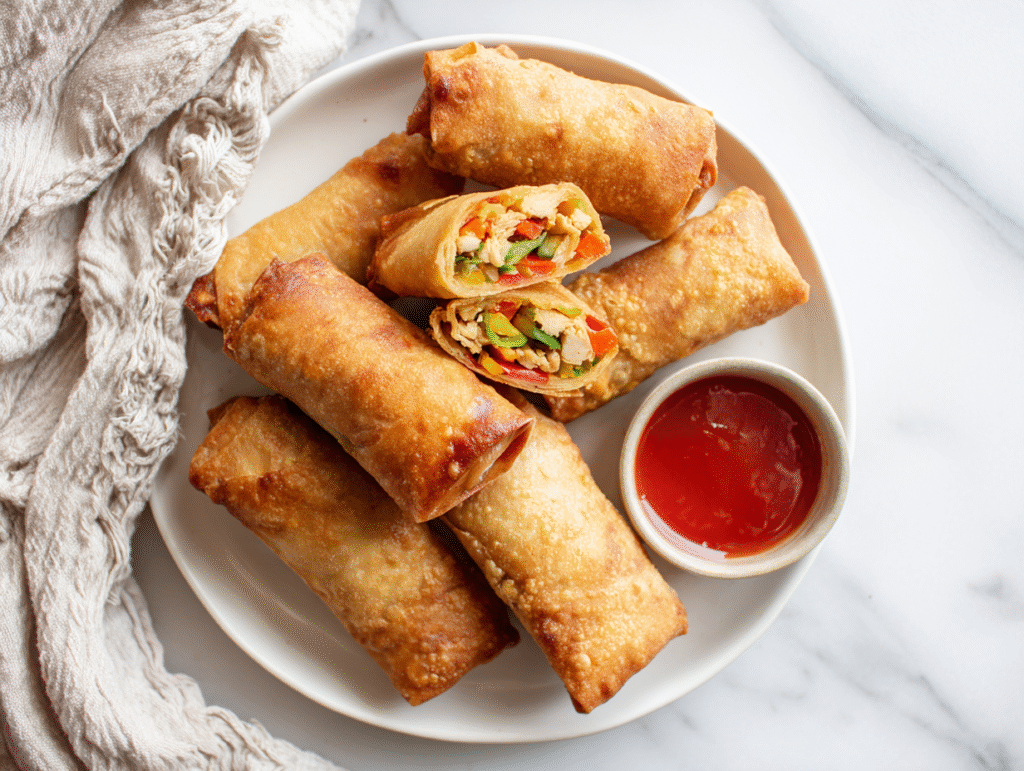
- Deep fry rolls in hot oil until golden and crisp.

- Drain on paper towels and serve hot with Katsu Sauce or your favorite dip.
Nutrition
Tips For Next-Level Chicken Spring Rolls!
1. Cool the Filling Completely Before Rolling:
Even a little steam can ruin the crispiness—moisture trapped inside the wrapper leads to soggy rolls or bursting during frying. Cool the filling to room temp for best results.
2. Stack Rolls with Parchment, Not Plastic:
When prepping ahead, layer raw spring rolls with parchment paper—not cling film—to prevent sticking and tearing. This keeps the wrappers smooth and easy to handle.
3. Double Wrap for Extra Crunch:
If you love that ultra-crispy shell, use two spring roll sheets per roll. It adds just enough extra texture and helps prevent oil from seeping in during frying.
4. Freeze Before Frying for Make-Ahead Ease:
Lay assembled rolls on a tray, freeze until firm, then transfer to a bag. Fry straight from frozen—just a minute longer—and they’ll turn out perfectly crisp and sealed.
5. Use Cornstarch in the Paste for Better Hold:
For a stronger seal, swap some all-purpose flour with cornstarch in your sealing paste. It gives a smoother finish and holds better during frying.
6. Fry in Small Batches:
Crowding the pan drops oil temperature, which means greasier rolls. Fry 3–4 at a time for that perfect golden crust.
7. Toss Leftovers into a Stir-Fry:
Got broken wrappers or extra filling? Sauté it into a stir-fry or fried rice—it’s a delicious zero-waste bonus.
Quick Questions?
Q. Can I bake the spring rolls instead of frying them?
Ans: Yes! Brush them lightly with oil and bake at 200°C (400°F) for 20–25 minutes, flipping halfway for even crispness.
Q. How do I keep the rolls crispy after frying?
Ans: Drain on a wire rack instead of paper towels and avoid covering them right away—steam trapped underneath can soften the shell.
Q. Can I make them ahead of time?
Ans: Definitely. You can assemble and freeze them raw. Fry straight from frozen whenever you need a quick snack or appetizer.
Q. What dipping sauces go best with these?
Ans: Katsu Sauce adds a rich umami flavor, but you can also serve them with sweet chili sauce, soy-garlic dip, or peanut sauce.
Q. How do I stop the wrappers from tearing while rolling?
Ans: Keep them covered with a damp towel while working, and don’t overfill. Also, let the filling cool completely before wrapping.
hi there,
i'm Anne
A food blogger with a passion for creating vibrant, approachable recipes.