Grilled vegetables have become much more than just a last-minute side dish at summer cookouts. With the right seasoning and a little char from the grill, simple vegetables can turn into some of the most flavorful dishes on the table. They add freshness, color, and balance to heavier BBQ meals.
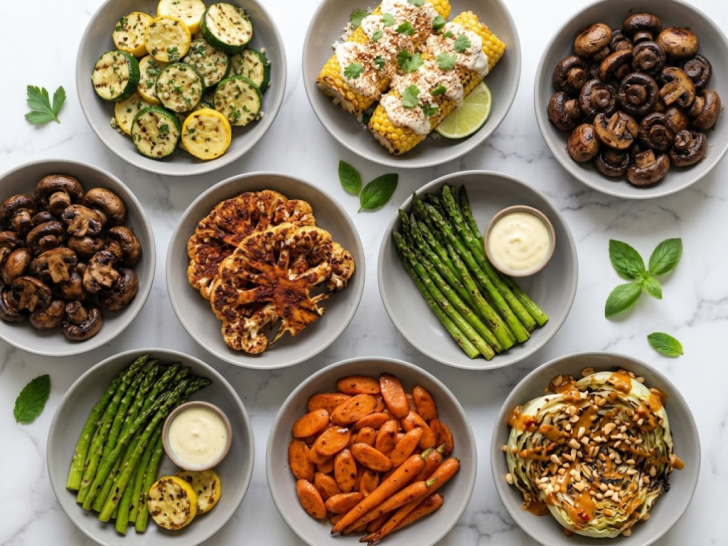
After reviewing both sources, a few clear favorites stand out. Corn, zucchini, cauliflower, cabbage, mushrooms, and asparagus continue to dominate grilled vegetable recipes because they hold up well over high heat and develop incredible smoky flavor. Creative toppings, herb sauces, and bold marinades are also becoming increasingly popular.
This list combines classic BBQ staples with fresh, modern ideas that feel exciting without being complicated. Each dish is easy to prepare, crowd-friendly, and perfect for adding more variety to your summer grilling spread.
1. Garlic Herb Grilled Zucchini
Preparing Garlic Herb Grilled Zucchini is a practical way to highlight the simplicity of summer produce. This recipe is highly effective because it uses high, direct heat to caramelize the zucchini’s natural sugars, transforming a vegetable that is often “mushy” into something with a smoky, al dente snap.
The process is remarkably efficient, it’s a “slice, toss, and sear” operation. By cutting the zucchini into thick “planks” or “spears,” you ensure they are sturdy enough to handle the grill grates without falling through. The garlic and herb oil acts as both a marinade and a finishing glaze, infusing the mild zucchini with a bold, savory punch.
The texture is a satisfying balance of “charred exterior” and “tender, succulent interior.” The flavor profile is bright, garlicky, and deeply herbal.
Servings: 4 servings
Ingredients
- 4 medium zucchini, ends trimmed
- 2 tablespoons extra-virgin olive oil
- 3 cloves garlic, minced (or 1 teaspoon garlic powder for an even coating)
- 1 teaspoon dried Italian seasoning (basil, oregano, thyme)
- 1/2 teaspoon kosher salt
- 1/4 teaspoon black pepper
- The Finisher:
- 1 tablespoon fresh parsley, chopped
- 1/2 lemon, for squeezing
- Optional: 2 tablespoons grated Parmesan cheese
Instructions
- The Cut: Slice each zucchini lengthwise into quarters to create “spears” or “batons.”
Pro Tip: Keeping the pieces thick (about 1/2-inch to 3/4-inch) prevents them from becoming soggy. Small zucchini are best because they have fewer seeds and a firmer texture. - The Marinade: In a large bowl, whisk together the olive oil, minced garlic, Italian seasoning, salt, and pepper. Add the zucchini and toss until every side is glistening.
The “Time-Saver” Hack: You can let these marinate for 15–20 minutes to deepen the flavor, but if you’re in a rush, they can go straight to the grill. - The Grill: Preheat your grill (or grill pan) to medium-high heat.
- The Sear: Place the zucchini spears on the grates in a single layer.
- Grill for 3–4 minutes per side.
- Flip once you see deep, dark grill marks and the flesh becomes slightly translucent but still holds its shape.
- The Brightening: Remove from the grill and place on a platter. Immediately squeeze the fresh lemon juice over the hot zucchini.
- The Finish: Sprinkle with fresh parsley and Parmesan cheese if you’re looking for an extra savory kick.
2. Mexican Street Corn with Lime Crema
Preparing Mexican Street Corn (Elotes) is a practical way to experience the high-contrast flavors of Mexican cuisine. This recipe is highly effective because it balances the natural, charred sweetness of grilled corn with a salty, tangy, and creamy “protective layer” of lime-infused crema.
The process is remarkably efficient once you master the Lime Crema. By whisking together the crema and spices while the corn is on the grill, you ensure that the second the corn is hot and charred, it’s ready to be slathered in flavor. It’s the perfect companion to your Garlic Herb Grilled Zucchini.
The texture is a satisfying “snap and pop” of kernels followed by a “creamy, crumbly” finish. The flavor profile is a bold mix of citrus, chili heat, and savory cheese.
Servings: 4–6 servings
Ingredients
- 4–6 ears of fresh sweet corn, husked
- 1 tablespoon vegetable oil or melted butter (for grilling)
- 1/2 cup crumbled Cotija cheese (or Feta as a salty substitute)
- 1/4 cup fresh cilantro, chopped
- 1 teaspoon chili powder or Tajín (for a lime-chili kick)
For the Lime Crema:
- 1/4 cup Mexican crema (or sour cream/Greek yogurt)
- 2 tablespoons mayonnaise
- 1 clove garlic, finely minced
- Juice and zest of 1 lime
- 1/4 teaspoon salt
Instructions
- The Crema: In a small bowl, whisk together the crema, mayo, minced garlic, lime juice, lime zest, and salt. Set aside.
Pro Tip: Making the crema first allows the garlic to infuse into the cream while you grill the corn. - The Corn Prep: Lightly brush the shucked corn with oil or melted butter.
The “Handle” Hack: If you leave the husks attached, peel them back and tie them with kitchen twine to create a natural “handle” for eating! - The Grill: Preheat your grill or grill pan to medium-high. Place the corn on the grates.
- The Char: Grill for 8–10 minutes, turning every 2 minutes. You want the kernels to be tender and show patches of deep, dark brown char marks.
- The Slather: Remove the hot corn from the grill. Immediately brush a generous layer of the Lime Crema over every inch of the cob.
- The Roll: Sprinkle (or roll the cob in) the crumbled Cotija cheese, cilantro, and chili powder.
- Serve: Serve immediately with extra lime wedges on the side.
3. Balsamic Grilled Mushrooms
Preparing Balsamic Grilled Mushrooms is a practical way to achieve a “meaty” texture without any meat. This recipe is highly effective because mushrooms act like sponges, soaking up the acidic, syrupy notes of balsamic vinegar and the deep umami of soy sauce.
The process is efficient because it relies on high heat to quickly evaporate the mushroom’s water content, concentrating its flavor. Whether you use whole creminis on skewers or large Portobello “steaks,” the result is a charred, juicy bite that pairs beautifully with anything from a grilled steak to a fresh salad.
The texture is “tender and succulent” with a glossy, mahogany glaze. The flavor profile is a sophisticated mix of tangy balsamic, savory garlic, and earthy herbs.
Servings: 4 servings
Ingredients
- 1 lb. (approx. 500g) Cremini or Baby Bella mushrooms
- 3 tablespoons balsamic vinegar
- 2 tablespoons extra-virgin olive oil
- 1 tablespoon soy sauce (or tamari for gluten-free)
- 2 cloves garlic, minced
- 1/2 teaspoon dried thyme (or 1 tablespoon fresh)
- 1/4 teaspoon black pepper
- The Finisher: A sprinkle of fresh parsley or chives
Instructions
- The Clean: Wipe the mushrooms with a damp paper towel to remove any dirt.
The “Dry” Rule: Never soak mushrooms in water! They will absorb the liquid and become rubbery on the grill rather than searing perfectly. - The Prep: If the mushrooms are small, leave them whole for maximum juiciness. If they are larger than 2 inches, slice them in half.
- The Marinade: In a large bowl, whisk together the balsamic vinegar, olive oil, soy sauce, garlic, thyme, and pepper.
- The Infusion: Add the mushrooms to the bowl and toss to coat. Let them marinate for at least 20–30 minutes.
Pro Tip: Don’t marinate for much longer than an hour, or the vinegar will start to break down the mushroom’s delicate structure. - The Skewers: If using small mushrooms, thread them onto metal or soaked wooden skewers. This makes flipping them on the grill effortless.
- The Grill: Preheat your grill to medium-high. Place the mushrooms (or skewers) on the grates.
- The Sear: Grill for 4–5 minutes per side (about 8–10 minutes total). Brush any remaining marinade over them halfway through. They are ready when they are darkened, slightly shrunken, and tender to the touch.
- Serve: Garnish with fresh herbs and serve immediately.
4. Smoky Grilled Cauliflower Steaks
Preparing Smoky Grilled Cauliflower Steaks is a practical way to turn a humble vegetable into a substantial, center-plate feature. This recipe is highly effective because the flat surfaces of the “steaks” allow for maximum contact with the grill, creating a deeply caramelized crust that mimics the savory char of meat. It’s an efficient plant-based option that absorbs smoky flavors better than almost any other brassica.
The “steak” cut ensures the cauliflower stays intact on the grates, providing a hearty, fork-and-knife texture. The addition of smoked paprika and cumin provides an earthy depth that balances the natural sweetness of the roasted vegetable.
Servings: 2–4 servings
Ingredients
- 1 large head of cauliflower
- 3 tablespoons olive oil
- 1 teaspoon smoked paprika
- 1/2 teaspoon garlic powder
- 1/2 teaspoon ground cumin
- 1/2 teaspoon kosher salt
- 1/4 teaspoon black pepper
- The Finisher:
- Fresh squeezed lemon juice
- Chopped fresh cilantro or parsley
- Optional: A drizzle of tahini or a sprinkle of toasted pine nuts
Instructions
- The Cut: Remove the outer leaves from the cauliflower but keep the core intact (this holds the steaks together). Cut the head in half through the center, then cut 3/4-inch thick slices from each half.
Note: You will likely get 2–3 solid “steaks” from the center. The remaining florets that fall off can be tossed in the same seasoning and grilled in a grill basket. - The Seasoning: In a small bowl, whisk together the olive oil, smoked paprika, garlic powder, cumin, salt, and pepper.
- The Coating: Brush both sides of each cauliflower steak generously with the oil mixture.
- The Grill: Preheat your grill to medium heat.
- The Sear: Place the steaks directly on the grates. Cover the grill and cook for 5–7 minutes per side.
- Flip carefully with a large flat spatula once they have dark grill marks and the core is tender when pierced with a fork.
- The Finish: Remove from the heat and immediately hit them with a squeeze of fresh lemon juice to brighten the smoky spices.
5. Grilled Asparagus with Lemon Aioli
Preparing Grilled Asparagus with Lemon Aioli is a practical way to elevate a simple spring and summer staple. This recipe is highly effective because the narrow stalks of asparagus cook rapidly under high heat, developing a nutty, charred flavor that pairs perfectly with a bright, fatty sauce. The lemon aioli acts as a cooling, citrusy dip that balances the smoky intensity of the grill.
This is an efficient side dish that requires minimal prep—just a quick snap of the woody ends and a fast sear. It provides a sophisticated, “bistro-style” presentation with very little effort.
Servings: 4 servings
Ingredients
- 1 lb. (approx. 500g) fresh asparagus
- 1 tablespoon extra-virgin olive oil
- 1/2 teaspoon kosher salt
- 1/4 teaspoon black pepper
For the Lemon Aioli:
- 1/4 cup mayonnaise
- 1 clove garlic, finely grated or minced
- 1 teaspoon lemon zest
- 1 tablespoon fresh lemon juice
- Optional: A pinch of cayenne pepper for a subtle kick
Instructions
- The Prep: Rinse the asparagus and snap off the woody bottom ends.
The “Natural Snap” Trick: Hold a stalk of asparagus at the base and in the middle, then bend it until it snaps. It will naturally break at the point where the stalk becomes tender. Use that as a guide to trim the rest of the bunch. - The Seasoning: Toss the asparagus with olive oil, salt, and pepper until the spears are evenly coated.
- The Aioli: While the grill heats up, whisk together the mayonnaise, garlic, lemon zest, and lemon juice in a small bowl. Set aside so the flavors can meld.
- The Grill: Preheat the grill to medium-high heat.
- The Sear: Place the asparagus spears across the grates (perpendicular to the bars so they don’t fall through).
- Grill for 3–5 minutes, rolling the spears occasionally with tongs.
- They are done when they are bright green with dark char marks and a slight “crunch” remains.
- The Finish: Transfer the asparagus to a platter. Drizzle with the lemon aioli or serve it on the side for dipping.
6. Honey Glazed Grilled Carrots
Preparing Honey Glazed Grilled Carrots is a practical way to intensify the natural sugars found in root vegetables. This recipe is highly effective because it uses the high heat of the grill to create “charred edges” that contrast with a sticky, sweet glaze. It is an efficient side dish that transforms a basic pantry staple into something vibrant and textured.
By par-boiling or using the “indirect heat” method, you ensure the carrots are tender all the way through without burning the honey coating. This provides a balance of earthy, roasted notes and a bright, floral sweetness.
Servings: 4 servings
Ingredients
- 1 lb. (approx. 500g) whole carrots (preferably with tops, or large garden carrots)
- 2 tablespoons honey
- 2 tablespoons extra-virgin olive oil
- 1 tablespoon apple cider vinegar or lemon juice
- 1/2 teaspoon ground cumin or smoked paprika
- 1/2 teaspoon kosher salt
- 1/4 teaspoon black pepper
- The Finisher:
- Fresh thyme or parsley, chopped
- Optional: A sprinkle of red pepper flakes for “hot honey” vibes
Instructions
- The Prep: Peel the carrots. If they are very thick, slice them in half lengthwise to ensure even cooking.
The “Tenderize” Hack: If using very large, woody carrots, simmer them in boiling water for 3–5 minutes before grilling. If using slender “young” carrots, you can skip this and go straight to the grill. - The Glaze: In a small bowl, whisk together the honey, olive oil, vinegar, cumin (or paprika), salt, and pepper.
- The Coating: Toss the carrots in a bowl with about two-thirds of the glaze. Save the remaining third for a final brush.
- The Grill: Preheat the grill to medium heat.
- The Char: Place the carrots across the grates. Grill for 8–12 minutes, turning occasionally.
- Look for deep grill marks and a slight “bend” in the carrot when lifted.
- The Final Brush: During the last 2 minutes of grilling, brush the remaining glaze over the carrots. The honey will bubble and caramelize quickly, so watch closely to prevent burning.
- The Finish: Remove from the grill and garnish with fresh herbs.
7. Spicy Thai Grilled Cabbage Wedges
Preparing Spicy Grilled Cabbage Wedges is a practical way to transform an affordable, humble vegetable into a smoky, high-impact side. This recipe is highly effective because it utilizes the tight layers of the cabbage to trap heat and seasoning, resulting in a “tender-crisp” texture. The high heat of the grill wilts the outer leaves into crispy “chips” while the interior remains succulent and sweet.
The spicy element provides a sharp contrast to the natural sweetness of the charred cabbage. This is a robust, “fork-and-knife” vegetable dish that stands up well to heavy proteins or works perfectly as a standalone plant-based snack.
Servings: 4 wedges
Ingredients
- 1 medium head of Green or Savoy cabbage
- 3 tablespoons extra-virgin olive oil
- 1 tablespoon Sriracha or your favorite hot sauce
- 1 tablespoon lime juice
- 1 teaspoon garlic powder
- 1/2 teaspoon smoked paprika
- 1/2 teaspoon salt
- The Finisher:
- A drizzle of ranch or blue cheese dressing (to cool the heat)
- Chopped green onions or chives
- Optional: Toasted sesame seeds
Instructions
- The Cut: Keep the root end of the cabbage intact. Slice the head in half, then slice each half into two or three wedges.
Crucial Step: Do not cut out the core. The core is what holds all the leaves together on the grill so the wedge doesn’t fall apart. - The Spicy Oil: In a small bowl, whisk together the olive oil, hot sauce, lime juice, garlic powder, paprika, and salt.
- The Coating: Brush the spicy oil mixture onto all sides of each wedge, making sure to let some of it seep down into the layers.
- The Grill: Preheat the grill to medium heat.
- The Char: Place the wedges on the grill. Cover and cook for 5–7 minutes per side.
- The edges should be blackened and crispy, and the core should be easily pierced with a knife.
- The Finish: Remove from the grill and garnish with green onions and a drizzle of dressing if you want to balance the spice.

hi there,
i’m James
The home cook and food blogger behind Beyond the Bayou Blog. Cooking has always been my happy place.
know more