When the heat is at its peak, the last thing anyone wants is to stand over a hot stove. That’s where no-cook dinners come in, they’re quick, refreshing, and perfect for keeping your kitchen cool. With the right ingredients, you can still enjoy a полноцен meal without turning on any heat.
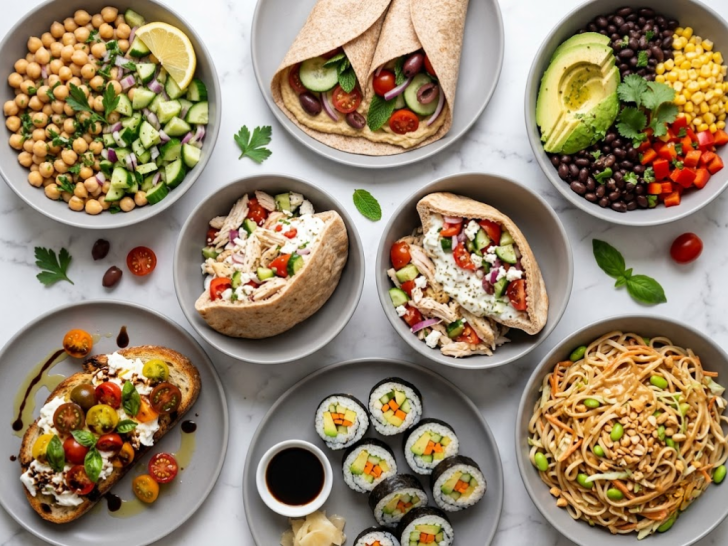
Looking at both sources, most no-cook meals focus on fresh produce, ready-to-use ingredients, and simple assembly. Think salads, wraps, chilled soups, and bowls made with beans, rotisserie chicken, or raw veggies. These meals are designed to be filling while staying light and easy.
This list brings together practical, summer-friendly dinners that require minimal effort. Each one is quick to put together, packed with flavor, and ideal for those days when you want something satisfying without the extra heat.
1. Chickpea Cucumber Lemon Salad Bowl
Preparing a Chickpea Cucumber Lemon Salad Bowl is a practical and high-impact way to enjoy a “nutrient-dense” meal without any cooking. This bowl is exceptionally effective because it combines plant-based protein from chickpeas with the hydrating crunch of cucumbers, all tied together by a zesty, alkaline-rich lemon dressing. It’s a staple of the Mediterranean diet, designed to be filling yet light enough to avoid a post-lunch energy crash.
The process is highly efficient, it’s essentially a “chopping assembly.” Since chickpeas are a pantry staple and cucumbers are year-round produce, this is the ultimate reliable meal for busy weekdays. It’s also a “fridge-hardy” salad; unlike leafy greens, the chickpeas and cucumbers actually taste better after marinating in the lemon juice for a few hours.
The texture is a satisfying interplay of “creamy-earthy” beans and “snappy-crisp” vegetables. The flavor profile is a bright, clean harmony of citrus, garlic, and fresh garden herbs.
Servings: 4 servings
Ingredients
- 2 cans (15 oz each) chickpeas, rinsed and drained
- 2 large English cucumbers (or 5–6 Persian cucumbers), diced
- 1/2 small red onion, finely minced
- 1 cup cherry tomatoes, halved (optional, for color)
- 1/2 cup fresh parsley, chopped
- 1/4 cup fresh dill or mint, chopped
- 1/2 cup crumbled feta cheese (optional, for a salty tang)
For the Zesty Lemon Dressing:
- 1/4 cup extra virgin olive oil
- 3 tablespoons fresh lemon juice (about 1–2 lemons)
- 1 teaspoon lemon zest
- 1 clove garlic, minced or grated
- 1/2 teaspoon dried oregano
- 1/2 teaspoon salt
- 1/4 teaspoon black pepper
- Optional: 1 teaspoon honey to balance the acidity
Instructions
- The Chickpea Prep: Drain and rinse your chickpeas thoroughly.
Pro Tip: Pat the chickpeas dry with a clean kitchen towel before adding them to the bowl. This helps the dressing cling to the beans rather than sliding off due to excess water. - The Chop: Dice the cucumbers and tomatoes into pieces roughly the same size as the chickpeas. This “uniformity” ensures you get a bit of everything in each spoonful.
- Mellow the Onion: If you find raw red onion too sharp, soak the minced pieces in a small bowl of cold water for 5 minutes, then drain. This removes the “bite” while keeping the crunch.
- Whisk the Dressing: In a small jar or bowl, whisk together the olive oil, lemon juice, zest, garlic, oregano, honey, salt, and pepper until emulsified.
- The Big Toss: In a large salad bowl, combine the chickpeas, cucumbers, onions, and fresh herbs. Pour the dressing over the top and toss well.
- The Cheese Fold: If using feta, fold it in last and very gently so it stays in distinct crumbles rather than dissolving into the dressing.
- The Marination: Let the salad sit for at least 15 minutes before serving. This allows the lemon juice to “pickle” the onions slightly and penetrate the chickpeas.
2. Mediterranean Hummus Veggie Wrap
Preparing a Mediterranean Hummus Veggie Wrap is a practical masterclass in “texture-stacking.” This wrap is highly effective because it uses hummus not just for flavor, but as a structural “glue” that keeps the fresh vegetables from sliding out of the tortilla. It’s a quintessential Mediterranean-style meal: plant-forward, protein-rich, and incredibly portable.
The process is efficient because it requires zero heat. It’s the ultimate “fridge-raid” lunch, if you have a container of hummus and a few crisp vegetables, you have a gourmet meal in under five minutes. It’s also a fantastic way to eat the rainbow; the more colors you pack inside, the more diverse the nutrient profile becomes.
The texture is a satisfying contrast of a “pillowy” wrap, “creamy” hummus, and “shredded, snappy” vegetables. The flavor profile is earthy and savory, finished with the bright, salty punch of olives and feta.
Servings: 2 wraps
Ingredients
- 2 large whole-wheat or spinach tortillas (flour tortillas work best for rolling)
- 1/2 cup classic or roasted red pepper hummus
- 1 cup baby spinach or mixed greens
- 1/2 cucumber, sliced into long matchsticks
- 1/2 red bell pepper, thinly sliced
- 1/4 red onion, thinly sliced
- 1/4 cup crumbled feta cheese
- 2 tablespoons Kalamata olives, sliced
- 1 tablespoon sunflower seeds or hemp hearts (for a “nutty” crunch)
- A squeeze of fresh lemon juice
Instructions
- The Foundation: Lay the tortillas flat on a clean surface. Spread a thick, even layer of hummus across the center of each, leaving about an inch of space around the edges.
The “Seal” Secret: Spreading the hummus all the way to the edges at the top and bottom helps “glue” the wrap together once you roll it up. - The Greens: Layer a handful of spinach or greens directly onto the hummus. This prevents the moisture from the other veggies from making the tortilla soggy.
- The Veggie Stack: Arrange the cucumber, bell pepper, and red onion in neat rows on top of the greens.
Pro Tip: Keep all the veggie slices running in the same direction, parallel to the way you intend to roll. This makes the wrap much easier to bite into. - The Flavor Bombs: Sprinkle the feta, olives, and sunflower seeds over the vegetables. Add a quick squeeze of lemon juice and a crack of black pepper.
- The Roll: Fold the sides of the tortilla inward over the filling. Starting from the bottom, roll the tortilla up tightly while keeping the sides tucked in.
- The Finish: Cut diagonally with a sharp serrated knife to show off those colorful layers.
3. Avocado Black Bean Corn Salad Bowl
Preparing an Avocado Black Bean Corn Salad Bowl is a practical way to bring “Southwestern soul” to your meal prep. This bowl is highly effective because it leans on the “Holy Trinity” of plant-based satisfaction: creamy fats (avocado), hearty protein (black beans), and starchy sweetness (corn). Often called “Texas Caviar” when served as a dip, this salad is substantial enough to stand alone as a main course or act as a vibrant side for grilled fish or chicken.
The process is efficient because it relies heavily on high-quality pantry staples. Since black beans and corn can be used straight from the can (after a good rinse), the only real “work” involves dicing fresh avocado and whisking a quick lime-cilantro vinaigrette. It is a “power bowl” that stays fresh in the fridge and provides a steady release of energy throughout the afternoon.
The texture is a playful mix of “velvety” avocado, “tender” beans, and “pop-in-your-mouth” corn kernels. The flavor profile is smoky, zesty, and buttery with a hint of garden freshness.
Servings: 4–6 servings
Ingredients
- 1 can (15 oz) black beans, rinsed and drained
- 1 ½ cups corn (fresh, frozen/thawed, or canned)
- 2 ripe avocados, diced
- 1 pint cherry tomatoes, halved
- 1/2 small red onion, finely diced
- 1/2 cup fresh cilantro, chopped
- 1 jalapeño, de-seeded and minced (optional, for heat)
For the Smoky Lime Dressing:
- 1/4 cup extra virgin olive oil
- 1/4 cup fresh lime juice (about 2 limes)
- 1 clove garlic, minced
- 1 teaspoon ground cumin
- 1/2 teaspoon smoked paprika (the “secret” for depth)
- Salt and black pepper to taste
Instructions
- The Base Mix: In a large bowl, combine the rinsed black beans, corn, tomatoes, red onion, and jalapeño.
- The “Char” Option: > Pro Tip: If you have an extra 5 minutes, toss your corn in a dry skillet over high heat until slightly charred. This smoky “street corn” vibe elevates the entire bowl.
- The Vinaigrette: Whisk together the olive oil, lime juice, garlic, cumin, smoked paprika, salt, and pepper.
Flavor Note: The smoked paprika mimics the taste of a grill, making the salad feel more “cooked” even though it’s raw. - The Dressing Toss: Pour the dressing over the bean and corn mixture and toss well.
- The Avocado Add: Fold in the diced avocado and fresh cilantro last.
Aesthetic Tip: Adding the avocado at the very end and folding gently prevents it from mashing into a “guacamole” paste, keeping the cubes distinct and beautiful. - Resting Time: Let the salad sit for 10 minutes at room temperature. The lime juice will season the beans and keep the avocado from browning.
4. Greek Yogurt Chicken Pita Pockets
Preparing Greek Yogurt Chicken Pita Pockets is a practical way to achieve a “creamy and indulgent” lunch without the heavy saturated fats of traditional mayonnaise-based salads. This recipe is highly effective because it uses Greek yogurt as a multi-purpose tool: it tenderizes the chicken during marination and serves as a high-protein “dressing” that binds the salad together. It’s the ultimate “portable bistro” meal, perfect for a busy workday or a light summer dinner.
The process is efficient because it’s a “shred and stir” operation if you use a rotisserie chicken, or a quick “marinate and sear” if you’re using fresh breasts. By stuffing the salad into puffy pita pockets, you create a self-contained meal that won’t fall apart on the go. It’s a refreshing, Mediterranean-inspired alternative to the standard chicken sandwich.
The texture is a satisfying blend of “pillowy” pita, “tender” chicken, and the “crunch” of fresh cucumbers and onions. The flavor profile is bright, tangy, and herby with a distinct garlic zing.
Servings: 4 pockets
Ingredients
- 2 cups cooked chicken, shredded or cubed (Rotisserie is a great time-saver)
- 4 whole-wheat or Greek-style pita breads
- 1/2 English cucumber, diced
- 1/2 cup cherry tomatoes, halved
- 1/4 cup red onion, finely minced
- 1/4 cup crumbled feta cheese
- 1/4 cup fresh dill or parsley, chopped
For the Creamy Yogurt Dressing:
- 1 cup plain Greek yogurt (full-fat for richness, or non-fat for high protein)
- 2 tablespoons fresh lemon juice
- 1 tablespoon extra virgin olive oil
- 2 cloves garlic, minced or grated
- 1 teaspoon dried oregano
- Salt and black pepper to taste
Instructions
- The Yogurt Base: In a large bowl, whisk together the Greek yogurt, lemon juice, olive oil, garlic, oregano, salt, and pepper.
Pro Tip: Let the dressing sit for 10 minutes before adding the chicken. This allows the garlic to “mellow” into the yogurt, preventing a harsh raw-garlic aftertaste. - The Salad Build: Add the shredded chicken, diced cucumber, tomatoes, and red onion to the bowl with the dressing.
- The Toss: Fold everything together until the chicken is thoroughly coated in the creamy sauce. Stir in the fresh dill and feta cheese last.
- Prep the Pitas: Warm your pita bread in the microwave for 15 seconds or on a dry skillet until soft and pliable. Slice off the top edge (about 1 inch) to open the “pocket.”
- The Stuffing: Gently pull the pocket open and stuff each pita generously with the chicken salad.
The “Leak-Proof” Layer: If you’re eating this later, place a large leaf of romaine lettuce inside the pita first. This acts as a barrier to prevent the yogurt dressing from making the bread soggy. - Serve: Garnish with an extra sprinkle of fresh herbs or a dash of paprika.
5. Fresh Tomato Burrata Toast
Preparing Fresh Tomato Burrata Toast is a practical way to enjoy a “five-star appetizer” with almost zero actual cooking. This dish is highly effective because it relies on the contrast of temperatures and textures: the warm, crunchy exterior of charred sourdough meets the cold, buttery, “oozing” center of fresh burrata cheese. It is the sophisticated older sibling of the standard avocado toast, designed for when you want something that feels intentional and luxurious.
The process is efficient because it’s all about the “assembly of excellence.” Since there are so few ingredients, the quality of your tomatoes and bread does all the heavy lifting for you. It’s the ultimate summer “light supper” or brunch centerpiece that looks stunning on a wooden board.
The texture is a masterpiece of “shatteringly crisp” bread, “silky-creamy” cheese, and “juicy” tomatoes. The flavor profile is a clean, sunny explosion of balsamic sweetness, peppery basil, and rich cream.
Servings: 2–4 toasts
Ingredients
- 2 large thick slices of sourdough or ciabatta bread
- 1 ball (4–8 oz) fresh Burrata cheese
- 1 cup heirloom cherry tomatoes, halved
- 1 clove garlic, peeled but left whole
- 2 tablespoons extra virgin olive oil
- 1 tablespoon balsamic glaze (the thick, syrupy kind)
- 1/4 cup fresh basil leaves, torn
- Flaky sea salt (like Maldon) and freshly cracked black pepper
Instructions
- The Toast: Brush both sides of your bread with olive oil. Grill them on a cast-iron skillet or a toaster until golden brown and sturdy.
The “Garlic Rub” Secret: While the bread is still hot and rough, rub the raw garlic clove across the surface of the toast. The heat will melt the garlic into the “nooks and crannies,” giving you a deep aroma without the harshness of chopped garlic. - The Tomato Marination: In a small bowl, toss the halved tomatoes with a drizzle of olive oil, salt, and pepper. Let them sit for 2 minutes so they release their juices.
- The Burrata Break: Place the burrata ball in the center of the toast slices. Use a knife or your fingers to break the outer “skin” (mozzarella) to reveal the creamy stracciatella center. Spread it gently toward the edges.
- The Topping: Spoon the marinated tomatoes (and their juices) over the creamy cheese.
- The Finishing Touches: Scatter the torn basil leaves over the top.
- The “Grand Finale”: Drizzle generously with balsamic glaze and finish with a pinch of flaky sea salt.
Pro Tip: Don’t skip the flaky salt! The large crystals provide a crunch that cuts through the richness of the cream.
6. No-Cook Veggie Sushi Rolls
Preparing no-cook veggie sushi rolls is a practical way to enjoy the “clean and crisp” experience of Japanese cuisine without the stress of perfect rice-cooker timing. This version is highly effective because it often swaps traditional sushi rice for “mock rice” (like finely pulsed cauliflower) or skips the grains entirely to focus on a high-density veggie crunch. It’s a “nutrient-bomb” disguised as a fun, finger-food dinner.
The process is efficient because it’s essentially an exercise in knife skills. Once your veggies are julienned (cut into matchsticks), the assembly is a simple roll-and-tuck. It’s the ultimate “cool kitchen” meal, no steam, no stove, just fresh ingredients and a bamboo mat. Plus, it’s a fantastic way to use up those odds and ends in your crisper drawer.
The texture is a satisfying “snap” from the vegetables wrapped in a “chewy, umami” Nori shell. The flavor profile is clean, salty, and bright, especially when paired with a zesty ginger-soy dipping sauce.
Servings: 2–3 rolls (approx. 16–24 pieces)
Ingredients
- 4 sheets of Nori (dried seaweed)
- 1 large carrot, julienned
- 1 cucumber, deseeded and julienned
- 1 bell pepper, thinly sliced
- 1 ripe avocado, sliced into thin strips
- 1/2 cup purple cabbage, shredded
- 1/2 cup sprouts (alfalfa or radish)
- Optional “Glue”: A thin layer of hummus or cream cheese to help the veggies stay in place if not using rice.
For the Ginger-Soy Dip:
- 3 tablespoons soy sauce (or Tamari)
- 1 tablespoon rice vinegar
- 1 teaspoon fresh ginger, grated
- 1/2 teaspoon sesame oil
Instructions
- The Setup: Place a Nori sheet on a bamboo sushi mat (or a piece of parchment paper), shiny side down.
- The “Glue” Layer: If you are making rice-free rolls, spread a very thin layer of hummus or mashed avocado over the bottom two-thirds of the Nori.
Pro Tip: This “glue” is essential for no-cook rolls; it prevents the dry matchstick veggies from tumbling out when you try to slice them. - The Veggie Stack: Arrange your julienned carrots, cucumber, peppers, and cabbage in neat horizontal rows on the bottom third of the sheet. Top with the avocado and a handful of sprouts.
The “Uniformity” Rule: Try to keep your veggie sticks the same length as the Nori sheet for a clean “cross-section” look when sliced. - The Roll: Using the mat, lift the bottom edge of the Nori over the vegetables. Tuck it tightly and continue to roll away from you, applying firm, even pressure.
- The Seal: Dab the top edge of the Nori with a little water using your finger. Finish the roll so the wet edge “sticks” to the body.
- The Slice: Use a very sharp serrated knife.
The “Clean Cut” Secret: Wipe your knife with a damp cloth between every single cut. This prevents the Nori from tearing and keeps the avocado from smearing. - Serve: Arrange on a platter with your ginger-soy dipping sauce and maybe a dollop of wasabi.
7. Cold Peanut Noodle Salad
Preparing a Cold Peanut Noodle Salad Bowl is a practical way to satisfy those “savory-sweet” cravings without turning on the oven. This dish is highly effective because it uses a protein-rich peanut base to create a sauce so luxurious it feels like it came from a professional Thai kitchen. It’s the ultimate “fridge-clearing” meal the sauce is so flavorful it can make almost any crunchy vegetable taste like a gourmet treat.
The process is remarkably efficient. By using “no-cook” noodles like rice vermicelli or glass noodles that only require a quick soak in hot water, you can have this on the table in under 15 minutes. It’s a resilient salad that actually improves after a night in the fridge, making it the “king of leftovers” for a busy 2026 summer.
The texture is a beautiful mix of “slippery” noodles, “crunchy” cabbage, and “creamy” sauce. The flavor profile is a deep, nutty umami brightened by lime and a lingering hint of chili heat.
Servings: 2–4 servings
Ingredients
- 8 oz rice noodles (vermicelli or thin pad thai style)
- 2 cups shredded red cabbage
- 1 large carrot, julienned or shredded
- 1 red bell pepper, thinly sliced
- 3 green onions, sliced
- 1/2 cup fresh cilantro, chopped
- Garnish: Crushed peanuts and lime wedges
For the “Liquid Gold” Peanut Sauce:
- 1/2 cup creamy peanut butter
- 2 tablespoons soy sauce (or tamari)
- 1 tablespoon rice vinegar
- 1 tablespoon honey or maple syrup
- 1 teaspoon fresh ginger, grated
- 1 clove garlic, minced
- 1–2 teaspoons Sriracha (depending on your heat preference)
- 2–3 tablespoons warm water (to thin)
Instructions
- The Noodles: Place your rice noodles in a large heat-proof bowl and cover with boiling water. Let them soak for 5–8 minutes (check the package for exact timing). Drain and immediately rinse with cold water to stop the cooking and prevent sticking.
- The Sauce: In a medium bowl, whisk together the peanut butter, soy sauce, vinegar, sweetener, ginger, garlic, and Sriracha.
The “Emulsion” Trick: Add warm water one tablespoon at a time, whisking constantly, until the sauce reaches a “pourable” consistency. It should look like heavy cream. - The Veggie Toss: In a large mixing bowl, combine the cold noodles, cabbage, carrots, and bell peppers.
- The Dress: Pour about 3/4 of the peanut sauce over the mixture and toss with tongs.
Pro Tip: Noodles act like sponges! If you’re serving this later, save the remaining 1/4 of the sauce to toss in right before eating to refresh the creaminess. - The Finishing Touches: Fold in the green onions and cilantro.
- Serve: Top with a heavy handful of crushed peanuts for that essential “crunch” and a squeeze of fresh lime juice to wake up all the flavors.

Hey there,
I’m James Taylor, the home cook and food blogger behind Beyond the Bayou Blog. Cooking has always been my happy place. It’s where I unwind, experiment, and bring people together with food that feels familiar and full of flavor. On this blog, I share the recipes I genuinely love making from easy weeknight meals to classic comfort food and bold Southern-inspired dishes.